Front seat removal
From THE Corrado Forum Knowledge Base
You will need the following:
- 10mm Spanner
- 5mm Allen wrench
So let's begin
1. Slide the seat fully forward.
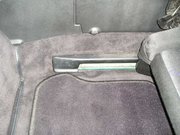
2. Remove the plastic trim cover by pulling it towards the back of the car. There may be a small plastic peg in the top of the trim that you need to take out first it should just unclip, but it may be tight.
3. Slide the seat fully back to gain access to the front nut and bolt.
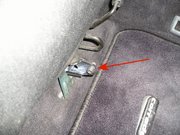
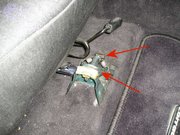
4. Remove the nut and bolt (arrowed) using the spanner and Allen wrench. Don’t forget the washer. Keep these in a safe place.
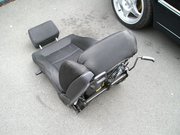
5. Slide the seat backwards and you’ll see and feel the front drop out of the floor bracket. Make sure the seat is clear of the runners at the back. You can now lift the whole seat out of the car. Make sure you unplug any heated/electric seat plugs if you have them!
6. It might be a good idea to apply grease to the sliding parts of the seat whilst it’s out and give the carpet a good vacuum. You can also gain access to the seat height handle screws to replace it.
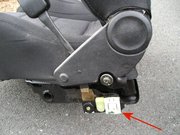
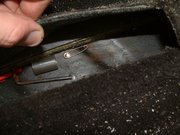
7. Before sliding the seat back into the runners ensure these clips are in place (arrowed). There should be one on both sides of the seat. If they are missing they have either fallen off when removing the seat or they were missing to start with. If they are missing there will be a lot of play when the seat is in the runner and will probably rattle as there will be a metal to metal contact.
8. Offer the seat back into the car and locate the part of the seat with plastic clips on, into the runners.
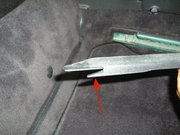
9. Now for the tricky part. Slide the seat forward and ensure the seat frame passes through the floor bracket (arrowed). While you do this you will have to pull the spring loaded pin out, lift the seat lever and locate it in the pin end bracket (arrowed), all this while sliding the seat forward.
10. Refit the nut, washer and bolt. It doesn’t matter which way round they are fitted as it only serves to stop the seat falling out when pushed fully back.
11. Now slide the seat fully forward and refit the plastic trim. Make sure the pointed tab at the end of the trim (arrowed) sits in the hole in the top of the metal runner at the front end. You’ll see the hole if you look down the side of the seat. Push the trim fully forward. It should clip into place.
12. The procedure is now complete. Well done!
13. The other seat is removed and refitted using the same procedure, but it's worth having a check under the carpet first - you never know what you might find! :)