Illuminated Late Style Heater Controls
From THE Corrado Forum Knowledge Base
Contents |
Tools required
Philips screw driver (to remove ashtray housing)
Electical wire cutters (to nip away plastic to make room for EL Wire)
Thin snub nosed plyers (to assist is removal of plastic ^^^)
Electrical insulation tape (Keeps you circuits sealed)
Electrical Multi-tester (To find a live when the lights are on)
Parts descriptions
I have no idea what the proper names are but here is what I mean:
Heater panel - The front panel which you want illuminated
Heater Matrix - The part of the heater the front panel attaches to. (houses light pipes etc...)
Time scales
Took me about an hour, budget for 2 - 3 if you've not had your ash tray and ciggie lighter out before. Most important, do not rush, take your time!
What to do
1) Search around e-Bay for some thin "EL wire" with a 12v DC car inverter (in the form of a ciggie lighter attachment). I got some for £6.00. This kit included the glue, 12v converter and of course the EL Wire. They come in various colours and you'll find them on e-bay no worries. I used 2.3mm diameter EL Wire.
2) Take off the front panel of the heater controls, (pull the knobs off first) use you fingers to pry off the panel from the bottom corner. (You might find using a flat ended screw driver helps)
3) Remove all the light pipe accessories from the back of the heater panel, one green one from the center dial and the two clear ones from the other two.
4) You are now left with 3 thin rings on the back of each dial, they are the misted white rings, leave these in place as they will help spread the light evenly.
5) Remove the ashtray and ciggie lighter housing.
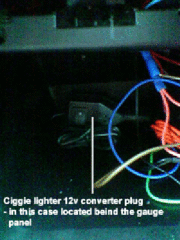
If you have gauges installed under the ash tray (you'll need to remove them), I would put the converter behind them so run the EL wire up from there to just above the circular ciggie lighter housing hole, there is a small rectagular hole there you can use to run the EL Wire out of and into the Heater panel.
If you do not have gauges you could house the converter behind the ashtray, so run the wire to the ciggie lighter housing from here.
6) Using the glue which comes with the EL Wire or a hot melt glue gun, carefully glue the EL wire to the back of the heater panel, hold the panel up to the light and you'll see where you need to stick the wire.
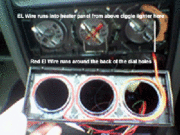
7) You will need to over-lap the wire in places as in effect you want to loop the wire around each dial hole so you get good illumintation.
8.) You will need to hack a bit of the plastic on the heater matrix away to make space for the EL wire but you'll see this and be able to determine the amount of hacking required. It is nothing serious and as you have removed the light pipe accessories from beind the front panel dials, so these plastic bits are not required.
9) You'll also need to just nip a bit out of the edge (near bottom right heater matrix screw) so the EL Wire can fit nicely into the back of the heater panel unhindered.
10) Re-fit panel (this is where you can figure out if you hacked enough plastic away from the front of the matrix!)
11) Take the converter which plugs into the ciggie lighter, you will note that the end has a metal post which is sprung. Unscrew the housing this is in and turn the post around (through 180 degress and attach a piece of wire to it (this will be your live wire), feed the wire through the hole the metal post used to go through and screw back on. Use the electrical tape to seal this up. The power on the ciggie lighter is activated when thie post is depressed, so turning it through 180 degrees will allow power to flow to it as it depresses the fuse.
12) You will note that there are two sprung clips on either side of the converter, attach another wire to one of these and again wrap the electrical tape around both these clips to prevent any shorts. This is your negative wire.
13) Using your multitester find out which wire gives you 12v when the lights are switched on, I used a feed from the ciggie lighter itself, then, find a good earth.
14) Wire in the live and earths from the 12v EL converter into you newly found live and earth, then job done!!

Anyway, the above may sound complicated but this is probably my description rather than what is actually required. As soon as you take off the front panel of the heater controls, all will become clear. Hell for 6 quid you can't go wrong and for the hour of two you'll spend doing this the results (providing you do a good job of course) are great, better then I expected!. Good luck and hope this helps.
Further notes
You may have excess EL Wire left over, you can cut EL Wire to length if you can be ar5ed to, I used the excess on mine to light up my ashtray in red instead of the standard green.