Passat W8 interior light conversion
From THE Corrado Forum Knowledge Base
Contents |
Tools required
Philips and flat screw drivers (to remove trim)
Wire cutters, and wire strippers
Soldering iron, solder etc.
Craft knife
Electrical insulation tape (Keeps you circuits sealed)
Circular plastic cutter on a dremmel/electric drill
Parts descriptions
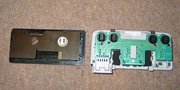
Passat W8 interior light 3B7 947 105 F2
Plug for interior light 3B0 972 706
Wires for use with plug (2 needed) 000 979 131 A
Time scales
This took me best part of a day to do. It is not particularly complicated, but it is fiddly, as the space for fitting the light into is tight. There is a lot of put it up, see if it fits, take it down, attack it with a dremel, put it up, see if it fits, take it down etc.
What to do
Remember these instructions were for the work I did to my G60 with an early trim. I understand that the later style trims are a little different, and I do not know whether there is enough room under there for this conversion (you'd also need to figure out some way of operating the sunroof as the switch is integral with the light) – you have been warned…
1) Lever the old interior light out using a flat bladed screw driver. This should just pop out. Remove the plug round the front of it.
2) Open the sunroof by a couple of centimeters. Remove the two screws holding the plastic trim in place. The trim can now be removed by gently sliding backwards (hence the need to open the sunroof).
3) Unplug the electric sunroof switch, and clip it out of the trim. It pops out through the front of the trim.
5) The new light has very little space to fit, so enlarging the hole for it is a bit of trial an error. I started by enlarging the width of the hole by approx 5mm in each side using a plastic cutter on a dremel or electric drill, to give enough room. You will notice there are a couple of protruberances on each side of the new light, which will still touch the edge of your hole, but don’t worry about this just yet.
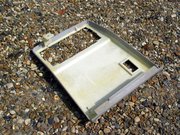
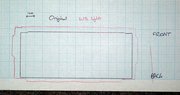
Also I've measured out the hole and compared it with the original cutout. This diagram was made by drawing through the cutout of the un-modified and modified trim and shows the amount of material that needs removing. Given that you want this to be a tight fit, best to cut the hole slight too small at first and then file it out as needed.
6) You will probably have a few goes at putting it up, checking the fit and taking it down again. Take your time over this – there is not much room, and it’s best to make sure now rather than later. The fit must be tight, but not too tight that you crack the light. When the trim is mounted on the roof check the fitting of the light with the black plug attached, to make sure you have enough room.
You will also have to remove a small section of roof trim, from the area where the socket will end up. I found this best cut using a sharp craft knife, and up at a 45 degree angle so as to give maximum clearance. When the trim fitting has been finished reconnect the sunroof switch and refit the trim.
7) Once you are happy with the trim and fit, it’s time to do the wiring. Using the leads you’ve bought, cut them dowm so have 4 lengths each about 8 inches long with connector on the end. Clip the plug off the existing wiring loom to the light. This is a 4 plug socket with 6 wires. For the red and brown wires (of which there are 2 of each going in to the plug) strip them back and twist together. Also twist on one of the new yellow wires with the connector on the end. Solder and cover with insulating tape to insulate. Repeat this again for each wire, one colour at a time if you’ve not disconnected the battery. You’ll end up with four yellow wires attached to your original wiring harness and each with a connector on the end (don’t let these touch each other or you’ll blow the fuse to your instruments – like I did).
8) Put the new yellow leads into the black plug in the following order (colours refer to the original colours on your wiring loom).
Black (for the LEDS) into position 1
Brown white (door sensor) into position 3
Red (x2) (+ve supply) into position 5
Brown (x2) (-ve supply) into position 4

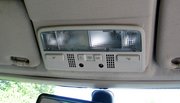
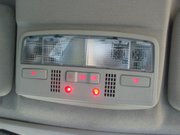
You can now plug it in a test it. After making sure you’re happy it works clip the light up into the trim and you’re good to go… What you should get is something like this...
This all sounds quite involved and complicated but has more to do with me trying to cover everything. Once you start it will all be a lot clearer. It really is not very complicated – just a little fiddly. Have fun and I hope it works out…
Further notes
There are a few other things I’d like to do to finish off this installation, and I have a few hints:
Firstly, the light is deep, and even though it is clipped firmly in place it isn’t flush with the trim. There is about 2mm all round which would normally be in line with the edge of the trim. I want to fit foam and redo the covering on the trim to deal with this.
Secondly, the light is the opposite way round to how it would sit in the Golf or Passat. Now I don’t think this is a problem, and I don’t think it’s possible mount it the other way round due to the space constraints. However if anyone wants to give it a go please do.
Finally, when you’re doing the wiring, do it one colour wire at a time. Muppet here used wire cutters on all the wires, only to then let 2 of them touch and blow a fuse. Doh!