Re-tumbing locks
From THE Corrado Forum Knowledge Base
How to re-tumble Corrado door locks to match a different key
This how-to will show you step-by-step how to alter Corrado door locks to match a different Corrado key. Because of a weakness in the Corrado door opening mechanism, many cars end up with second-hand door handles and their associated locks, meaning that the vehicle has a different ignition and door key. The simplest way to remedy this is to alter the door lock barrels so that the car’s original ignition key will open the new lock. This is the procedure detailed in this how to. This can be carried out with a second-hand or new lock barrel. The alternative to this is to purchase a new barrel from VAG (around £10) and get them to tumble it to your required key – people have apparently had this done by VAG dealers for £8, although my dealer wanted a full hours labour for two barrels and couldn’t ‘book me in’ for 10 days so I got the hump and this how-to is the result…
Recommendations:
I would recommend that before attempting this procedure you obtain your cars original key code, order a new key blank through a VAG dealer and have them cut the blank to the original pattern. Your car’s original key code may be on a small metal tag with your car’s keys or can be obtained by any VAG dealer on production on your registration mark and / or vehicle VIN number. (Any VAG dealer should be able to get VIN number from registration mark if necessary). An AH code key blank is around £3 and a £5 cutting charge is money well spent – the picture below shows the difference between my existing ignition key obtained with the car and a new key cut to the car’s key number.
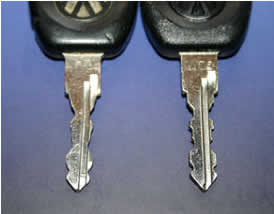
As you can see, not only is the existing key on the left bent, it has little of the detail of the original pattern. This is probably a combination of wear and tear and / or being a copy of a copy. If a lock barrel is re-tumbled to a worn key, it may enable other worn keys to use the lock. Not a definite, but for £8, why take the risk?
What you'll need
You will also need some new tumblers and ideally some new helper springs. It may be possible for you to go to your local VAG dealer and blag some, I would guess three of each type would be enough for one if not two locks. If, like mine, your dealer is terminally crap (hello Priory Park Volkswagen, Hull), worst case scenario is that you get them to order part No. 443 898 041 A pictured below:
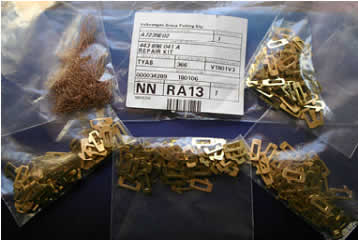
This kit consists of forty (yes, forty) of each type of the four tumblers and forty new springs. Remarkably, it will set you back the princely sum of forty (yes, forty) pounds. I will probably make up some smaller sets with enough to do one or two locks.
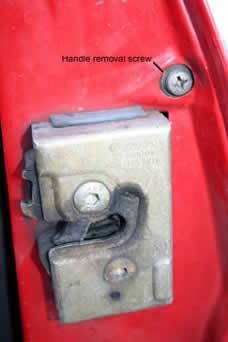
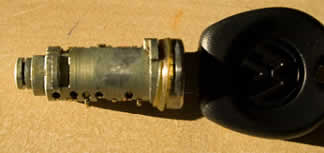
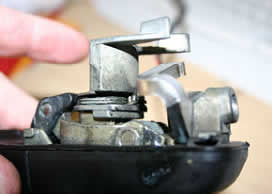
Remove the Philips screw arrowed above, (be warned - the handle removal screw can be reverse threaded! - this could be just the left door, or both...not sure) carefully rock the handle up and down to release it and pull the lock end of the handle from the outside of the door. Once the locking mechanism is clear of the car door, the handle will slide forwards to allow the front part of the handle to come free. If you are lucky, the central locking switch cable will have enough slack to enable you to perform this whole procedure without removing the handle from the car (the handle will be ‘hanging’ on the central locking cable – take care to ensure that unnecessary strain is not put on the cable). I did the re-tumble and changed a broken striker whilst the handle was hanging from the cable at the side of the car in the rain… If there is not enough cable, the inner door trim panel must be released partly, to allow the central locking cable to be released from its connector which is towards the bottom of the door. It may be preferred to do this anyway, to allow the handle to be worked on away from the car.

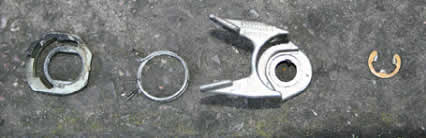
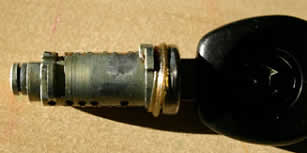
Once removed, the inner workings of the handle can be seen. To remove the lock barrel from the handle, the circlip (arrowed) should be removed. This should slide off easily with a pair of circlip pliers or a terminal screwdriver. If using a screwdriver, take care not to slip.
Once the circlip is removed, the striker, spring and backplate can be removed. Ideally, the barrel should be removed with the key in place. This is because the key holds the tumblers in place in the barrel. The barrel may be slid out without the key in, although it may be necessary to jiggle the barrel slightly. Care should be taken not to lose the tumblers and tiny springs, although if they come out of the barrel it is no problem, as they are probably going to be moved anyway.
The picture above shows a barrel with an incorrect key in place. As you can see, four of the ten tumblers are raised – this will not allow the barrel to turn in the lock. All of the tumblers have to be flat to the barrel to allow the barrel to turn and open the door.
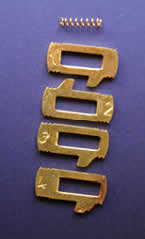
As described above, there are four different size tumblers, numbered 1-4. To re-tumble the lock, it is si of checking to see which tumblers are raised with the required key in place, removing the key, carefull offending tumbler and replacing with a different size, until with the key in place all the tumblers lie flat.
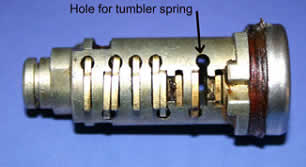
The pic above shows how the springs fit under the tumblers (one spring per tumbler). The springs just drop into the round hole at one end of the tumbler slot and the small tab on the side of the tumbler rides on the spring. With the key removed, all of the tumblers should stand proud of the barrel.
If some do not, they are sticking – the pic above shows one of my barrels as removed, all of the tumblers on one side (bottom) are proud, but none of the top ones are – they are all sticking. I would recommend removing all of the tumblers during this procedure, cleaning and replacing with a little white / silicone grease. If a tumbler does not stand proud with no key inserted, it is not preventing the barrel from turning and the lock is therefore not as secure as it should be. It is also recommended to replace all springs to ensure longevity etc.
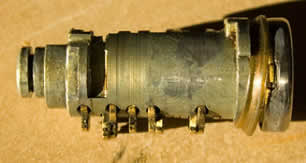
This is the finished barrel with new key – all tumblers nice and flush.

Re-assambly is just the reverse of disassembly: Place barrel (with key ideally) in handle (will only fit one way) (pic 1). Place backplane over end of barrel (pic 2). Notice that the two ends of the spring stick out from the round part – these ‘ends’ are the parts that actually push against the backplate and the striker and do the work. Place spring over the backplate, with the bottom ‘end’ against the tab on the backplate (pic 3). Stretch the ‘top’ ‘end’ of the spring over the bottom end and the tab, so that the two spring ends are at either side of the tab and the spring is in tension (pic 4). The spring may have lost some of its roundness, do not worry about this at this stage.
Place the striker over the assembly and get it to sit down inside the round part of the spring by ‘waggling’ the striker and if necessary using a screwdriver to push the coils of the spring sideways to make it round again. Once the striker is inside the spring, the groove in the end of the lock barrel for the circlip should be visible. If it is not, either the striker is not sat down properly or the lock barrel is not pushed fully into the handle.
Slide the cipclip back into the slot – this should slide in easily. Once reassembly complete, lubricate all of the lock and handle mechanism with white / silicone grease and refit to the car door. Take care not to trap the central locking cable whilst refitting the handle. Connect the cable if disconnected earlier and enjoy!
Whilst you have the handles out, I would thoroughly recommend replacing the handle striker mechanism with one of dave16v’s repair kits. These kits are very highly recommended – I spent three weeks climbing in and out of my passenger door waiting for a kit and was glad I did rather than paying £70 for a new handle from VAG or getting a second-hand handle and risking the thing breaking all over again.
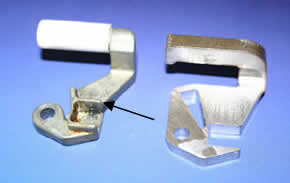
This picture shows the difference between a VAG striker on the left and Dave’s on the right. The original ones break just above the rib (arrowed). The replacement is stainless steel and appears to be much stronger – the handle operation even feels more positive when fitted. His supplied instructions are also very, very good.