Tinting Rear Lights
From THE Corrado Forum Knowledge Base
Contents |
You Will Need
Plenty of time - This job can't be done in a day as the paint needs 24 hours to dry so you're car will need to be off the road for a couple of days and preferably under cover. If you can't garage it you'll need to find a way of waterproofing the boot whilst the lights are out.
Screwdrivers
8mm socket
Kitchen Roll
Washing Up Liquid
Wet & Dry paper - 200, 500, 1000
Masking tape 10mm, 30mm
Newspaper
Stanley/craft knife
Light tint colour of choice, I used Savage
Clear Lacquer
Discalaimer.. It is highly likely that you will end up with indicators that flash red on completion of this mod. CF.net is in no way responsible for this. There are two methods to avoid this, 1. Paint your indicator bulbs green - green light through a red filter helps to create an orange flash (not fullproof). 2. Follow the instructions on masking below and leave thin pinstripes of orange untouched. Good luck!
Removing The Lights
First of all remember when removing the lights that it would be a nightmare if they broke so be careful especially with rubber seals etc.
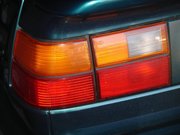
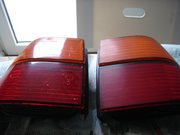
Taking the lights out is very easy and shouldn't take more than 15minutes. The lights are 4 pieces:- 2x corner 'wings' & 2x flat boot panel lights. First lets get the corner ones off..

Open up the boot and look down in the bottom left corner (behind the light cluster), pull the carpet down and the back of the light should be clearly visible.
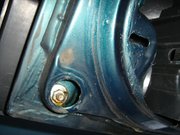
Unplug the light by squeezing the two prongs together and pull the plug out, if the plug is really in there a flat screwdriver may be useful but be careful!. The light is held in place by 3x 8mm nuts, use the socket and remove the nuts.
The whole corner light should be free to slide out now, the only thing holding it in place still will be the rubber seal so pull gently and it should ease away. Once you have them out screw the nuts back onto the thread so you don't loose them!
Repeat on the other side, easy eh?
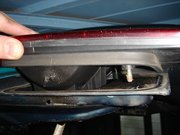
With the boot open stand at the back of the car facing away and look up, you'll see a large piece of black trim that needs to come off to gain access to the other light fittings. Use a phillips screwdriver to undo the 8 plastic screws, be VERY careful not to tear the screws to pieces, they are only plastic! The trim should then slide off to reveal all the spoiler gubbins & the lights!

Again there are 3x 8mm nuts holding each light in place, only 2 are visible at first sight so the rubber bung/stopper/things needs to come out, you should be able to do this with your hands, start by rotating it.

So undo all 3 of the nuts and the light should ease off (gently!). Repeat on the other side and remember to pick up the nuts and screw them back onto the thread. So with all the lights off we're ready for cleaning and prepping, close the boot so you don't drain the battery and head indoors.
Cleaning & Prepping

Get a nice bowl of warm water, washing up liquid, paper towels and a scourer. Give the lights a good clean up, mine had all sorts of wierd scum on them and this too me a while, make sure you get rid of all the crap, no cutting corners here.

Next job is to sand off all the markings and stamps on the lights. There are markings on every lens so this might take you 30minutes to get them smoothed down.
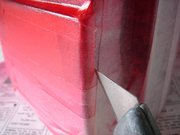
Ok, now get the 500 grade wet & dry and get it nice and wet in your clean soapy water and start going at it on the lights, make sure you cover all surfaces including the edges on both lenses. This part should take you at least another 30minutes Ideally allow 10 minutes per light, if you do it quicker then you haven't taken enough time. Preparation is everything!
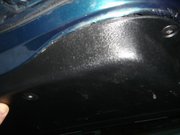
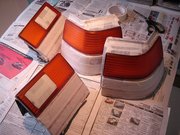
When you're happy that you've taken off all the shiny stuff on each light give it a good thorough drying off with the kitchen roll and move onto the next one.

Notice on the picture on the right how the lights have lost their shine.
You may now be tempted to move onto a finer wet & dry. I reccommend that you don't you need a certain amount of roughness for the paint to 'grip to'.
Now you need to mask up everything but the ornage part of the lens. I masked over the reverse light as well because I want it to stay completely clear. All of the black plastic between the lenses needs to be masked and I even put newspaper around the back of the flat boot lights as the angle we will be spraying at means the back could get wet.. we don't want that.
At this point you may choose to mask a small portion of that orange lense in order to keep the flash distinctively orange. If you can get hold of some very thing craft masking tape it is possible to leave thin 'pinstripes' orange on the corner lights. I would suggest drawing a vertical line about halfway round the corner light and then applying 5-10 (depending on the thickness of your tape) strips equally spaced up to the line. When complete this will leave thin horizontal orange lines that will help to keep your light flashing orange rather than red! Remember you want to leave these lines only on the half of the corner light that will be on the rear face of the car.
In total the masking will probably take you at least an hour. It really is worth taking the time to get this bit right, it could be the difference between a botch job and a really professional looking one.
Onto the painting
Painting
Make sure the can of paint is at room temperature, it will dry and go on a lot better, you may even prefer to warm it slightly in a bowl of warm water. I used 'Savage' paint and I highly recommend it.
Spray evenly accross the surface of the light from aprox 20cm away. We are just putting on thin coats, this way they dry quicker and smoother and we can build up a solid finish. Remember to colour all of the edges on the lens as well, spray up and down on the lens.
I allowed 30 mintues inbetween coats this allowed each coat to dry well but still be very slightly 'tacky' so that the next coat has something to bond to. It is important not to rush this stage or you could and up with a rubbish finish, leave it the full 30 minutes between coats.
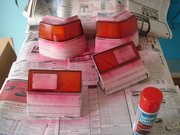
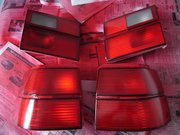
The left hand picture shows the lights with one coat, the right picture shows with 7 coats (3hours later). I found that 7 coats was about right, the colour didn't seem to be getting anymore intense between coats so I stopped it there. How many coats you do will depend on how thick your applications are though.
I think one of the most important parts of this mod is matching the new red with the old one so I chose to give the bottom (old red) a couple of coats of savage paint to match it.
Using the stanley knife carefully cut out the tape around the bottom lenses, there is a groove running around that the knife should slot into. Remember we want to leave the rest of the light masked still, all we are revealing is the bottom lens for painting.
Give the bottom lens a couple coats of paint, no need to mask the top but make sure ou keep the mask over the reverse lights. Leave 30 minutes between coats. As long as you have left enough time between each coat you will probably find that the final coat of both lenses dries quite quickly, I would advise to leave it for at least 4 hours. Savage paint does det quickly.
Lacquering
Ok the final stage is to Laquer the light. You may like to get this done at a body shop for a professional quality finish. I chose not to and bought some clear laquer form Halfords for about £5. You may like to use a very fine 1200 grit wet and dry paper at this stage in order to take the sheen off the light ready for Lacquering, I didn't bother as savage paint seems to have a fairly matt finish.
Peel off the masking tape that covers the reverse light so you have all of both both the lenses uncovered on the flat lights & the corner lights. Give all 4 lights a good rub down with some kitchen roll to remove any oddities.
As with the tint I found that thin coats with 30 minutes between do the job nicely. 2-3 coats should be fine.

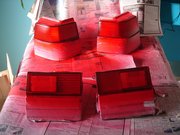
Lacquer takes a lot longer to dry than paint and needs to be left at least 24 hours, be patient! Once dry peel off all the remaining masking tape, looks good eh?!
Refit the lights onto the car, basically do everything in the removal section but in reverse order! Stand back to admire your handywork! Well done!
sailoor moon having sex safe sex party games sadistic sex videos sabatage sex toys rv sex on the road russian sex xxx rusain preteen sex rumberger 1983 dropping out of high school the influence of race sex and family background rough sex during pregnancy causing spotting rosie mason sex rose mcgowan sex samples rood sex pic romance and sex stories african moon role play sex story robbie williams sex scandal road rules sex risky sex richmond county sex offenders rich women looking for sex review sex toys gravity results from a sex change residentevil4 sex research on sex in the classroom rensellaer county sex offenders remy ma having sex religon sex religious reasons against sex registered sex offenders winchester ky registered sex offenders in bowie maryland registered sex offender mark hardy registered sex offender arkansas garland county ree sex stories redhead sex london massage redhead sex galliers redhead and sex recurrent bladder cancer abd sex record number of male sex partners rebecca romiln sex scene reasons for teen pregnancy and sex reasons against same sex marriage reality sex site real sex spy cam real sex marriage real sex galleries real sex 30 real free sex readuforhottime email sex man network raven sex rat sex rape sex pics rape old sex randy plessor sex offender random sex stuff quicktime sex clips quick time lesbian sex movies quick free sex chat question about sex pussy wild sex pure hard sex pure dee sex videos public sex with observers psp sex video prteteen boy sex protective orders colorado for sex crimes victims pros and cons same sex marriage pros and cons of alcohol on sex prop sex in shower prono sex problems with sex probability of getting aids from oral sex private homemade sex videos private home teen sex party private amateur teenage sex torrent download privat sex video prison sex penpals previews of best movie sex scenes preview sex pics preveiws of sex clips preteen sex stories free preteen sex partner in apple valley preteen sex gallery preteen k9 sex premarital sex mindset prelolita sex pregnant sex stories proggoman preeteen incest 13 yeard old sex pics prednent sex premature teen sex posted sex photos posh women sex pornstars having sex porno sex free hard core porn star sex porn girls sex thumbs porn free sex pic galleries popular adult sex toy websites poor sex pool table sex pool sex video poll ban same sex marriage pokemon sex world pokemon having sex poemon sex plymouth county ma sex offender registry plump sex videos please view my wife pics sex pissing girls during sex pis sex affiche museum pictures young underage preteen sex naked pictures to have sex pictures of teens having sex pictures of sex in spandex pictures of sex girls pictures of people having intimate sex in bed pictures free cum sucking sex old picture sex golf course pics of hardcore lesbian sex pick the way sex stories pic of jessica simpson having sex photos sex girls free photos of women who want sex in florida photos of girls having sex with animals photography sex art photo sex prone position phone sex spanking phone sex foreign accent philippines sex tours philippines sex scandals philipino naked sex petite babe sex peters sex password peter ball church of england sex scandal pet sex pics personal sex stories personal sex gallery person having sex with corpes persian porn sex people that want to have sex peolple haveing sex pennsylvania sex clubs pedophilia erotic child sex stories pedo sex gallerie pay fr sex in illinois patras sex massage password sex free password list sex passionate first time sex passed out girls sex party sex net partners and anal sex partner sex parris hilton sex tape paris sex tape xxx paris hilton sex taype paris hilton sex tape screenshota paris hilton sex tape movie paris hilton sex pixx paris hilton home sex video paris hilton home sex tape paris having sex parents having sex with child porn movies parents against teen sex parenting teens sex paparazzi sex photos pap smear sex before panty sex videos pannthose sex pandora sex worker pamela rogers sex with boy pamela andersons sex scenees