VR6 belt tensioner pulley repair
From THE Corrado Forum Knowledge Base
Contents |
Removing a VR6 serpentine belt & tensioner and replacing the tensioner pulley bearing
You will need the following:
The tools/parts needed to perform the procedures are:
1) T30 Torx driver
2) M8x50x1.25 pitch bolt.
2) 13mm socket or wrench
3) 15mm socket or wrench
4) Small screwdriver
5) Large heavy duty vice
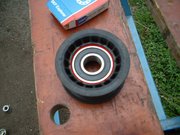
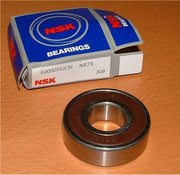
6) Replacement NSK bearing part no. 6203-2RS1 (available from BSL for £6.70inc VAT)
7) Stanley Knife
8) Patience :o)
So let's begin
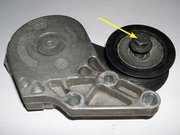
The following outlines the procedure for removing the serpentine belt tensioner from a VR6 engine and replacing the tensioner pulley bearing. It is common for the bearing in the pulley to dry out, causing the bearing to become very noisy when the engine is running and eventually, to fail. The replacement of the bearing as preventative maintenance or at the first sign of noise can significantly extend the lifetime of the tensioner pulley. Since VW does not sell the pulley separately, replacing the £5 bearing before it fails can prevent you from having to purchase a whole new OEM tensioner unit for £160.
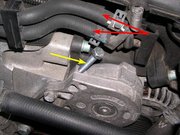
REMOVING THE SERPENTINE BELT TENSIONER
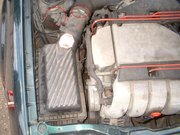
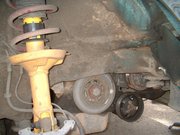
1. The serpentine belt tensioner is located on the driver's side of the engine.
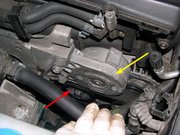
NOTE: If you do not plan on replacing the pulley bearing and reinstalling the tensioner back onto the engine right away, I recommend that you remove the M8 tension-release bolt to release the extra tension from the spring inside the tensioner. While not likely, it's possible that the spring may be damaged or deformed if it sits for too long in an over-tensioned state. If you do remove the tension, make sure to thread the M8 bolt back into the tensioner and reapply tension to the spring before reinstalling the tensioner onto the engine. If you don't, you will not be able to get the serpentine belt back onto the tensioner pulley.
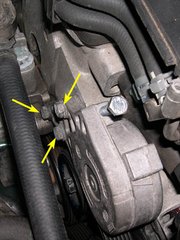
REPLACING THE TENSIONER PULLEY BEARING

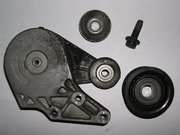
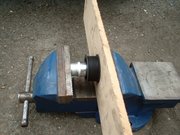
12. Once its out, clean up the pulley with the knife to remove any lip that may still be there. This will make fitting the new bearing a lot easier
15. After reapplying tension to the serpentine belt and BEFORE starting the engine, check to see that the belt is properly positioned on ALL of the pulleys that it contacts.
For those interested in replacing the serpentine belt as well, the illustration below shows how to route the belt around the various accessory pulleys. (The diagram shows the route for cars with the optional AC, so uses a double-sided V-belt)
.
Excuse for my post but I do not have money to buy meal to my children. Forgive me please. phentermine on line phentermine online phentermine online consultation phentermine online pay with mastercard phentermine onset peak duration phentermine pill phentermine price phentermine priority mail phentermine result phentermine shortage phentermine side effects phentermine phentermine no consultation phentermine no prescription phentermine no prior prescription aciphex acyclovir adipex aldara alesse allegra alprazolam ambien amoxicillin buspar butalbital carisoprodol celebrex celexa cialis clarinex claritin clonazepam cyclobenzaprine didrex diflucan effexor elavil estradiol fioricet flexeril flonase fluoxetine fosamax imitrex lamisil levitra lexapro lipitor2 lorazepam meridia motrin nexium norvasc ortho paxil phentermine prevacid prilosec propecia prozac remeron renova retin seasonale sildenafil soma tadalafil tetracycline tramadol ultracet ultram valium valtrex viagra wellbutrin xanax xenical yasmin zithromax zoloft zovirax zyban zyrtec aciphex acyclovir adipex aldara alesse allegra alprazolam ambien amoxicillin buspar butalbital carisoprodol celebrex celexa cialis clarinex claritin clonazepam cyclobenzaprine didrex diflucan effexor elavil estradiol fioricet flexeril flonase fluoxetine fosamax imitrex lamisil levitra lexapro lipitor2 lorazepam meridia motrin nexium norvasc ortho paxil phentermine prevacid prilosec propecia prozac remeron renova retin seasonale sildenafil soma tadalafil tetracycline tramadol ultracet ultram valium valtrex viagra wellbutrin xanax xenical yasmin zithromax zoloft zovirax zyban zyrtec aciphex acyclovir adipex aldara alesse allegra alprazolam ambien amoxicillin buspar butalbital carisoprodol celebrex celexa cialis clarinex claritin clonazepam cyclobenzaprine didrex diflucan effexor elavil estradiol fioricet flexeril flonase fluoxetine fosamax imitrex lamisil levitra lexapro lipitor2 lorazepam meridia motrin nexium norvasc ortho paxil phentermine prevacid prilosec propecia prozac remeron renova retin seasonale sildenafil soma tadalafil tetracycline tramadol ultracet ultram valium valtrex viagra wellbutrin xanax xenical yasmin zithromax zoloft zovirax zyban zyrtec