

Bruno
-
Content Count
235 -
Joined
-
Last visited
-
Days Won
4
Posts posted by Bruno
-
-
Thats enough information for me. Time to find someone in these companies who will supply and install in two visits....
-
@Keyo - do you know what the product code is for the version with the blue stripe, encapsulated? Am getting the run around from two national players - Autoglass being one of them!
I've found one potential code - 8538AGN. Does this tally?
-
Thanks guys. James I see you have aircon fitted. Mine was fitted with the Diavia system from new. PITA fan assembly - believe one of the Seats had a compatible passenger side assembly, must research.
-
That's brilliant. Yes do contact me when you are ready.. happy to help. Really good detective work!!!
-
@Keyo. Odd. Have a spare cover still in its wrapping, also exactly the same champagne colour. My original one had a hairline crack when I till delivery of it, which the dealer offered to replace. Never fitted the replacement bit.
Is it possible there were two colours?
-
I could swear that one of the oldies actually found the colour. It's just that this forum has been through so many incarnations- I cannot locate that thread.
@Cressa. Silver huh? Any recollection of the specific colour/ code?
-
Anybody managed to find a decent match for this mild champagne metallic colour? In the process of tidying up my bay...
-
Is that exhaust still going? PM me with a photo please.
-
Indeed. Ok. Will drop in there and buy one. Methinks that it may be easier to let the rack stay in place and drop the K frame, replace the rack bushes, reduce the hassle.
-
Hi guys. Taking the K frame off and hit a glitch I wasn't expecting. There's an M8 bolt which ties the steering column to the steering rack My bolt seems frozen- and given where it is, as my engine is still in place, this is a right pain.
Is this something that anybody else has faced? Apart from WD40, any suggestions? Dare not cook the bolt - the rubber boot is still hanging over it.
-
I have a copy of that heater matrix change guide from the Canada forum as well. @ g0ldf1ng3r PM me if you want me to mail you the PDF.
-
Hello. Just found a supplier, Sebastian Bürgel, in Germany who sources part N90433801 - the hybrid bolt, screw that holds the splitter onto the bumper/radiator support. His version is in marine grade stainless steel (chrome moly). He seems to sell them at about 31 Euro a set, posted to Blighty.
He also seems to be pitching them on Ebay - more expensively. VW CORRADO N90433801 Bolt | eBay - although since the Brexit the postage costs are now silly through Ebay. However he does respond well to emails. He's having a whole new batch made up, so if you need some, do enquire. If anybody wants a set, I'd be happy to pass on his email and address, if I'm given a PM. No I dont get a commission. I've just bought a set. Will post pics when they arrive.
By the way. Did anybody manage to secure a supplier willing to do a run of the radiator support cross member thingy? Needs to be in S/S rather than alum because it takes the first compression hit when the splitter is banged back by something.
-
Hello all. Am on the brink of doing my OBD2 conversion. Dont really want to lose my ABV inlet manifold. Did anybody manage to find/make an adaptor which didn't tilt the TB?
There seem to be three options:
1. The Schimmel solution: Intake Elbow - VR6 - Volkswagen (vr6parts.com)
2. The 034 solution: Throttle Body Adapter, OBD1 VR6 to OBD2 VR6 TB - 034-112-1002 - 034Motorsport - which involves tilting the throttle body.
3. Two versions of what look like welded adaptors. First is Nubworks: NubWorks-Nubworks Fabrication ShopIntake Manifold VR6 ABA ANubWorksVolkswagen. Second is from Performance MRP Volkswagen MK3 & MK4 VR6 12V Throttle Body Flange Adapter | Performance MRP.
Anybody know anybody who would be able to cut and weld such an adaptor without costing lots?
Anybody tried and found a way to make this work?
-
Rear beam needs to be mounted with both the body hangers loose as the beam eyes are mounted up. Dont torque up the beam eyes, or the hanger bolts until the the car has dropped and rolled a bit. Torque up with the wheels on the ground. That should lead to automatic squaring of the beam.
Actually - has anybody noticed this before - the hangers for the rear beam are somewhat slotted on purpose. I wonder if, given the torque levels used, this was deliberate, to allow some adjustment - probably no more than 0.5 degrees (looking at the size of the slots). So, if this is correct, you are right, there is some room for adjustment. I spoke to a master tech at a VW garage just now and he said the A2 chassis (MK2s-MKivs) including the Corrado all had the slots built into the hangers to enable the rear axle to be fitted without hassle, but also confirmed that those slots come in useful, offering a "shave of adjustment ".
The front K frame is more interesting - am doing it myself right now - the crucial part seems to be in getting the steering rack properly marked and resited on the K-frame when bolted in; the steering column properly settled, camber bolts being used (if needed) to get the front geometry right. Dont set the geometry until the dampers have settled for about 30 miles. The alignment team can only adjust the front wheels- but they may need to do it 3 times before it sits right.
-
 2
2
-
-
You still sourcing this sump kit? Bolts with washers? Please PM me.
-
On 4/22/2008 at 4:36 PM, Kevin Bacon said:... here's the low down:-
R32 baffled sump - 022 103 601R - £89
R32 oil pump - 022 115 105E - £103
R32 pump-to-block pipe - 021 115 203 - £18
Sump sealant - D176 404 A2 - £8
You need the R32 pump due to the sump being shallower, and it's been redesigned accordingly.
... In terms of dipstick arrangements, the R32 one is obviously calibrated for the sump, but it won't work on the 12V. I use the 4 motion dipstick and dipstick tube as it bolts to the filter housing, so is very rigidly mounted. The R32 dipstick is moved 2" toward the bell housing to clear the intake manifold, so to that effect, you also need to drill a hole in the plastic windage tray in the sump to clear your dipstick, which is in the 12V's position. Sounds quite involved but it's not. It's p1ss easy and you'll understand all of it when the parts are in your hands...
Just found my sump needs replacing, so considering the R32 sump - not because I go through corners fast - but because we have sleeping policemen on my road which knacker the sump every time - a shallower one may save me grief. My car isn't lowered.
For completeness, these seem to be the part numbers for the dipstick and tube assembly - from my research. Please could someone confirm these numbers so that I don't lead anybody astray? There are four bits, the dipstick, the tube, the o-ring that fits between the dipstick and the tube at the top, and the o-ring between the tube and engine block.
- Dipstick itself: 022 115 607 D
- Top o-ring: 034 115 625 B
- Dipstick tube: 022 115 629 B
- Bottom o ring: N 90067202
When fitting the replacement pump, one needs to be watchful for two parts from the old ABV pump to block pipe (a crush washer that sits on the block, and an o-ring). The crush washer must be retained when refitting, the O-ring must be replaced -- part number 021 115 444 B).
Kevin refers to drilling a hole in the windage tray.. Anybody done that? Got photos?
Many thanks
-
I presume these are the items that sit behind the scuttle cover. Not quite sure, the searches for windscreen replacements on this forum keep mentioning clips. Hence my confusion and asking for clarity.
If I get this right, she's due for a respray anyway this year, I could ask the bodyshop to have the windscreen changed at that time and ask them to treat the screen edges when they open her up.
-
31 minutes ago, Keyo said:Sekurit come in thee options - factory green tint- green tint with a darker green banner- and a blue top banner- if you ask for encapsulated that means it comes with the three trims around windscreen
Can still buy the windscreen rubber border seal from Heritage OE.
The spacers you can still get from vag .
You should take it to a body shop as they can take care of any orange peril underneath - go and inspect after removal of glass and again pre fitted when any area have been treated.
Thank you very much. Do I also need to purchase the clips? May I ask where and how you sourced your windscreen?
-
Hello all. My car is stored in Whitstable Kent and as I was getting it ready to be moved, I noticed the tell tale crack in the corner. Definitely means a new windscreen. And yes, it was a replacement fitted 12 years ago and it leaks. As I understand it, the recommendations are:
1. Pull out the broken one, fix the metal edges, paint and make good.
2. Find the clips, edging, from somewhere. Where?
3. Find a SEKURIT windscreen with a fitter who isn't an idiot. Have him fit it.
Would ya'll be so kind as to conifrm the bits I need, where to get them? Do I start with Robin at Stealth?
The old girl is SORN'd at the moment, and the last steps before moving will involve replacing the windscreen, the battery, getting her started, MOT'd, then trailered to our new home - wherever that may be.....
-
-
Are you running a Euro ECU, with Euro firmware, or the normal version used on SLCs? AFAIK they are quite different and the petrol maps are handled differently. There's also a difference in base code for the ECUs that support OBD2. There are a couple of articles on VWVORTEX about the differences between the Euro and NA version. Just don't have access to my laptop right now.
-
Wrong post.
-
@ABV-VR6 Thanks for the suggestion to put the bushes in the freezer - and all the initial advice. Spurred me on to try this. I'm definately going to contact the guy again and see if we can arrange a group buy.
-
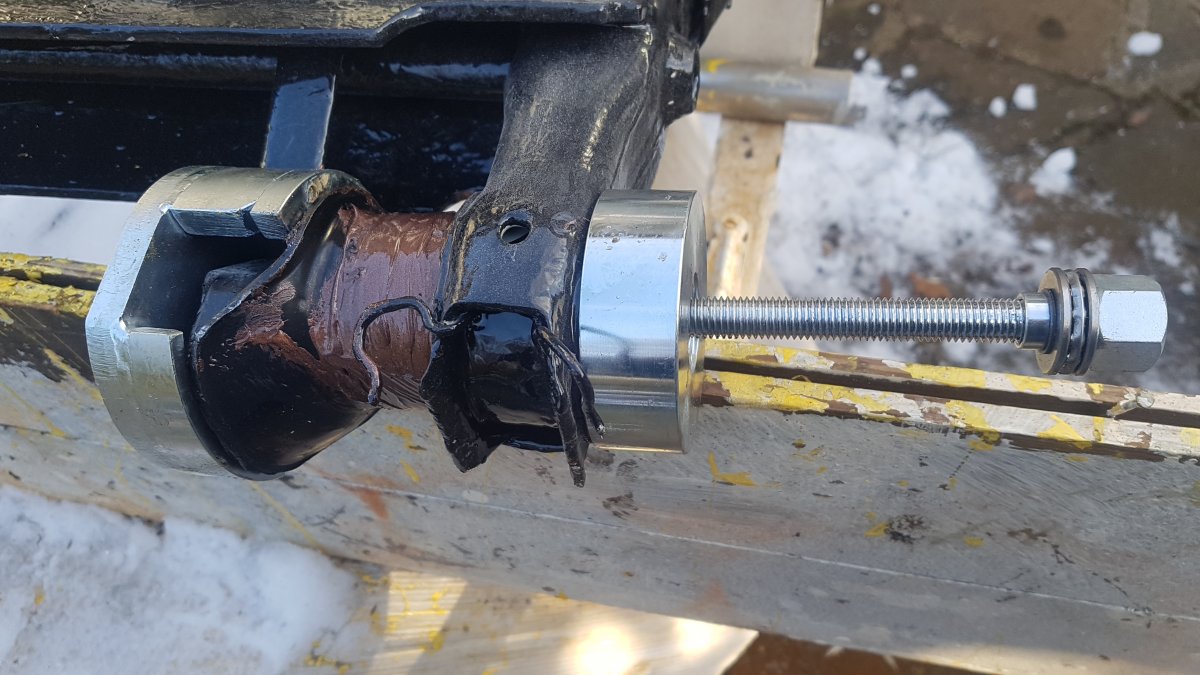
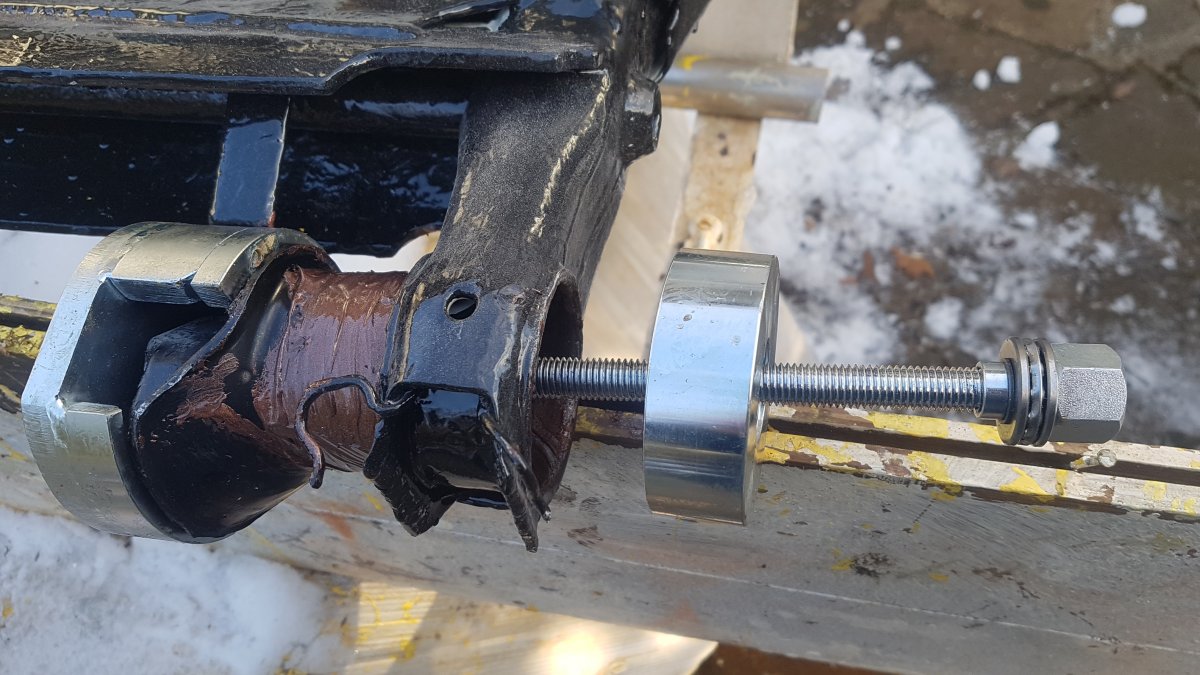
Having just used the product, and realised how amazingly well made it is, how much trouble it saves when removing and replacing the bushes, how much better it is than the VAG 3111 tool, I've found myself being quite unsettled with the idea of with taking someone's excellent design and helping others to copy it. It works brilliantly. It removes the existing bushes without any drama and it helps one to slide the new bushes - and orient them properly - with genuine ease. I was surprised- really surprised at how easy this was. I was expecting to take all day on this.
It took me less than 1 hour to remove the old bushes, power wire brush and smooth off the inner face, lace the new bushes with copper grease, pop them on and screw them into place with this tool. It comes with a long bolt that has a 19mm nut at one end, a cap for the part which fits over the bumpy part of the bush (pics 12/13), a large cap (pic 14/15) which fits over the other end of the bush housing, a bearing and two-part capnut which fits perfectly over the cap. It also comes with an additional press head (not in the pics) which I used to push out the original bush. No cutting, no burning. The pictures attached showed the process of assembly after the bush receivers had been brushed smooth.
So here's my problem. It really does not sit right with me to help steal someone's idea, when have alternative approaches. If I may, I'd like to suggest the alternatives:
- It cost me about £65 to buy it, shipped to NL, then forwarded to the UK. I'm not likely to use it again myself, but I thought - what do ya'll think of the idea of me simply lending/renting it to the forum users in return for £15 plus postage. No intention to profit - just want to make sure that is used in a good and decent way. I would get my money back after lending it out four times - and ya'll get to use a really strong, well made tool. I'm really not trying to make anything from this - just trying to do the right thing.
- I have an old friend in Poland who may be willing to contact the maker of the tool and ask him to see if he can arrange a group buy for the rest of us
Does this make sense?

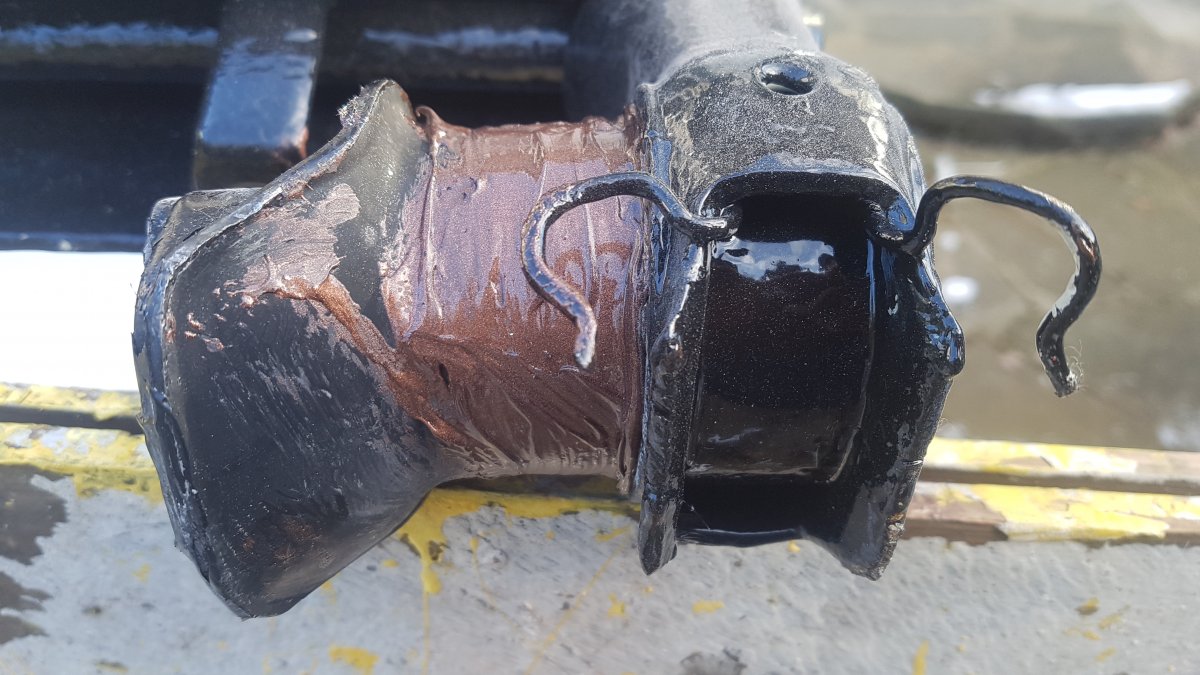
Pic 12 This is a view looking down upon the tool snug onto the bumpy side of the bush.
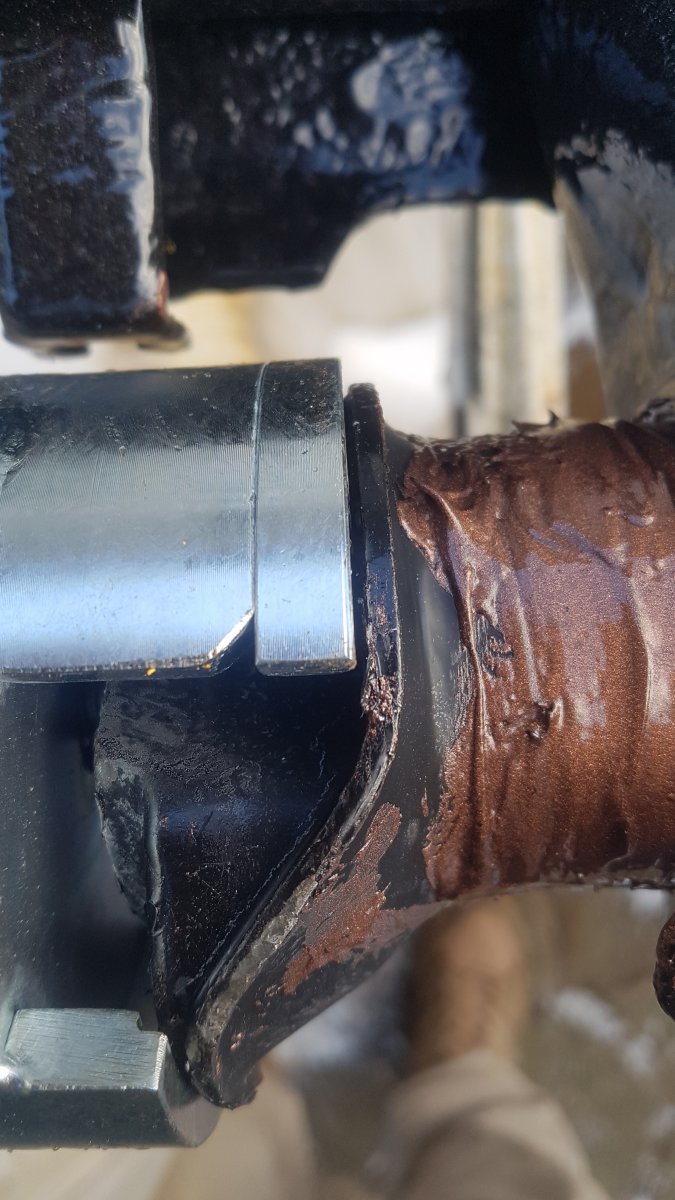
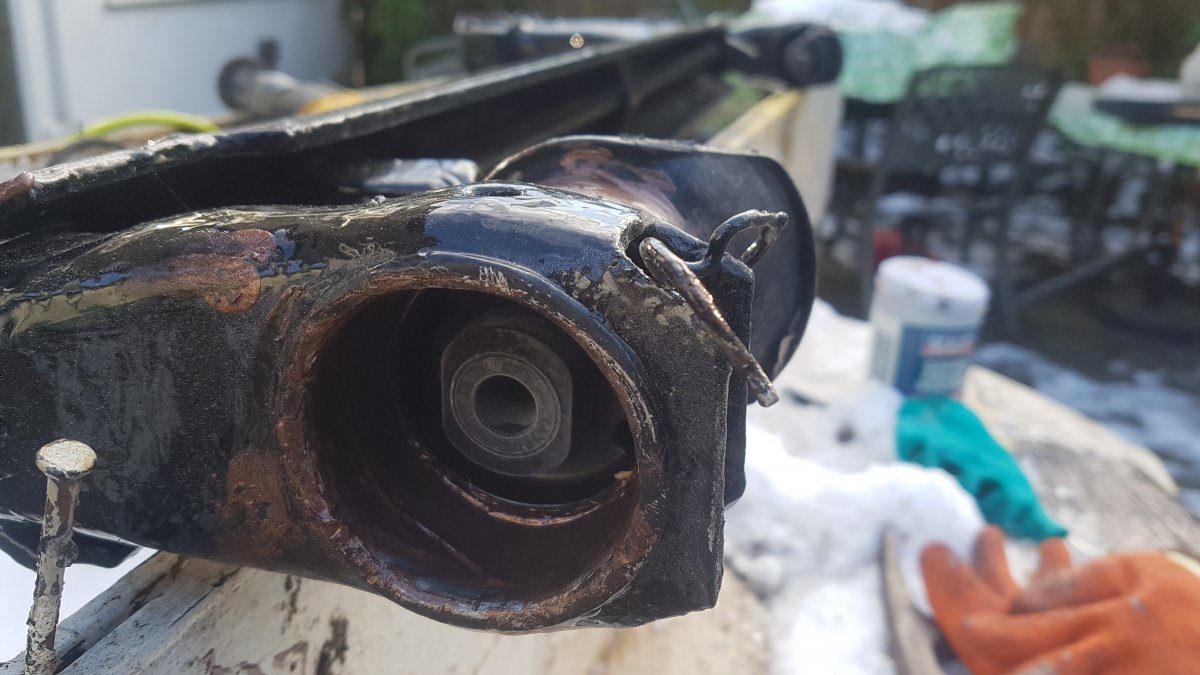
Pic 10 View from with the opposite side of the beam, with bush ready to be pushed home, just lightly wedged (tapped) in place.
Pic 11 This is the other side, bush sitting ready to be pushed home.
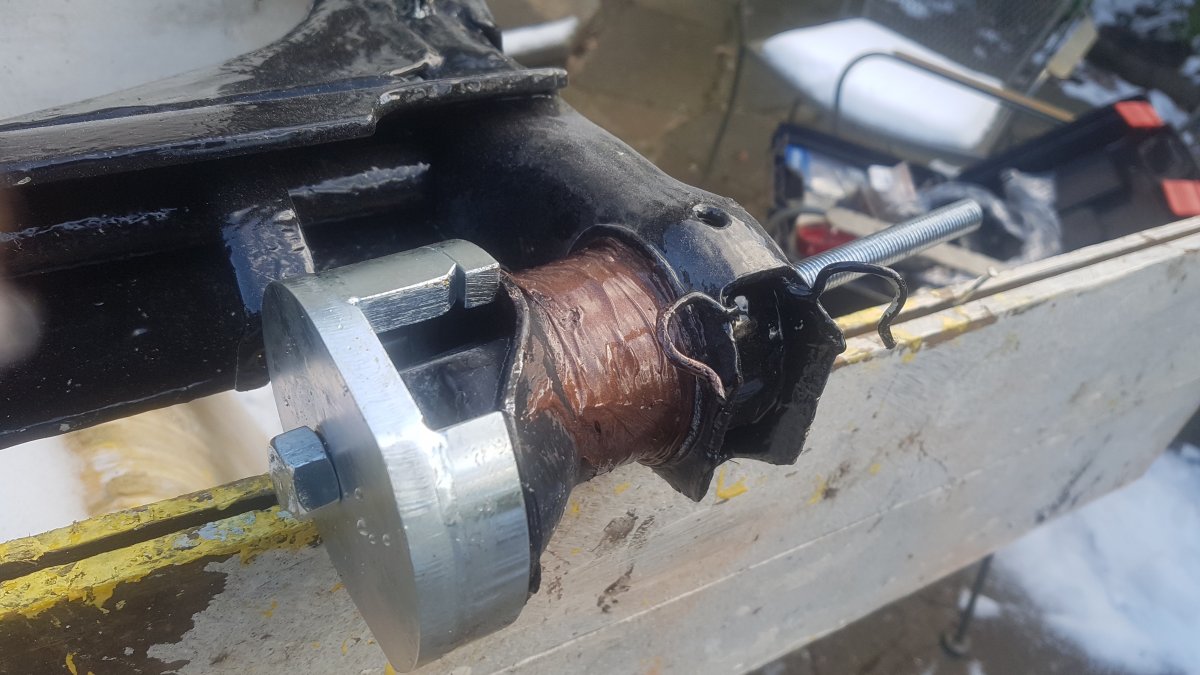
Pic 13 Now with the tool in place, rod threaded through. Not how nicely it sits on the bumpy bit.
Pic 14-1 The cap is then placed on the other side, and over that is this two part cap-nut with a built in bearing. When screwed home the part above, to the left side the capnut's bearing slips nicely into the spacer (on the left), centres everything. It then sits entirely square. One holds the nut on the other side firm and slowly one turns the nut with the bearing on it. The threaded bar has to be greased, then cleaned after handling each bush, then new grease applied, don't forget that. It needed 19mm spanner on the fixed side, 22mm spanner on the side with the bearing/capnut.
Pic 14-2. Note how the right hand cap slides over the receiver. It really is well thought out. There is a further part to push a bush out. Not in the pics.
When removing the bush, I found that it moved quickly if I left it sodden overnight in a bowl of WD40.
I forgot to mention. It works with the earlier beams (smaller bush diameter) as well as the later beams (larger bush diameter, similar to the ones on the Mk3). There's a different cap for the smaller beam.
Quite impressed with the time it took to fit the bushes back.
We also did some new parts: 535853813 A01C
in Suppliers Forum
Posted
The OEM condensor, pump and dryer were included with the Diavia aircon kit for RHD Corrado VR6s. It was possible to order a Corrado from the with aircon delivered to the UK but instead of a VAG system being fitted (the one applied to Passats and an option on Golf IIIs), it came it came with a Diavia kit fitted by a crew in Milton Keynes.