

twinbeltg60
-
Content Count
70 -
Joined
-
Last visited
-
Days Won
2
Posts posted by twinbeltg60
-
-
Well done, professional quality re-make, a dab hand at the sewing, you could start making a living doing this sort of thing.
🍺
-
2 minutes ago, twinbeltg60 said:
Not the best of pics, but I blame the low winter sun etc...!
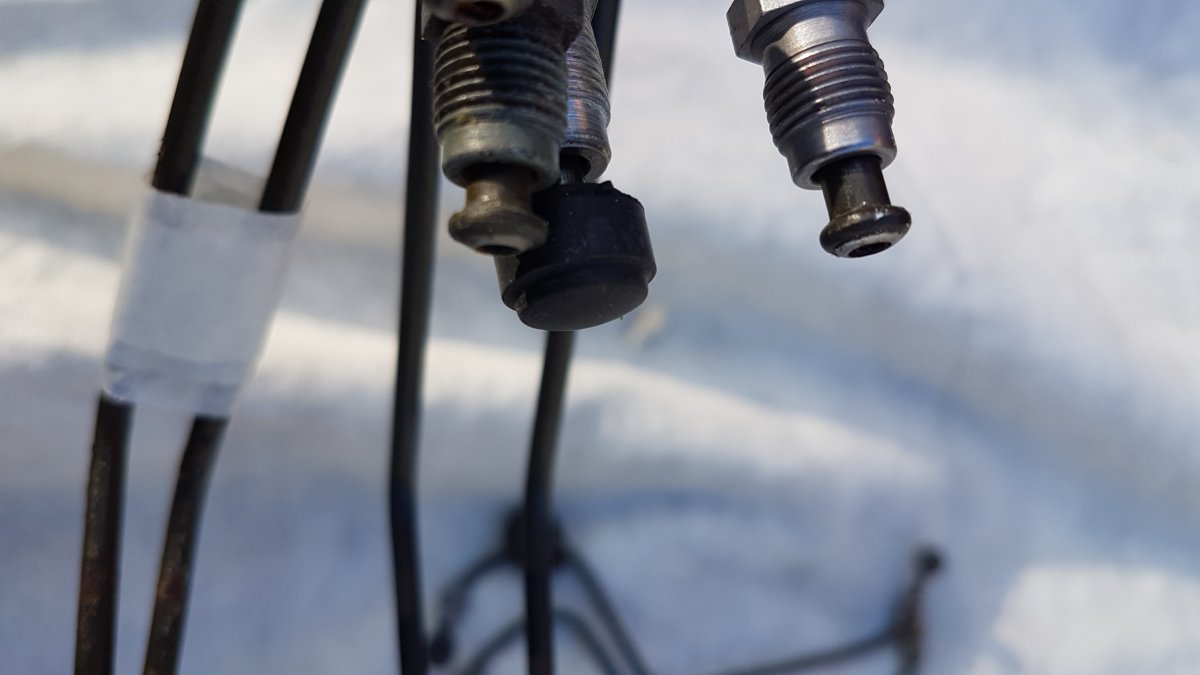
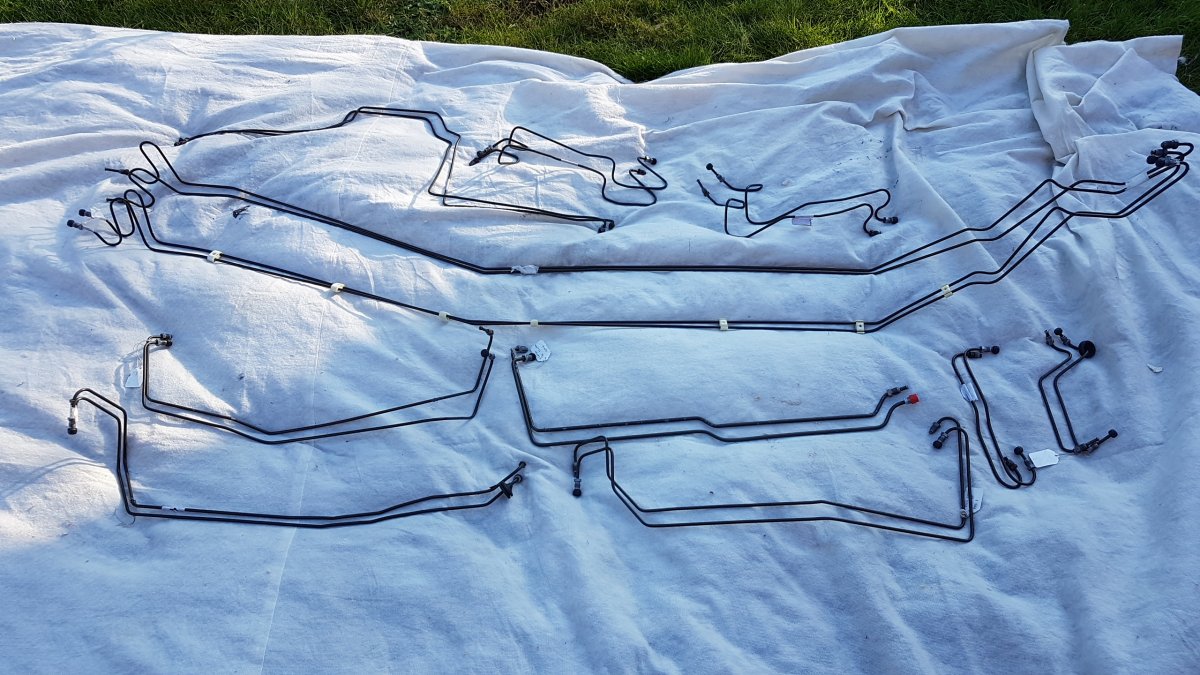
No space in my small garage to photo these, middle pic of brake lines shows the pipe end crimp, this was not easy, steel is pretty hard to work with, if you don't have factory hydraulic presses.
-
3 hours ago, twinbeltg60 said:Hi, ABV,
That is quite an audacious project, like you I was after UV Recaro's but long unobtainable, so I will stick with my factory chairs.
Wish you all the success with it though, and thanks for keeping us informed.
You might remember me posting about brake piping, well soon after that I did make up a straightening tool, from steel offcuts of square section tube, and did all the brake lines (4.75mm), clutch feed pipe (6mm) in factory steel, not turned out too bad at all. took a fair bit of time, the rear axle feed's to caliper's were blooming awkward!
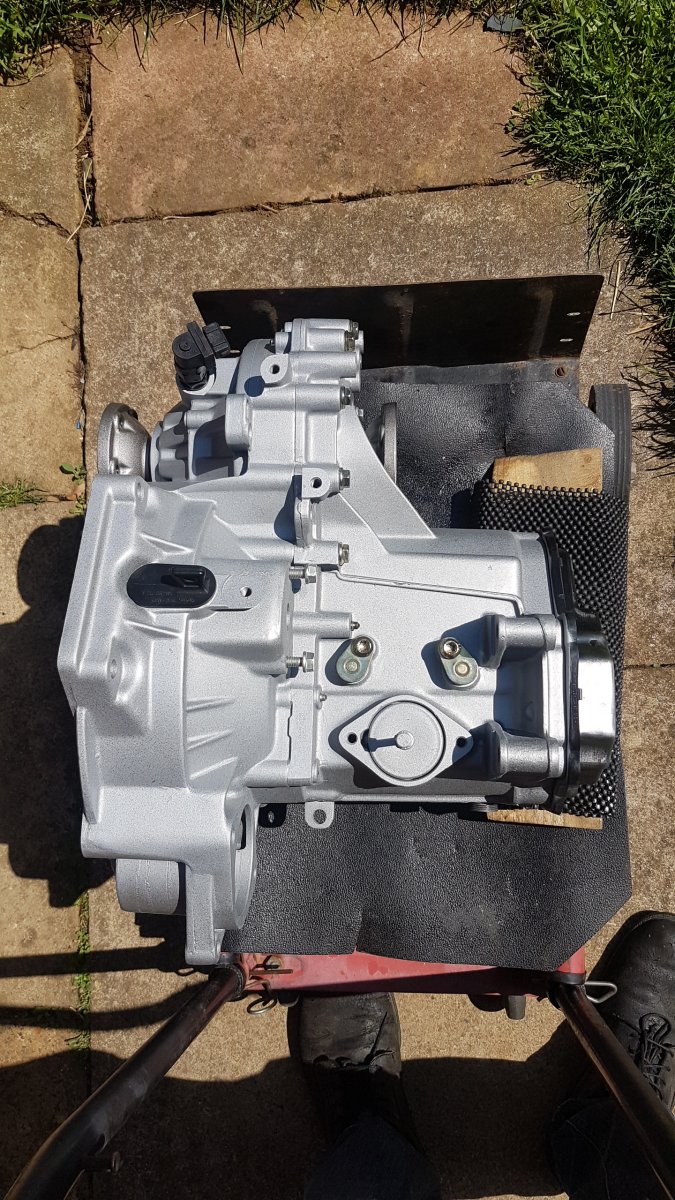
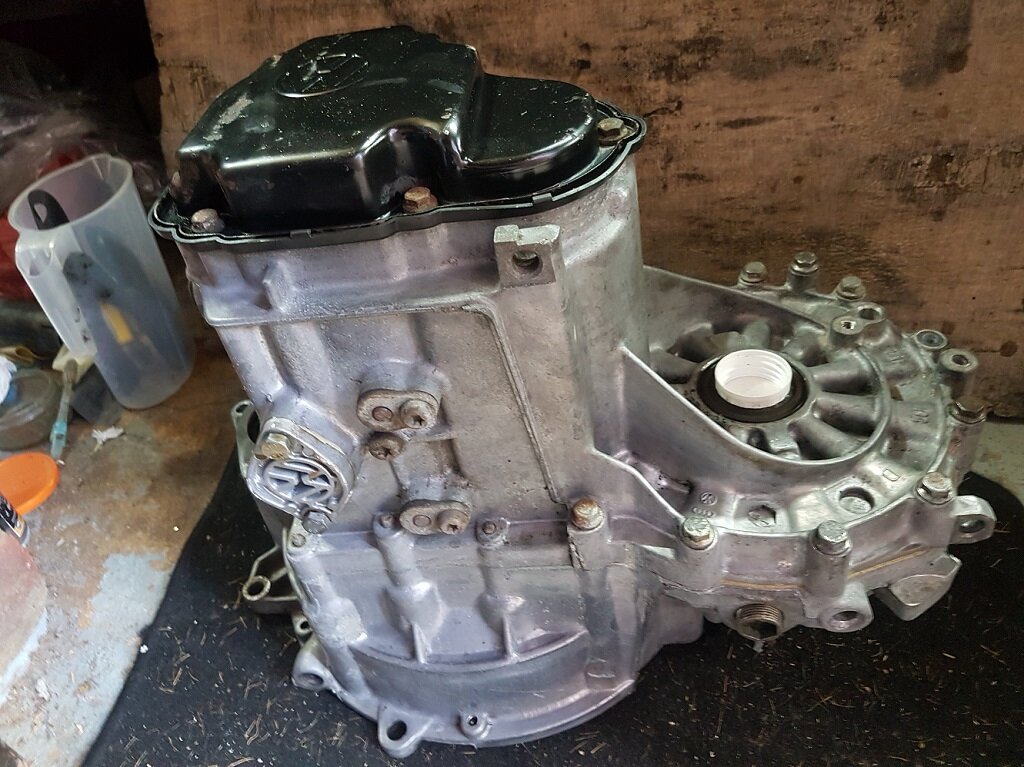
Also painted the gearbox and re-plated the bolts using my DIY kit, must post some pics up.

-
Hi, ABV,
That is quite an audacious project, like you I was after UV Recaro's but long unobtainable, so I will stick with my factory chairs.
Wish you all the success with it though, and thanks for keeping us informed.
You might remember me posting about brake piping, well soon after that I did make up a straightening tool, from steel offcuts of square section tube, and did all the brake lines (4.75mm), clutch feed pipe (6mm) in factory steel, not turned out too bad at all. took a fair bit of time, the rear axle feed's to caliper's were blooming awkward!
Also painted the gearbox and re-plated the bolts using my DIY kit, must post some pics up.
-
5 hours ago, ChrisL said:I took all the foam off and wrapped it in wiring loom tape which is a bit like felt stuff. It’s all clipped in well so shouldn’t rattle
Right, thanks for that, just wondered.
-
On 9/21/2023 at 12:51 PM, ChrisL said:Just to keep the updates coming.
heater matrix all sorted and dash back in along with the re-trimmed steering wheel and new gearknob.
Hi,
Can I ask, what did you do about the dash area wiring where most of the harness sponge tubes had dis-integrated, did you re-loom with felt tape or what, to avoid potential noises inside the dash ?
-
Hi,
Re you original post for replacement early style Corrado scripted sill strips in 2018, do you still do these ?
Please look at our new "Corrado" - strip:
https://www.pic-upload.de/view-35786063/20180723_153845.jpg.html
-
Hi,
Thanks for replying so quickly.
Hmmm, well if these are from OEM+ , run by a guy called "Darko" from Macedonia, then I will forget about it, i dealt with him before, of about 6 stickers on his regular website 4 were wrong shade, or wrong size, or wrong font, and just looked odd.
When I queried this he promised to send replacements, but ultimately never did, I took him off my christmass card list.
So thanks , I will go ahead with my originals.
Thanks.
-
Hi,
Can I ask where did you get the decals / stickers from ?
I have overhauled my original servo and was going to try to re-apply my original ATE Blue sticker, I also have a brand new OEM Master Cylinder bought from VW 10+ years ago, and that had no sticker..
I could not find these correct number ones on line.
Thanks.
-
Corroda,
HI,
Late to the thread, but unless I missed it, did you return the doors to Heritage for a refund, and if so is the moral of the story don't bother buying new doors, they probably won't fit ?
Regards.
-
35 minutes ago, ChrisL said:I live in Hull and there is a place nearby that does it. This however was done by derby plating. They did my clutch line and fan case too
Chris,
Many thanks for taking time out to post the pics and for the info, I have re-plated/ passivated the offending end fittings today, need to paint, the main pipes again, the olive green spray I used was rubbish, came off to easily, need to find the right colour and type of paint, but hopefully will get there, just another thousand things to do along the way with my G60.
Have spent Far too much of my time, on this project, any sane person would have taken another direction a long time ago !
Hopefully will be on the road next year ?
Cheers.
-
10 hours ago, ChrisL said:Thanks, I actually just cleaned them, had them plated, I then matched the colour and sprayed them.
one of the pipes is still available from classic parts.
Ah,
Many thanks for responding so quickly, so I home electroplated just the end fittings on mine , having taped up the main pipes and hose ends, all looked great at first but about 6 months later got corrosion spreading out from the small holes in the tube end fittings, some of the electrolyte must have been trapped and started leaching out.
I started doing the plating myself (done majority of bolts , nuts, brackets etc) really only because I could not find any electroplaters within a 50 mile radius of Brackley that would bother to answer my voice mails, or online contact requests...perhaps I should have just knocked on their door, less easy to ignore me!
Who does yours ?
Many thanks, maybe I should try again , but plate the whole tubes with no taping so less chance of the problem.
-
On 5/14/2023 at 7:53 PM, ChrisL said:Refurbished the ABS pump.
Hi,
You are getting on well, will be very satisfying for you when you have it back on the road.
I have a question, your ABS to Master Cylinder feed pipes look New are they, or were they in that good a condition to start ?.
-
On 5/24/2020 at 7:57 PM, seanl82 said:Thanks mate. Yeah looks like those are identified then. Not sure why I have a different type.
No idea what the other one is in the first pic though......
Hi,
Only noticed this, and so you may have corrected this already, but I just thought you should know the handbrake cable clip shown in the picture is not fitted correctly, it will not hold anything on, the clip horsehoe end should butt up against the cable metal collar, and the end "legs" should clip over the caliper internal bracket where the cable passes through, see pic of my yet to be rebuilt caliper for ref.
Cheers.
-
22 minutes ago, ABV-VR6 said:Don't be sorry, I'm happy to help and if my build can help you out. That tool was cheap to make and a real game changer. Use solid wood like oak or maple. I frequently do plumbing work with my work but this was my first time doing brake lines. You take it off and mimic it, super easy, not even a leak on the lines. A pressure bleeder was a wise investment mate.
Here's the link to the bearings I got: https://www.amazon.ca/gp/aw/d/B014884ZYG?psc=1&ref=ppx_pop_mob_b_asin_title
Line was a mix of copper and nickel, link won't work anymore sorry
Hi,
Wow, thanks for the real quick reply, and the link did work, bearings are M8x30x10 with a 6mm groove, I have now ordered similar ones from Amazon UK, similar price too, £14 ish for 10, next day delivery, thanks a lot.
https://www.amazon.co.uk/Kozelo-10pcs-U608ZZ-U-Groove-Bearing
I am probably going to regret it but my intention is to use OEM steel line, already bought full quantity needed from AUTODOC, manufactured by ATE, green coating, with new ATE nuts also, I hope I don't regret going this route, bought a Vice fixed line forming tool for the flares, and it takes some effort on steel, on Kunifer it is a doddle.!
Cheers.
-
On 12/17/2020 at 5:11 PM, ABV-VR6 said:And.... up to the next update!
Next after the interior, I've been working from the bottom up. Everything is remove in the engine bay.
I started with my conversion from ABS to non-ABS. First the ABS has only one line that goes to the rear and I decided to install two lines for safety sake.
-I bought everything new: ATE booster, ATE master cylinder upgraded from 22.5mm to 23.8mm for added braking power, ATE master cylinder.
-I also sourced an OEM brake reservoir and cap.
This was my first time making brake lines. I have to say, I quite enjoyed it. I do some plumbing here and there at work so I tough it was kind of similar.
I made a cheap brake line straightener with bearings from Amazon and left over hard maple from the stairs, worked fantastic!
Hi ABV,
Sorry but I have another question for you, what dimension bearings did you use for your brake line straightening tool, as I intend to do my own brake lines, and was toying with the idea of making a tool like yours, the bearings I was thinking of have a 4.5mm groove , ( as the brake line is 4.75mm) or if possible can you provide a link to the items you used ?
Cheers.
-
On 2/24/2023 at 4:38 PM, ABV-VR6 said:Thanks Hasan, that's nice to hear. I did put in a lot of hours to realize that dream. You've been a great part of the puzzle as well and I'm very thankful.
Twinbeltg60: I forgot to say that POR15 degreaser is also a real game changer, worth buying it. In contrast to the previous product I was using, it got 3 to 5 more grease out in the same amount of time.
Ok, thanks again, will bear that in mind for the future...cheers.
-
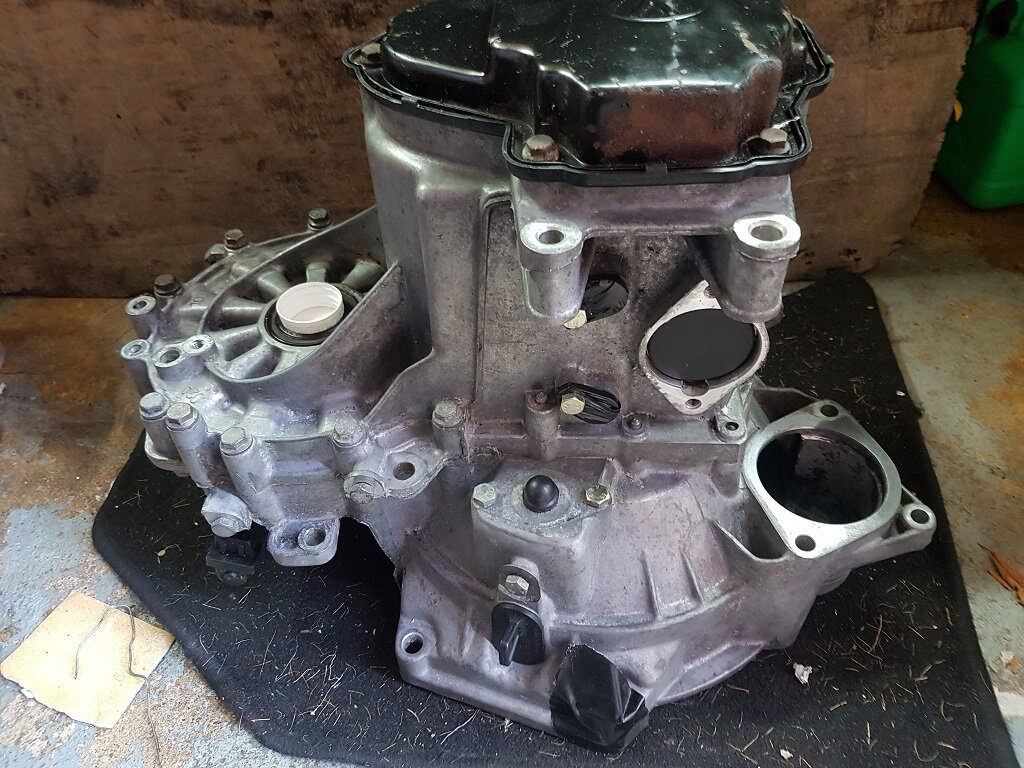
Ah, yes saw that pic earlier, i had cleaned the Gearbox up , underneath was not too bad due to VW Wax, and oil leaks from the Cam Cover, up top had been affected by salt, but , yes, its not bad compared to some.
So bearing in mind what you said about the color choice, I will probably go with the Stainless option as well, it does look good on yours.
Very glad that due to all the enthusiast owners across the world , like yourself, these cars are not fading away like some cars of the past...
Cheers.
-
1 hour ago, ABV-VR6 said:You're probably right, they didn't wanted to deal with it... It's heavy and it's loaded with small details. I think it's a great winter project personally. I took my time, even smoothed the casting with a Dremel equipped with sanding drums and a file. These are things only you can do and takes it to another level once completed. A good degreaser, brushes and patience and nothing is stop
ping you!
As for the paint, here in Canada POR15 is the best brand. I think your equivalent may be Hammerite or something like that? Anyway, I knew some kind of special paint was needed for the transmission as you want it to be able to still evacuate the heat. That's the most important thing, second is being oil repellent. So I reached out to them and this can in the picture is what they recommended and nothing else from there long list of products.
https://por15canada.ca/store/por15-detail-paint-aerosol.html
Hi,
Thanks for the response, that POR15 Detail paint is available in the UK, around £35.00 from Frost Restoration co over here, so that's probably what I will use, interesting you used "Stainless Steel" shade, I would probably have gone for Cast Aluminium, but maybe that would look a bit dull, I will have to decide.
Attached a couple of pics so you can see what i am starting with.
Anyway, thanks again, much appreciated.
Cheers.
-
On 3/24/2022 at 4:59 PM, ABV-VR6 said:You know mate, I didn't get it blasted. Mostly a lot of scrubbing with degreaser, pressure wash when the transmission was empty. Then hot tank prior to spray paint with a special paint for the case. Rest is powder coated. Well, there's was a long debate about this stainless in aluminum on the FB Canada group a year ago. I'm not going to change everything all over again, these are to stay and we'll see with time what happens...
Hi, Great job, I initially looked into getting the Gearbox casing Vapour (Aqua) blasted, but as a whole unit, blocking off all the apertures etc, but the blaster's quoted cost would have been a bit too much (£220+), possibly they didn't want the job due to the cumbersome / heavy nature of it, anyway so I am now thinking of painting it like you, so you mention a "special paint" for the Casing, I know there are lots of "Aluminium" paints out there, but can I ask what did you use ?
-
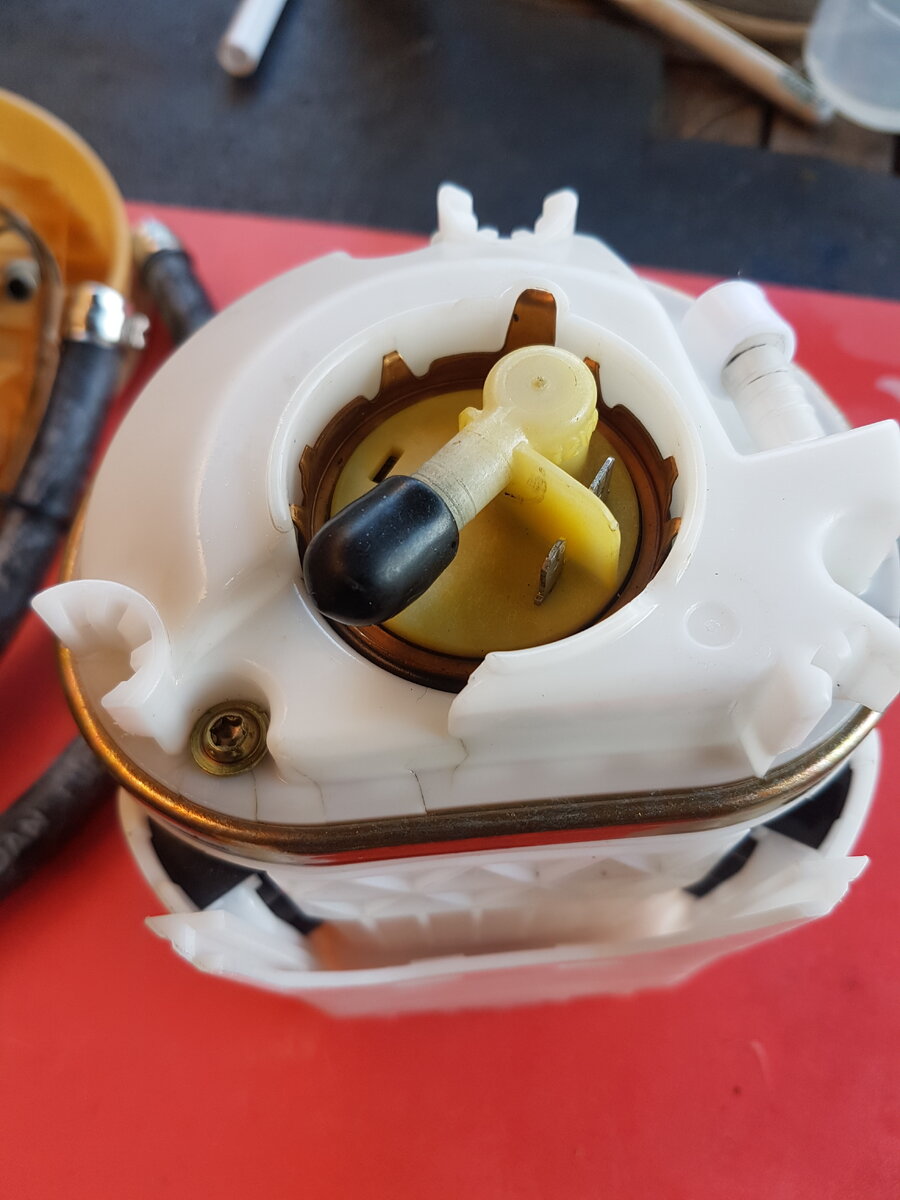
1 hour ago, fendervg said:IF the Mk3 pump has the same swirl pot mountings and location for the fuel level sender, it should work.
I think the cracking problems are not so much poor quality (not generally an issue with VDO) but the result of age (these might well be 20 years old), poor storage and bad handling in transit and warehouses. It definitely means you should check them over carefully after receiving one. I don't think the swirl pot would disentigrate anyway.
My VDO pump was not poorly stored , handled badly in any way, it was crack free when I bought it new, but 10+ years later had developed a couple of cracks on the swirl pot top casing when I went to install it, 18+ months later the cracks had spread on the swirl pot top casing only, so it is most likely the plastic has aged , and dried out , if it had been sitting in a tank full of fuel I am guessing it would not have aged and cracked in that way.
The main plastic parts of the pump are made of POM (Polyoxymethylene), but the top casing that is cracking, has no markings at all to indicate the type of plastic.
Anyway, I have probably spent too much time on this subject, so will get on with something else now !
-
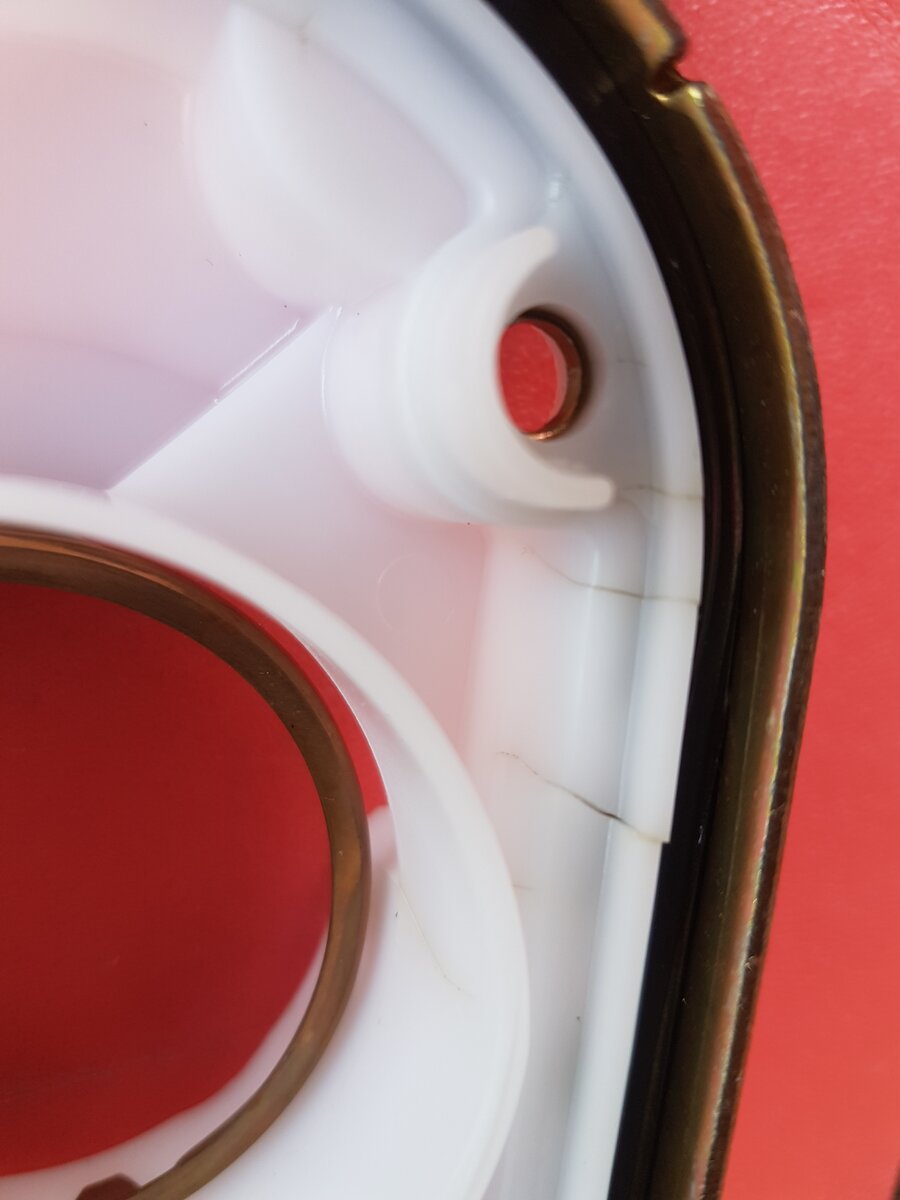
Update, as I would have had to remove my "NOS", from about 2006 VDO Pump I mentioned I installed 18+ months ago to replace the fuel hoses (which I did change at the time , but stupid me, used the wrong hose, needs to be Submersible type, which I have now got Cohline 2190), it was just as well I did.
The couple of small cracks noticed before install had spread like cancer, and given time probably the whole top cap would have broken apart, only the swirlpot top, where the return nozzle is affected, all the rest is fine, so its probably a different crappy plastic.
See attached pictures, to me this evidence that the VOO NOS items, are probably not worth the risk, as even if the cracks are not there to start with, they could start sometime later.
The Pump itself is ok, I have taken the unit apart completely to clean the filters, I obviously need to remove the old fuel (car has not been driven in 10+ years, has been started many times, but always on a low tank, and the fuel is now pretty horrible.!
I may buy the JP Pump, and see if i can swap my VDO Pump into the JP casing, I would then have a spare pump.
-
 1
1
-
-
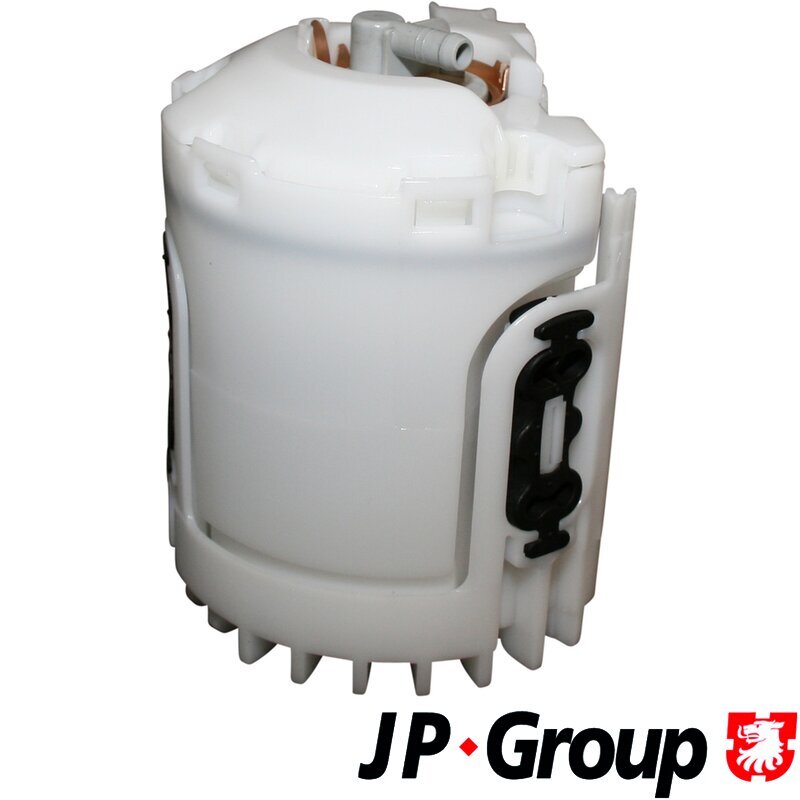
4 hours ago, daves16v said:That pump is the 3 bar version, the 4 bar version is as per the Heritage site.
https://www.jpproducts.uk/products/fuel-pump-with-housing-1h0919651q-1h0919051ah-1h0919651q.html
Hmmm...don't know how I got that mixed up, i looked on the JP Classic Site, but hey ho, I sit corrected !
Good luck to anyone buying any of these manufacturers pumps, its hobson's choice.
Cheers.
-
Hello,
Just so you are aware the picture on Heritage Parts site shows a Unit with Screws holding the halves together, but this is different to the picture shown on JP Parts Website for 1H0919651Q, which I attach, the JP own parts website pictured item has no screws , the halves clip together 9
As an aside, has anyone ever traced the "FORST" supplier Heritage suggest they use?, I have never found that company on any web search.
Cheers.


.jpg.7b7d0a341bd98a2a77f0763e157c3e5c.jpg)
G60 PG engine MFA on sale at Classics
in Engine Bay
Posted
Note, This is for very early Instrument Clusters , from "M" Chassis Build onwards it was integrated into the main board on the cluster, and non replaceable.