Danny B 0 Posted March 18, 2010 I like white c's but I think as with some of the other comments you need a bit of black to break it up.....maybe front grill, splitter and handles :shrug: - as you seem to be swaying towards !! sorry really dislike rears, all red looks great on white IMO :) Great stance though, looking good :salute: Quote Share this post Link to post Share on other sites
Wastegate86 0 Posted March 24, 2010 borbets look ace gota aggree prefer the black grill and chin spoiler but im bias keep the white handles though White Rados = SEX :lol: Quote Share this post Link to post Share on other sites
turbomagikz 0 Posted March 31, 2010 Hello matey Thumbs up !! white corrados ruled before "WHITE" was the in colour .... ive had white corrado for over 6+ years now ! i dont think that the corrado needs any colour codein of door handles grill splitter ect ? i think its sexy enuff as it is ....... just my opinion because WHITE is bright & well sex in your face ! .. as for the clear tail lights ... they are horible lol yerr horibble . now i know that because i have them on mine and still have ! but i sprayed them half red .... never even took them off car ... just masked them off and sprayed that red light stuff on them . . HOPE my little bit of "white corrado talk helps you " a couple of pics of mine that i aint drove for 4 months now .....cannot wait for the sunshine again . respect fella . ( HOPE you dont mind the pics ? its just so you can do your opinions against others ) cheers mark :shrug: :shrug: :shrug: Quote Share this post Link to post Share on other sites
STU175 0 Posted May 9, 2010 (edited) nice pics mark allways nice to see another white c ......is the best colour after all :clap: :clap: quick update fitted original rear lights and got another set to tint red...stuck on rear badges...and a good clean... just front grille and splitter to get round to...climatronic wiring-Golf from May 01.pdfImage030.jpg[/attachment:bbnadjxq] [ATTACH=CONFIG]83621[/ATTACH] Edited April 12, 2016 by STU175 Quote Share this post Link to post Share on other sites
borarob 0 Posted May 9, 2010 standard lights look 100 times better - i'd be tempted to leave them like that, and even put the side repeaters back to amber too.... Quote Share this post Link to post Share on other sites
STU175 0 Posted May 26, 2011 wow a year since ive updated! not much of an update really. done cv gaitors for MOT fitted new grille and just drove it wiithout it breaking for once! [ATTACH=CONFIG]47020[/ATTACH] [ATTACH=CONFIG]47021[/ATTACH] Quote Share this post Link to post Share on other sites
STU175 0 Posted March 17, 2012 well this kept me busy today[ATTACH=CONFIG]56041[/ATTACH] had kept hold of spare subframe and steering rack of my old 16v so set about a rebuild. wire brush attachment to metal then acid etched primer them some hammerite i had laying around. came out pretty good i think. fitting was interesting in the end i sat the whole subframe on a scaffold board then slowly built up the height each side using some more scaffold boards untill it was high enough to get the bolts in.. works a treat if your fitting on your own. anyone see the un-deliberate mistake i made on the assembly i didnt notice untill i had the subframe in place ??????:bonk: Quote Share this post Link to post Share on other sites
STU175 0 Posted June 29, 2014 been a few years since i last updated this so ill let the pictures do the talking axle off [ATTACH=CONFIG]79101[/ATTACH] [ATTACH=CONFIG]79102[/ATTACH] refurbished rear axle, audi s2 front calipers [ATTACH=CONFIG]79100[/ATTACH] decided to tackle the crusty arch lip, was a bit worse than i thought once i'd removed the underseal [ATTACH=CONFIG]79103[/ATTACH] [ATTACH=CONFIG]79104[/ATTACH] Quote Share this post Link to post Share on other sites
STU175 0 Posted June 29, 2014 (edited) rusty bit cut out from drivers side [ATTACH=CONFIG]79106[/ATTACH] new piece shaped and welded [ATTACH=CONFIG]79105[/ATTACH] [ATTACH=CONFIG]79107[/ATTACH] clean and repair underseal, removed unused brackets [ATTACH=CONFIG]79108[/ATTACH] to be continued...... Edited June 29, 2014 by STU175 Quote Share this post Link to post Share on other sites
STU175 0 Posted December 2, 2014 still playing with it nearly back together.....well pleased with it after the hours ive spent. problem is the engine bay looks even worse than before now ive done all this! i think ive caught the corrado ocd bug ... im gonna take the engine out next for rebuild and detailing!! [ATTACH=CONFIG]80246[/ATTACH] [ATTACH=CONFIG]80247[/ATTACH] [ATTACH=CONFIG]80248[/ATTACH] [ATTACH=CONFIG]80249[/ATTACH] to be continued.... Quote Share this post Link to post Share on other sites
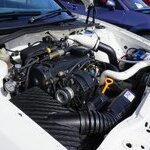
STU175 0 Posted May 14, 2015 Not updated for a while but i have been busy... Engine has been removed. Plan is to smooth and respray whole engine bay and rebuild engine with a few upgrades! a few pics of my progress so far [ATTACH=CONFIG]81548[/ATTACH] [ATTACH=CONFIG]81549[/ATTACH] hi build primer [ATTACH=CONFIG]81550[/ATTACH] primer [ATTACH=CONFIG]81551[/ATTACH] first coat of gloss [ATTACH=CONFIG]81552[/ATTACH] Engine wise so far i have- JMR Stage 4 supercharger JMR Big valve head Schrick 268/276 Cam 83mm Wossner pistons Forged conrods Lightened & Balanced Flywheel & Bottom end... parts still to purchase/to complete- powdercoat all engine parts port TB/inlet/exhaust 315cc Injectors wagner intercooler oil cooler waterpump oil pump silicone hose kit radiator cant wait to finish this to be continued.... Quote Share this post Link to post Share on other sites
Goldie 2 Posted May 14, 2015 Some serious work going into this, fair play to you.. White G60s must be a very rare beast these days... Quote Share this post Link to post Share on other sites
STU175 0 Posted May 14, 2015 thanks Goldie i wish i had kept track of the hours ive spent, it must be ridiculous ......and ive not even finished yet :lol: Quote Share this post Link to post Share on other sites
odub 0 Posted May 16, 2015 Looking really good and local to me as well Quote Share this post Link to post Share on other sites
STU175 0 Posted May 17, 2015 thats right think ive seen your build on dubgen i think? Quote Share this post Link to post Share on other sites
STU175 0 Posted May 28, 2015 got a few coats of gloss on today. its taking shape... [ATTACH=CONFIG]81677[/ATTACH] [ATTACH=CONFIG]81678[/ATTACH] parts sent for powdercoating too... also bought a stainless exhaust manifold... [ATTACH=CONFIG]81679[/ATTACH] might actually be able to start re-assembly soon :dance: Quote Share this post Link to post Share on other sites
STU175 0 Posted October 14, 2015 been i while since ive updated, engine bay bodywork done engine assembly has started:cheers: ![ATTACH=CONFIG]82522[/ATTACH] [ATTACH=CONFIG]82523[/ATTACH] [ATTACH=CONFIG]82524[/ATTACH] [ATTACH=CONFIG]82525[/ATTACH] [ATTACH=CONFIG]82526[/ATTACH] [ATTACH=CONFIG]82527[/ATTACH] Quote Share this post Link to post Share on other sites
STU175 0 Posted October 14, 2015 (edited) oh and subframe powdercoated this time .....hammerite doesnt like brake fluid... [ATTACH=CONFIG]82528[/ATTACH][ATTACH=CONFIG]82529[/ATTACH] Edited February 1, 2016 by STU175 Quote Share this post Link to post Share on other sites
STU175 0 Posted February 6, 2016 finished up the brake lines in engine bay now. not far off getting my engine in now. just got to source and fit injectors manifolds then it can come off the stand to install clutch gearbox starter motor etc im finding some use 0208 150 945 or 0208 150 785. which am i best using? where to buy? recommendations welcome.... [ATTACH=CONFIG]83141[/ATTACH] [ATTACH=CONFIG]83142[/ATTACH] [ATTACH=CONFIG]83143[/ATTACH] Quote Share this post Link to post Share on other sites
16VG60 1 Posted February 6, 2016 (edited) Some lovely work and a good many hours going in there Stuart. Our Rebuilt chargers prefer to sit in smart engine bays . Well done. I look forward to seeing you soon. PS I am still trying to get that Goodwood circuit site plan for you, but meeting with a little resistance at the moment. Edited February 6, 2016 by 16VG60 Quote Share this post Link to post Share on other sites
STU175 0 Posted February 6, 2016 (edited) PS I am still trying to get that Goodwood circuit site plan for you, but meeting with a little resistance at the moment. hi thanks john, i think you may have me mixed up with another stuart maybe? dont know anything about goodwood site plans LOL?? whats your view on the best injectors to use? as above^^ thanks Edited February 6, 2016 by STU175 Quote Share this post Link to post Share on other sites
16VG60 1 Posted February 6, 2016 Hi Stuart, yup you've got me there I have indeed got two Stuart's mixed up Ref your engine build I would recommend running it in for 2k miles on the stock G60 green tops and then a swap to reds for mapping post run in. I strongly recommend you fit a good quality adjustable FPR and ensure your greens are cleaned and flow tested first to prevent fuelling faults on that shiny new engine. We can of course look after all your fuel injection services and parts if you wish. Regards, John JMR Ltd Quote Share this post Link to post Share on other sites
STU175 0 Posted February 6, 2016 that was a quick reply, thanks ill get my greens tested and put them in then. thanks again ps loving the progress on your car:thumbleft: Quote Share this post Link to post Share on other sites
16VG60 1 Posted February 6, 2016 Brill, my pleasure Stuart. Quote Share this post Link to post Share on other sites
STU175 0 Posted March 6, 2016 im getting closer now... ill let the pictures do the talking [ATTACH=CONFIG]83430[/ATTACH][ATTACH=CONFIG]83431[/ATTACH][ATTACH=CONFIG]83432[/ATTACH][ATTACH=CONFIG]83433[/ATTACH] Quote Share this post Link to post Share on other sites