

TimDoc
-
Content Count
459 -
Joined
-
Last visited
Posts posted by TimDoc
-
-
-
Hey, reupholstered my car a few months back in cream leather, did all the seats, the door cards and the gear stick gaiter, but ran out of time and didnt get to do the handbreak gaiter. Am going to get onto the job soon. Was thinking, if i knocked up some of these in leather (just the gaiter and not the handle) would people be interested in purchasing them. They would be of a professional standard (looks back thru the threads about leather retrims at my interior) and could do them in both black and cream. Just wanting to gage the interest. I'll do mine and put up some pics soon. I rekon I would prob charge about £10-12 with p&p included. What doya think?
Tim
-
you need to buy 3/4 full sized hides, there is a chap that i bought these hides from who's doind a deal on ebay at the moment but will also sell to you outside ebay (is kosher), they were hides tanned for jaguar! He's doin them for just under £60 per hide and has loads at the mo, but only in this colour, other colours are more expensive (black at £90 per hide). I paid £240 total with postage. If you do a good job you've saved youself between £2.5 and £3K! The co are called martrim (google finds them) give them a call as their website is crap, talk to josh hibbert and he will sort you out. Have fun. Tim
-
unless you can get hold of the correct double needle and have a machine that is set you for dual threads then i would advise that you just flatten the material out after the inital line of sewing and then sew along parallel to the join. This means you have to go slightly slower in order to make it neater. Hope this helps. Tim
-
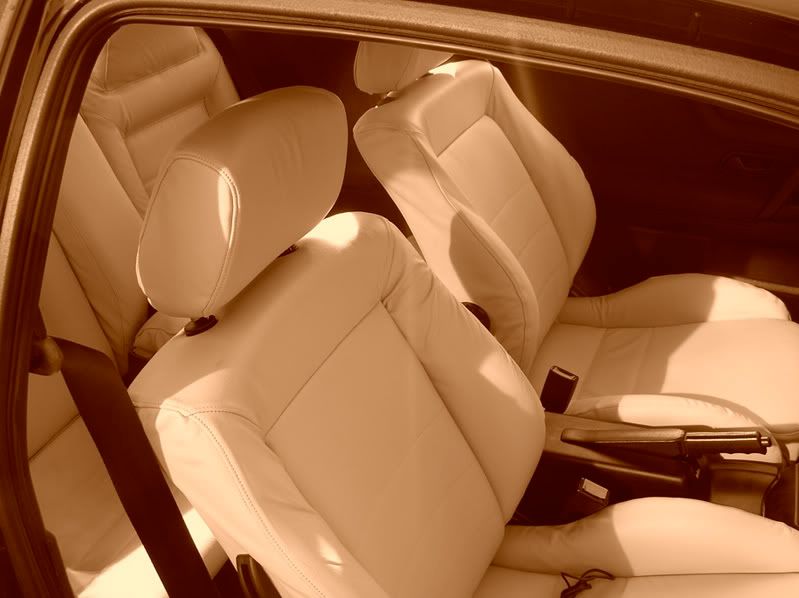
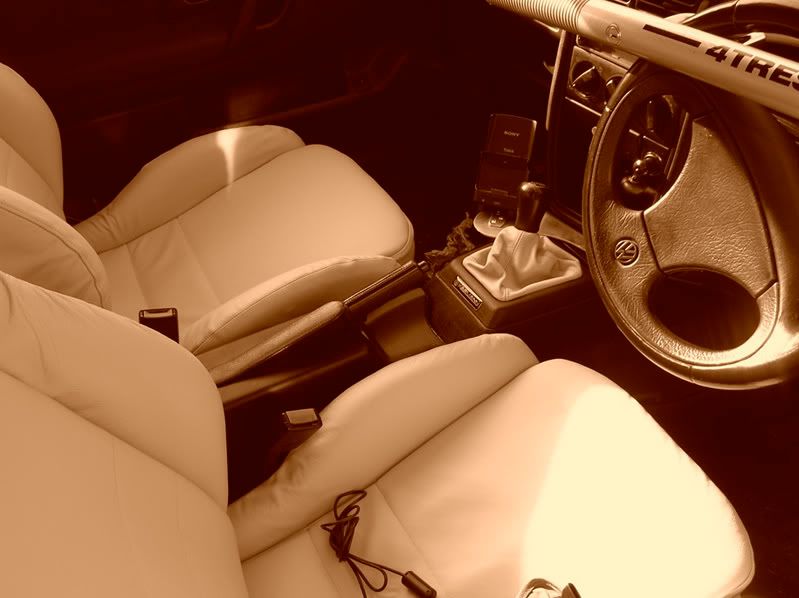
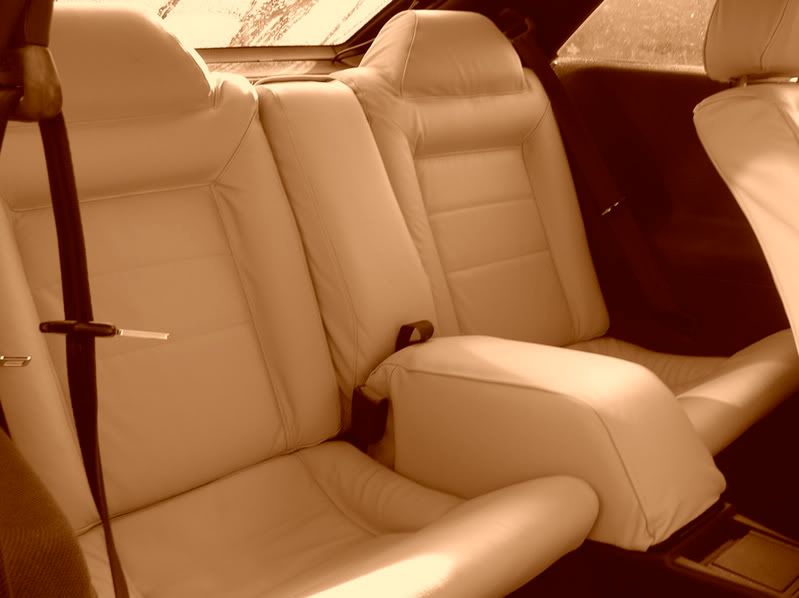
Guys, nice to meet u all, not spoken to any of u before, i have just completely reupholstered my VR6 in cream leather. Luckily my old job was in textile design with heavy duty fabrics and foams so i had a few skills to carry into the job. A few tips for anyone going to do a home made job - once you hace dissected all of the parts of the seat fabric and sketched round them on the back of the leather hide, take those olde seat parts and try to stich them back together as neatly as possible and refit it to the seat, you will get a good idea of how you need to manipulate the materials. Also take note of the little notches that have been made in the edges of the patterns, they are there to match up with notches in their adjacent piece - v. important. Mke sure any sewing maching you use has feet that are both walking feet or you will scuff the leather at the thicker pieces. Also, one line of sewing is not strong enough in leather, it will cut through when any pressure is put on it. Once sewn you must turn both of the hems to one side and sew alongside the join, this will create a nice neat seam with a single paralell sewing line beside it. Sew all the seams allowing more hem than you think as this will create a tight finish with a neater look. There is no need to buy any foam pads for your new covers, just include the old ones with a new cover over the top! Below are the pictures of my finished result, I am about to purchase another interior that i am going to do in black leather. I plan to then see which i prefer and sell on the colour i dont. I will get them up on the forum when i have decided which ones to flog!

-
thought i would share the wealth! Oh yeah - forgot about the sunvisors! Good luck, will have photos soon of me redoing mine. Tim
-
Wait for a sunny day....
.....and then, wash your hands well, make sure the sunroof is in the down position...
....and then:
1. Get a flat table knife and push it in to the L (passengers) end of the light unit, lever it gently and it will pop out.
2. Take all of the electric plugs out of the back of the unit
3. Undo the two posidrive screws at the windscreen end of the hole you have just removed the lighting unit from. That middle panel should come away leaving the motor on view.
4. Undo the two (i think they are bronze on mine) screws that hold the motor onto the sunroof frame but be careful as these are all that holds it on and it will fall on you!
5. You now need to remove the headlining - wash your hands again as they will prob be greasy by now. Go to the back first, and yank off the plastic coving that meets both the rear window and the headlining, there will be a few plastic retaining clips fly off, and with come gentle persuasion will come free from each end.
6. Remove the rubber endging that actually lines the gap in the roof and holds the edge of the headlining onto the sunroof cassette.
7. The plastic coving that is between the headlining and both of the side doors will also come free with some gentle persuasion.
8. At the front end, I cut (with a stanley knife) a central line across the flimsy bit that is between the motor cover and the windsreen, this allows you to flex the headining easily with less risk of creasing it by mistake when removing it.
9. Once you have freed the headlining you can open the boot, drop the parcel shelf and it will slide out easily.
10. You should now be able to see the sunroof cassette easily, firstly get a bowl to catch water in and pull of all of the four corner hoses (with the bowl to protect your interior if there is any water in them)
11. Using a 10mm socket remove the 10 (i think) bolts that hold the cassette into the roof (get someone to sit in the car with you to help with the weight), the front of the cassette will then fall down but the back is supported by a shelf on each side.
12. Manouvre the cassette out of the car
13. Cover the hole left in the roof of the car as we all love the weather in the UK!
14. The cassette is then ready for you diagnosis
Cassette dissasembly:
I would advise you to do this on a lot of newspaper or a dust sheet as you get grease everywhere!
1. Remove the plastic plugs that are on the end of each of the runner's arms
2. Slide out the headlining of the unit - needs a bit of wiggling
3. Using a posdrive screwdriver - remove the four little black screws that hold the actual roof panel on, remember which way the panel fits on as it is tricky to work it out later when you try to put it back together, also remember (or mark) the level at which the little black screws were set - you will know what i mean when you see them
4. You can now slide the running components along their tracks individually and out of the end of the tracks, remember how the come out so u can put them back in easily.
5. You will now have to stare at the components for 10 minutes and work out how the system actually operates as it is not really something i can explain in words easily but here is an attempt:
-there are four components that run in the track, these are 1. The "arm" that has a flimsy extension who's role is to lower the noise baffler when the sunroof is closing, 2. The "main block", from which the "arm" is suspended and from which the routed "tilt piece" articulates, 3. The Pushing element which is attached to the furry coil that runs through the motor. 4. The "Rocker Mount" which has the sprung random shaped rocker on it with the wheel on the back.
6. These parts should all be intact and run (with some resistance) smoothly up and down the track, you may well need to completely wipe them down and regrease them.
7. If any components are broken, either take a pic and display on this thread and i can let u know whats up with them, or take them into a vw dealer as they have diagrams of what they are meant to be like.
8. If you think you have sorted the problem, re-insert both of the mecahnismsvinto each side, leaving the roog panel detached still, Make sure that both sides are completely equal and are flat and pushed all the way to the front of the cassette. Re attach the motor with the two screws and use the allen key to take the mechanism through its full cycle.
9. Diagnose any problems by this process.
Good luck with this, I did mine in a day but found that i had to put it all back together still broken as i could not get the parts to mend it that day. I now have the parts but am waiting for a day off work to do the deed again. Be careful putting the cassette back in afterwards, is a real struggle on your own. Maks sure you connect the hoses and also that the panel seats flush with the metal of the roof.
Have fun!

God damn sunroof jammed
in Interior
Posted
Nooo! Take your time doing it, by all means delay the mend til sunnier weather, but u can close it most of the time without forcing it too much. is it stuck in the rear slide position or in the tilt position? Let me know and i will let u know the best course of action. They are actually fixable with minimal cost most of the time, u just have to spend a bit of time working out the mechanism.
Tim