All Activity
This stream auto-updates
- Last week
-
That’s very interesting Crasher, because I couldn’t find anything about this sleeve in the VW parts info, nor anything in Bentley about it being present . I have the whole suspension out , so hopefully it wont be too much of a bitch putting the new sleeve back in - as you say it would be very difficult if you couldn’t get the control arm fully horizontal. Managed to get Febi replacements from Opie Oils for next to nothing so thanks for offering to dip into your parts bin! Not sure whether to copper grease the sleeve before putting it into the control arm or not because I assume the sleeve is there for compression around the bolt. A vertical bolt surely has the highest risk of falling out eventually if no countermeasures present (apart from thread lock and proper torque setting of course). But what is the reasoning behind the sleeve do you think? Perhaps to allow some rotational movement ?
-

WHICH mount to loosen to replace the front drivers control arm
Crasher replied to STORM 2's topic in Engine Bay
There are two evil little buggers up inside the bell housing into the rear crank oil seal holder. Depending on the screws used, a 1/4” drive wobbly end extension bar and 10mm socket or long ball ended 5mm hex (Allen) key is required. -
The old practice was to stick a drift up the side of the sleeve and collapse it so it can be pulled out with pin nosed grips, or just bust the wishbone out with a crowbar. What confuses me is no Corrado ever used this sleeve, part number 191 407 190 A, as it was only used in the Golf 2 subframe, instead the type 535 subframe employed curved slots that the wishbone bush centre tube engages in as per Golf 3. In the 191 subframe, the key point to successful reinstallation of a new tube is having the wishbone absolutely flat so not connected to the hub. In the 90’s I designed an installation slide hammer tool which centred the bush tube even loaded and allowed the tube to be pushed in. If you need any selves I still have a bucket load but they are rusty and the postage costs more than they are worth, a Febi 03544 is typically 50p.
-
Glad you got it sorted🖕
-
got it out after using every expletive known - for anyone’s info. -take out the sleeve first . Mine was rusted in so ruined it getting the control arm out . now have to source another without the bush (new control arm has a bushing already pressed in)
-
does it matter if the sleeve is damaged when trying to whack out the control arm? cheers
-
I believe there is a fine soft metal sleeve there also that may be holding it in - helps stop the bolt and bushing metal sleeve rusting together A good thump should remove it as the sleeve is soft
-
removed both bolts but wont shift from the back ! the control arm will move around on the rubber bush but wont come out from the subframe . Am I missing something here?
- Earlier
-

WHICH mount to loosen to replace the front drivers control arm
STORM 2 replied to STORM 2's topic in Engine Bay
Is it a case of just removing all the sump bolts and dropping the sump or are there hidden bolts inside the crankcase ? -
WHICH mount to loosen to replace the front drivers control arm
Crasher replied to STORM 2's topic in Engine Bay
You also need to release the front mount under the radiator but lifting the engine high enough puts a lot of strain on hoses and wiring plus the front mount bracket hits the bottom of the radiator cowl from dim and distant memory. I prefer to drop the subframe and if you are doing both wishbones, it is only four more bolts plus the one for the column shaft.If the sump is in the usual terrible condition, you could remove it instead. -
WHICH mount to loosen to replace the front drivers control arm
STORM 2 replied to STORM 2's topic in Engine Bay
Thanks Matt just one thing, where is a safe jack point to lift the engine once loosened. - i was going to use a block of wood under the sump but not sure if that’s safe! -
WHICH mount to loosen to replace the front drivers control arm
_Matt_ replied to STORM 2's topic in Engine Bay
Hi, yes just the rear drivers side mount. I believe the bolt is 13mm once the covering piece that secures the lambda cables is removed. It is accessible with socket extensions. Take extra care screwing in the rear wishbone bolt. It threads into a captive nut within the floor section and would be a pig to fix! Not usual for it to go wrong but has happened. -
trying to replace the drivers front wishbone , but need to jack up the engine to remove the front wishbone bolt. Does anyone know which mount I need to loosen. - can i get away with. the rear drivers side mount alone? cheers in advance
-
Stretched? Are you sure it hasn’t pulled its thread? The part number is 021 103 397 but unfortunately they are obsolete.
-
The journey continues .... boy is it taking some time. I finally got to some welding.
-
I would also be interested in, any repair panels. If anyone knows if they are availible.
-
Superb - thank you. Looks like I'm missing the rhs one so will have to rummage through my box of random bits of trim to see if it's ended up in there at some point!
-
If i recall correctly it clips at the back of the sunroof metal mech, above where a rear passenger would sit sort of area.
-
Hi, hoping that someone may be able to advise if I'm on a wild goose chase or not! Have recently fitted a DAB radio and just got round to replacing the factory aerial with a new beesting DAB aerial, so had the headlining out to run the wiring properly. Whilst it was out decided to give the headlining a clean up, which meant I needed to do the sunroof interior panel too as otherwise it would have looked rubbish! So here's the question - a black piece of trim came out during this process and I have no idea where it's come from / what it's actually for! It's part number 763684959 (image below), but I can't find it on a parts diagram anywhere for the Corrado sunroof, it only seems to be referenced on a Polo! I only seem to have one and can't see it's opposite part anywhere, as I assume it's "sided" and there should be a mirror image for the other side.... Thanks in advance to anyone who can advise on this (especially if it's important for the sunroof continuing to tilt and slide!).... Cheers, Phil
-
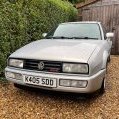
Looks a good one - best of luck with it My own is a K reg also
-
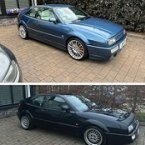
Back on track after a few months of weakness with no fun cars 😃 G60, it was on eBay and Car and Classic, higher miles - 149k - but well looked after. One of its owners was apparantely an aircraft engineer and everywhere I look I can see a job I would have done but it is already done. It came from Somerset and I am the first owner to take it away from within 10 miles of it's supplying dealer. It is mostly stock, all I can see so far is Bilstein yellow dampers on standard springs, powerflex rear bushes, a jabba charger rebuild (assume their standard one looking at the price) and a stainless 2 silencer cat back exhaust that has been made to look like the original. The seller was a great guy and we built up a good relationship during the buying process.... which was fortunate as when I went to transfer the remaining money over to him on the day my bank flagged it as fraud and the banking app wouldn't let me in. We waited around for a couple of hours for a "fraud officer" to be allocated to the case but the issue was unresolved (until the following Saturday morning). He let me take the car home on trust, as although I could see the money had left my account before the bank locked access to it, he had not had the money in his bank. This is something we know we should never do when selling cars and the risk was on him. He obviously knew the car was awesome and I would never have messed him about anyway so I am pleased he trusted me to let that happen. It was 3 hour drive home and my friend drove the car home as I was in my EV, it didn't miss a beat. And awesome it is indeed. I quickly looked at the sills when I collected it and was happy but when I got it home and crawled underneath it is even better: It is immaculate and original and easily the best one I have had condition wise (twilight one really needed the axle and frames refreshing due caked on rust, which I did do), this one hasn't been refurbished but is just clean and spot of lanoguard will preserve it. Even the rear tow area is rust free and clean. All my other ones needed wire brushing and sorting out to tidy up that bit. Body work is great, just one bit of rust to tend too in the corner of the rear screen. Like the blue hinge to the silver. Even the drivers door has not dropped and closes as perfectly as the passenger side. And my purple one had a tiny bit of up and own play in the steering wheel but this one is solid. Interior is black leather and original and doest not rattle too. Some pics, also some of the TT for those intersted. For couple of grand paid the TT is a hell of a lot of car for the money (recon dsg box 9k ago, £1500 of suspension and brake work done last year, chains well within in tolerance on the computer but even if I had to do them later down the line I wouldn't be too upset given the price I paid, serviced every year since new). I have stripped the arch lines etc and cleaned/inpsected + lanoguarded, no rust. I also replaced the rear shocks and springs as one had snapped and both shocks looked tired. Had the wheels refurbished back to silver. It's also got a custom exhaust on it that had been made to original specs but stainless. Pics:
-
_Matt_ changed their profile photo
-
-
Cheers,custom armrest also in,upgrade to led headlight bulbs and better loom,cruise conrol to fit also
-
love the interior, good work 👍
-
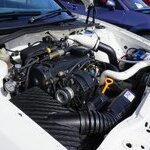
Related issue, i have AC on my RHD corrado VR6, also prob Davia, now the blower has stopped working, pain to get out and no part number to replace, some pics attached any idea where i may pick up a replacement ? you can see a strange set up and custom blower ... My AC does not work a the mo, think it just needs a service,all parts are in place .. my switches are on the RHS of steering wheel