
-
Content Count
1,404 -
Joined
-
Last visited
-
Days Won
5
Posts posted by GrahamU
-
-
Have a look at these, the wire you want is on line 31
-
I use 3M scotchweld DP490
We use it at work for gluing many things from plastics to carbon fiber
-
It hasn't torn but the material has shrunk quite a bit making the corner part tricky to put back. I noticed today that the other side is starting to do the same. No harm in trying and perhaps a bit of heat/conditioner might help in massaging it into position.Got to be worth a try to fix it, little bit of heat should help.
I used evo / bostick to fix my leather rear panels
-
How about an R32 conversion for 10K
Was wondering if it is Kev Bacons old car
-
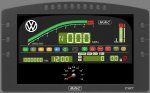
How old is the car, do you have the cluster with a single LCD and analogue speedo or 2x LCD with digital speedo
If the single LCD then I would try the voltage reg that is part of the Fuel/Coolant gauge pod, easy to get to once the front plastics are removed
If its the later 2x LCD then they use a different setup with stepper motors and a single PCB for complete cluster so it would be a bigger issue for them.
-
I plan to be going but in the R:. not the Corrado
-
Nice, what kit did you use for the carbon?
-
-
It is glued around the top and bottom edge's and they dont come off easily.
Would probably be better if some care was taken
bottom edge

top edge
-
There is a group on facebook for putting a 2.0 tfsi in mk1 and 2 golfs
https://www.facebook.com/groups/391855057873252/
Be interest in this as I have an eye on an engine but trying to justify if its that much better than the 1.8T I have now
-
I wouldn't solder a loom, much better to use Duraseal connectorsI've just seen that phrase on a Facebook Corrado page :)
Agreed, but I've given up arguing the point
Although I use these:
http://www.te.com/usa-en/product-680327-000.html?q=&d=129372%20557502&type=products&samples=N
-
The 12v comes from the ignition live feed, benley shows the same feed as the ECM IGN live, its a black wire that comes from G1/4 of the fuse box (thick wire from fuse then spliced to a smaller black wire)
For my 1.8T conversion, the signal to the gearbox sensor went direct to the cluster to drive the speedo and didnt go to the engine ECU.
This time I have wired it so the signal T's off and also runs to the ECU (but its not running yet).
-
Depends on what you intend to do with it.
If you are only soldering some wires together then you can get them from most hardware stores for around 10 - 15 quid.
If you want to solder PCBs then look out for a temp adjustable weller iron, that is what I have at home and it does the job fine, they have replaceable tips so you can change to suit whatever the job is.
I used to have an expensive metcal iron that was self adjusting for temp, auto switch off, quick change tips etc but I didnt really use it to its full potential so sold it and carried on using the weller.
-
have you got another job now Oli?
-
I use 3M DP490 for any plastic repairs, used it the other day to fix my rear spoiler mount
-
-
-
-
Glad you got it sorted, everyday's a school day :)
-
I prefer morrisons doughnuts, the sugar is powered, but again in packs of 5 and custard of coarse :)
-
I've had a sweet tooth for all of my 48 years and I'll be honest and say I'm a little overweight (would be classed as obese) but I have only been to the doctor once in the last 14 years that I've lived here and that was to get a referral for a hernia, I've been in hospital twice in my life, first to have tonsils out at the age of 7 and the other to have my hernia fixed.
I have all my own teeth and no fillings, I check my blood pressure every now and then which is lower than average and my cholesterol is ok.
The problem for my weight is when I'm working away I dont eat till late and have a beer then go back to a hotel room to either work on the laptop or sleep, I always put some on when I'm away then loose some when I'm back home
-
Would banning such products open up an opportunity for these products to go onto the black market hence causing new problems?I think you're getting your Cokes mixed up there :)
So we cant have sugar, cant have salt, cant eat meat, cant fry anything, smoking is bad, alcohol is bad, chocolate is bad, cakes are bad, when will it stop, they will only be happy when we are all vegan and that will make it a sad place to live in
-
Tyre pressures back in 1988 were set basis the suspension at the time which was oil shocks, when today we are using gas shocks we should also use tyre pressures adjusted not only basis the harsher dumping action of gas shocks but also basis the stiffer todays tyrewalls. Its a no win situation as our cars, talking for g60s, were built basis an oil shock suspension, which admittedly did a landmark job and set a reference for handling and comfort. Don't know if also the vr6s were factory equipped with oil shocks, but the factory tyre pressure for their 205 50 15 tyres of 33/29 would most probably indicate that gas shocks were used.
Not arguing cos I didn't have VWs back then but are you sure they didn't have gas shocks? They are after all a sports coupe and my fast fords had gas shocks
like I said earlier, if you are seeing bad wear on the tyres when set to the VW recommended pressures then adjust to suit,
As you are saying you think the pressures are to high then you must be seeing uneven wear in the center of the tyre
I've not run standard wheels or suspension on any of my Corrado's for more than a couple of weeks so cant remember what the ride was like, I set my 17s with 205/40 to lower pressures
Out of interest, how did you measure the pressures 30 years ago and how accurate were they once you had set them ;) I'm assuming either a dial gauge thrown around by everyone that used it or one of those tube things that extended when put on the valve
-
What TPMS systems do you recommend?This is one of the bluetooth systems I have tried, its accurate and once you have worked out how to connect it to the phone (there were 2 sets of serial numbers in the box I got :) ) it works ok
Only thing I did notice was one of the app's had an odd message that said to call the police when it detected a low pressure :) (But I cant remember which set had that problem)
Not really tried any of the cheap RF systems from ebay as we supply our own systems for that but we are looking to move into a bluetooth system soon


Help 91 g60 half clocks dont work etc
in Interior
Posted
Sounds like you have the twin LDC cluster, yes?
I'd first wip the cluster out and see if it is that that smells or something else behind the dash.
If it is the cluster you will have 2 possible choices, remove the front plastic and gauges, find what has burnt and if you are lucky and the damage is limited, replace it (or have someone else replace it)
Or, buy another cluster.
It does all sound cluster related with the loss of gauges and the spoiler stuck.
Can you move the spoiler manually?