

nmahi
-
Content Count
359 -
Joined
-
Last visited
Posts posted by nmahi
-
-
Yep, worked a treat :notworthy:Really easy to do and what a difference !!! For the sake of 1hour of your time it's well worth it.
Just need to sort the flickering handbrake light and that will be the most annoying niggles out of the way :clap:
thanks for the feedback.......it accelerates much better and smoother now right?
check your brake fluid levels ....maybe sure its not falling short of the senor...and check the plug too...the pins in the plug sometimes push back.
-
-
car idles fine when warm but it always over revs when you change gear(takes along time for the idle to drop) so its mpg is crap at the minute. thanks for the help im off work thurs and fri so will have a proper look then. does anyone know if they do a haynes manuals for the corrados?Mine did exactly the same until today.
Was not going below 2500rpm at times and really annoying when changing gear.
Took the throttle body off and gave it a good clean and now runs great. :clap:
did you use my guide by any chance?>
bob
-
-
-
Hi guys, here a quick guide on how to clean out you throttle bodies on a 16v engine.
Reasons to clean it out......
1.The acceleration is not smooth
2.Cable seems to be sticking
3.Doesn't idle probably
4.and similar problems...including general maintenance.
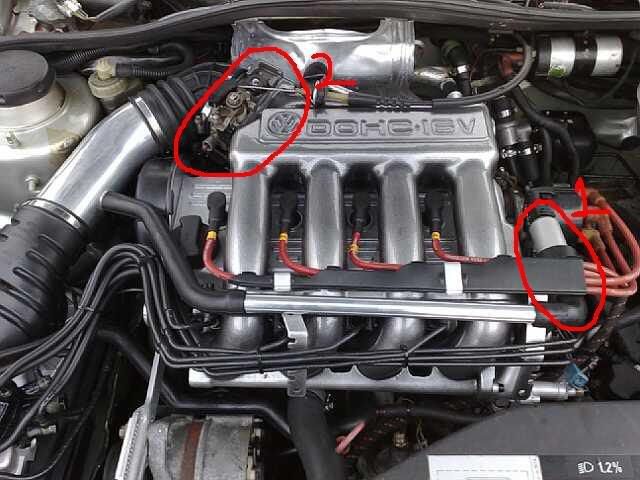
Highlighted in the photo below is the starting point.....undone the 2 hose clips and vacuum hose and pull away slowly

Remember to unplug the other smaller vacuum hoses underneath. There is another bigger vacuum hose underneath which just pulls out (this in the pic, if you follow the smaller pipe down is on the edge of page; a Grey cylinder)
Undo the plug in the pic and also the throttle cable (pull forward and around catch)
Now, there are only 4 Allen key bolts (cant remember size, think its 6 or 8mm ) that need unscrewing.......BE CAREFULLY not to round off bolts, if you do its a hammer and chisel to get them off (not easy)
Ok the throttle body should just pull forward and its off. BE CAREFUL not to rip the gasket.
Circle 1 shows the a CLEAN finger smudge mark in the dirt. Circle 2 shows, the dirt.
Another pic of the dirt in the throttle, this causes the butterflies (paddles/flaps) to become sticky....
1. the clean side, 2. the dirt.
With brake cleaner or carb cleaner, simply wash out the throttle body, you may need a soft brush to help. toothbrush or painting brush is good to use. Remember to open the butterflies and clean around the rims and pivot point. Ive used a soft handle screwdriver to lodge the butterflies open.
* A quick test that's always good is:-
Once the throttle body is off, leaving the butterflies in the closed position and simply fill (not full) the chambers with a little carb or brake cleaner and see it holds...a little leek is FINE. This check for any damage to the chambers.....
and the final stage..
Make sure you clean all "OUTER" springs and moving parts then WD40 them and work it a little(opening/closing the butterflies) so the WD40 gets in.
then refit.......remember to reconnect all vacuum hoses or you'll get miss fires..
YOU WILL FEEL THE DIFFERENCE.......... TRUST ME.
Happy days :salute:
-
im going to clean my throttle body out today any1 want a DIY guide "how to?" 8)
-
have a look at the pic, where the number 1 is, if u follow it down towards the rad, you see in the pic the blue clip......happy days........
im going to clean my throttle body out today any1 want a DIY guide "how to?"
-
1. ISV
2.Throttle Body
-
hi. This afternoon, I dediced to take out driver's side (rhd) window regulator and the whole mechanism including motor. Well now, 2 hours later and some cuts in my hands and arms, I have done it.Now I have been looking at the following:
http://www.a1electric.com/Merchant2/mer ... e=50-54060
and I was wondering: has any one used any of these? are they better than second hand oe ones?
if there is a better way to go, please, tell me where to buy it! :D
thanks :)
hi mate, i aint used that kit, but i tried a after market kit once.....was more then shit!......very slow and made a horrible nasty noise.....i ended up using normal standard electric windows/motors.
-
Thanks for this. I had intended to strip out the cluster this weekend to replace the high beam light and was dreading the hassle of getting it in and out. Read this half an hour ago and the jobs done. :D Thanks again for a great little guide :clap:your welcome :notworthy:
-
Thanks for that, I thought you had to take the whole cluster out but now I see from very helpful pictures that isnt necessary. :Dto be honest, i took cluster all out the other day to change the display screen, only to stop and think about it..i could of done it without taking it all out.
for all those you have taking the whole cluster out, you'll know how hard it is to get the speedo cable back in, esp if you got big hands.
bob
-
-
Here is a guide on how to change the bulb behind the display on the instrumental panel, im sure it will be the same process for the rest...apart from the one on top that light up the whole panel itself, in that case you'll need to take the clocks out completely.
Firstly, you need to lower your steering wheel down to the lowest setting. You may find you need to adjust to get screw drivers in to place also you might need to move stalks up/down.
Remove caps and screws..(2 +)
Remove the 2 screws from the top of surround. (2 +)
Remove surround, should pull forward and slide out towards passenger side.
You should be left with something like this (different models = different clocks)
Remove the two screws on both side of the clock....NOT THE ONES THAT HAD THE CLOCKS IN THE DASH! (i had a spare set clocks, so took a pic of the screws to make it easier to see)
You should be left with this; firstly remove the smaller light fixing, this just pulls away. Then
notice the two small circles in the photo, these may need a little squeeze gentle together for the clock face to release...then simple pull forward.
Once out, flip over and you'll see the bulb, simply twist and pull out....(you might need pliers to help)
then reverse process......
Whole process to me 15mins........out and back in...
bobs you uncle :clap: :norty: :salute:
-
Thanks, what sort of bulb do i need though? Can you get them fron halfords?i think you can get them from halfords.......its just a normal intrumental bulb, the shape might be different but its works all the same....patrol station around mine sell them on selve...
if it helps i can do a photo guide and write up on how to....
bob
-
Same thing has happened to mine, do you have a part number or know where i can get the bulb? Also is it a job you can do without taking the whole cluster out?you'll have to take the clock cluster out, but thinking about it u can do it with it in.
1.lower the steerling wheel to the lowest setting
2.Undo the 4 clock surround screws. 2 in bottom corners (remove the caps first) then 2 on the upper lid of the surround.
3.this should slide out sideways, leaving the clocks.
4. undo the 2 side screws(half way down the sides of the clock face surround * not the screws that hold the clock is the dash.
5. once off, gentely pull the clock face towards you, pushing together the two clips (one then right corner, one bottom left corner)
6. the whole clock face will pull away, then simple twist and pull the bulb and replace.
7.reverse all instructions....and put it back in.
Bob
-
abit of cardboard, the think stuff is better then the thin, i recommend a walkers box.....if your lucky your corner shop will give you them 4 free.... :clap: :lol:
-
cheers guys........for sale now....piston heads. :wave:just went throught the thread, brilliant work...........had noticed it first on pistonheads. Can't believe after doing all that you are selling :confused4: unless of course you have found another C in which to create your magic :eek:
thank you, no more magic for me.......
-
cheers guys........for sale now....piston heads. :wave:Ya kidding?! :shock: :(
Lovely car mate, fantastic job! Well impressed with the attention to detail :salute: :notworthy:
no it has to go....open to offers..
-
cheers guys........for sale now....piston heads. :wave:
-
lol, i hate that.........happened to me.......out bidden by £1 ..........i offer an extra £20 to the fella......but he stuck to the auction :shrug:
-
BNQ off the roll.......i changed mine recently...
-
Well finally died again last night, called out the AA mainly in the hope they could diagnose the problem. Was 99% sure it was the alternator, got one on order for £97, should be here tomorrow. Fingers crossed it solves the problem.Now have 2 knackered alternators at home though
once the cars running do you want to bring it down to mine? im in bham not that far and i'll check it against mine?....then we can both scratch are heads together?
Fitted the new alternator tonight and it seems to have solved the problem. I'll see how the car behaves over the weekend, if it carries on acting up i'll let you know mate. Cheers for the offer but fingers crossed its sorted.
hate to say i told u so in my 1st posting lok,,,,,,,,,, alternator
-
Well finally died again last night, called out the AA mainly in the hope they could diagnose the problem. Was 99% sure it was the alternator, got one on order for £97, should be here tomorrow. Fingers crossed it solves the problem.Now have 2 knackered alternators at home though
once the cars running do you want to bring it down to mine? im in bham not that far and i'll check it against mine?....then we can both scratch are heads together?


can someone do a how to wiring a upgrade loom wih pics?
in Engine Bay
Posted
can any do a headlight loom upgrade "how to fit guide" with photos for me? Im ok doing it, just not with the supplied diagram and text.....its confusing :confused4: electrics ain't my thing....
i got a early 16v rad....
cheers bob