1xshaunx1
-
Content Count
1,565 -
Joined
-
Last visited
-
Days Won
16
Everything posted by 1xshaunx1
-
What et are the wheels? that can be important too.
-
Turn up the stiffness, raise it up, or a combo of both
-
That should be enough, I think the curved blades are quieter too but makes less difference the smaller you go.
-
What no photos. What kind of meeting is that😥
-
They’ve gone up a lot in 2 years I paid £247 delivered nearly 2 years ago my slim fan knocks out 1328 cfm
-
This is my not so slim fan https://www.malpasairflow.co.uk/itm/12-305mm-Fans/SPAL-12-305mm-Cooling-Fan-VA34-AP70-LL-36A-12v-1434-cfm-Pulling/30102051 it’s about 1640 cfm the combined fabless system is 1547 so wouldn’t be as good for me as my one larger fan. But running standard engine you’ll be alright I would have thought.
-
No idea cfm on oem fans but quite powerful on stage 3 and uses a lot of power. Fairly gentle spin on speed one
-
It’s a minefield mate. Do a lot of research and get an idea of what you going to do or you’ll end up like me with two sets of fans. I also made a double 11” set up before I went for 12”. That’s in the loft 😂😂🤣🤣
-
Looks lovely, well done for getting it motd etc.good luck with the radio
-
The fan controller controls 3 speeds. 1 & 2 from the rad switch and 3rd speed from the black sender in the thermostat housing. The fan control unit sends power to one of the three cables from the signal it gets. That’s why you can join the three wires together near the fan plug without getting current bleed going somewhere else that connects to the new fans. I use the two signals from the rad switch and the black switch unplugged so I can’t go over temp and bring that signal in. It would have easier and less complicated to just use the rad switch for just the first two signals direct from the fan switch like the Phenix fan set up. mine don’t change speed. the slim fan come on a 95 Celsius and both come on at 105 Celsius. that shroud seem basic for the money and the fans aren’t the best either. My bent plate cost £40 I think and I cut it out with a jigsaw. Look on the Spal fan website to determine fans and flow rates. it’s the fans, relays and wiring where the money is.
-
If you want to get rid of the fan control box and all the shite connected to it you need to run 2 fused powered relays from the battery to the fans and signal them from the two stage rad switch. You just need the plug that’s on your loom feeding a signal to the relays from the switch. You could have one or both come on. I have set mine up using the sharan plug so I can keep the fan control unit and it’s wiring. Hope that makes sense
-
The inner panel needs the sunroof closed to be removed and refitted. it arches to 2 hooks on the sunroof mech one near each corner. You have to push up firmly while pushing backwards, Be careful though as you’ll break the plastic on the inner panel if you don’t push up enough to clear the hooks. As the mech move backwards and forwards it pushes the inner panel about with these hooks. If yours is nearly closed it might help to do what cressa said and see if you can close it manually by messing with the motor, you can turn it with an Allen key or similar and the sunroof will move.
-
you can remove the whole sunroof mechanism what ever the sunroof position. It’s got to come out to fix it anyway and a lot easier to see what’s going on while it’s on the bench. A lot of trim needs to come off but the b pillar trims don’t need to fully come off just dropped down. I say a lot, it looks a lot while in place, but if you get at it it’s a couple of hours. Another pair of hands near the end is a massive plus. good luck
-
Mine arrived from Amazon yesterday, shipped by the seller actually, although it requires a slightly shorter plate it’s the closest to oem you are going to get without having an actual oem one. Not ridiculously exspensive either at £75.50 delivered
-
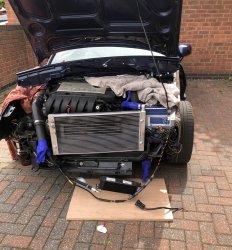
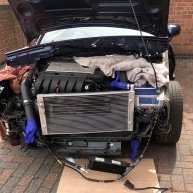
That just goes to show that there is a massive increase in power and torque over the original manifold, especially upto 4K revs. I can’t believe you’d get that just by altering the air flow that it’s sucking in without any other engine mods or tune. No wonder you seemed so pleased with the first drives after fitting.
-
Quite right you shouldn’t need a reinforced one. I was saying that in case your only option was a topran or other inferior quality item. I’ve read something that said mk2,3,4 golf and the Corrado are the same, have you a breakers near by so you could compare yours with the others. What’s up with your original one by the way.
-
No help in sourcing one, but did you know you can reinforce the fork by welding a plate to the unflat side.
-
Good to hear you’ve been out in it at last and that all is well. Id be interested with the rollers as you haven’t had it mapped? or have you?
-
I think you may have to travel to save yourself lots of time and money. looks nice https://www.autoscout24.com/offers/volkswagen-corrado-1-8-g60-gasoline-orange-be137410-80c1-47f9-9d1f-774ad9ab11cd?cldtidx=11&cldtsrc=listPage&searchId=-620311300 With everything thrown at it https://www.autoscout24.com/offers/volkswagen-corrado-sonder-model-gasoline-violet-2965893d-c378-46ee-8014-e5da52ce53f0?cldtidx=5&cldtsrc=listPage&searchId=718100571
-
Good idea What’s the size of the washer
-
I had a Halfords cover on mine while I had it parked up on and off for 6 years. In fact I think I had 2 and that one was goosed when I took it off for the last time. They certainly stop the weather beating your paint and rubbers up. You do have to keep an eye on the weather though as it’s best to remove it for a bit if 70 mile an hour winds are coming, the car covers don’t like that high wind speed.
-
Are you selling any bits off of it Dox. I’m after after a set of rear lights that aren’t scratched to death or haven’t been badly painted 🙏
-
Not all of I notice 😂😂
-
Won’t it fit where the switch and the blank goes and relocate the headlight switch
-
 When it’s all back together, leave the two bolts that attach the hub to bottom of the shock absorber loose. Put the wheel on and you should be able to move the top of the wheel in and out, toward the engine and away a fair bit. Set to where you think best tighten the two bolts up drop it back down and have a look. Repeat until your happy it’s something like