Leaderboard

.thumb.jpg.c28e860f2b35da39217cf8b96a7a5c73.jpg)

Popular Content
Showing content with the highest reputation since 02/05/2011 in Posts
-
3 pointsCheers, no green bulbs but they do flash a bit red. now fitted
-
2 pointsThere is a guide on vagdrivers for replacing the matrix without removing the dash: https://www.vagdrivers.net/threads/corrado-heater-matrix-replacement.19713/ Sent from my LE2123 using Tapatalk
-
2 pointsApologies all, I haven't managed to put the order in for the next batch yet, but hopefully will get onto that in the next couple of weeks.
-
2 pointsRight, it all works! You were right about this, I was going way overboard with 6mm wire, which wouldn't have fitted in all the connectors. i guess the original fan motor ran a much higher current. When I looked the actual ratings I found 1mm wire would be sufficient for fan speed 1. Anyway, this is what the finished wiring looked like: Which is to this wiring diagram: Essentially the same as the one at the top of the page but I have updated the wire thicknesses. Also I couldn't find Red/Green wire in 4mm so just used Red. I used this wire: Thin Wall Cable (autoelectricsupplies.co.uk) And these connectors to splice the wires: 108961-000 Raychem - Te Connectivity, Butt Splice, Yellow, DuraSeal Series | Farnell Which are Duraseal Yellow crimp butt connectors with heatshrink. These are nice because the heatshrink material gives a good seal around the wires at the connection. You need yellow (10-12AWG) for all connections I found. The Blue connectors (14-16 AWG) is just too small, even for the 1 and 2mm wire join, which approximately makes 13 AWG. You have to double over the end of the 2.0mm wire where it is on its own, but this is no big issue. The resistors I used are: HSC100R47J | TE Connectivity HSC100 Series Aluminium Housed Solder Lug Wire Wound Panel Mount Resistor, 470mΩ ±5% 100W | RS Components (rs-online.com) For the fan speed 1 circuit. This is a 0.47 Ohm resistor as I couldn't find a 0.4 Ohm. Makes little difference though. Don't know if this is the best brand, but it seemed to have a better temperature stability. And: HSA50R10J | TE Connectivity HSA50 Series Aluminium Housed Solder Lug Wire Wound Panel Mount Resistor, 100mΩ ±5% 50W | RS Components (rs-online.com) For fan speed 2. At the end the resistances were about 0.7 Ohm for fan speed 1, 0.2 Ohm for fan speed 2 and 0.1 Ohm for fan speed 3. Little bit higher accounting for the extra resistances for the other circuit components, and possibly rounding due to my multimeter only going to 1 decimal place accuracy, but within the right original range. You can also get the female connectors for the Comex slimline fans here: 2 Pin Plug Connector for Comex Fans from Merlin Motorsport For straight plug and play. These (and the spade connectors on the Passat plug) are open barrel types so you will need the correct crimper tool. To get the existing wires out of the Passat spade connectors is a pain but doable. For the 2 larger connectors (Speed 3 and Ground) I found it was possible to hammer a small screwdriver (jewellery/watch type) down the back of the wire to open it up. Make sure the spade is held securely in a vice to stop it bending, and use pliers to hold the neck of the connector as well. For the smaller two it should be possible to pull the wires out with a pair of pliers, starting with one or two threads in the middle of the bunch. With the wires out you can just about open the metal enough to get the new wire in. Because you are reusing these I would solder as well as re-crimping them. I re-crimped and the seemed to be holding OK, but soldered as well as a back up. I then knocked up a bracket to mount the resistors on. Here is the finished setup: Not my best wrapping! Thought I had ran out of the usual tape, and used the slightly furry stuff which doesn't look as neat, and then found the plain roll again. The panel for the resistors tucks around the side of the rad between the battery in the void behind the headlights, as my original plan of mounting the panel straight out clashed with the battery. This is it in the car: The big downside with this is that you can't get the battery out without removing the fans as the plug is in the way... Unfortunately I had no time to prototype this so I had to live with it for the time being. I think it theoretically should be possible to slide the whole shroud out in one go to get the battery out but it's a pain, and I will need to try and remedy this longer term. In hindsight I should have kept the panel coming out perpendicularly but flipped so that the resistors are mounted in the fan slipstream; I may try and do this, although will have to try and find another Passat plug! Anyway, I tested the three fan speeds with the battery prior to fitting and the all come on fine, and at different speeds (no reason why they shouldn't!) Since being on the car they do come on alright, although I can't really tell if all 3 speeds have been used yet. Not sure what temp speeds 2 and 3 come on and it's a bit hard to tell over the engine noise. Don't know if it was worth the hassle and expense yet, but the fans seem a bit quieter and on the initial slow (20-30mph), albeit, short driving runs the temp seems to have stayed about 90-100 degrees.
-
2 pointsNo disrespect for the poster but unfortunately a lot of people don't seem to be able to calculate. If someone wonders why I avoid Facebook. It's comments like this. Lots of people can build lots of parts, cheaper and better. Many people find a lot of parts too expensive. Lots of people talk a lot. Unfortunately, they never show better quality or a cheaper price. They want to drive an exclusive car for which there are no spare parts. They want the best quality. But they don't want to pay anything. That does not work. But, Iet me explain the 10th time. You think 600-700 € for a set of fog lights as good as new are too expensive? You think 800-900 € for a set of headlights as good as new are too expensive? Fog lights: A set of usable facelift fog lights with broken lenses, where it makes sense to renew them, costs around € 200. New lenses from VX are $ 175 + shipping + customs. Around € 220. Then comes the work: Remove 2x glasses and glue = 1.5h Repaint 2x housing = 1.0h Replace 2x reflectors = 80 € + 0.5h Build 2x new wiring harnesses = 1.0h Glue in new glasses twice = 0.5h Packing + writing an invoice + little things = 1.0h Then subtract 12% eBay fees from the price, subtract 3% PayPal fees and 16% VAT from the price. Headlights: A useful set of facelift headlights costs around € 400. 2 x polishing glasses = 6h Replace 2 x reflectors and recoat = 100 € + 0.5h Repair 2 x minor damage = 1.0h Packing + writing an invoice + little things = 1.0h Then subtract 12% eBay fees from the price, subtract 3% PayPal fees and 16% VAT from the price. Anyone who thinks the price is too high for this quality should perhaps buy a MK 2 or 3. The spare parts are cheap and available. I don't want to have these conversations anymore. My aim is not to sell as much as possible. My goal is to make the parts as good as possible. If the parts are too expensive for you, simply don't buy them. best regards Chris
-
2 pointsI wanna blob!!!!! Lol!!!
-
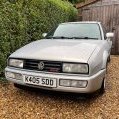
1 pointLooks a good one - best of luck with it My own is a K reg also
-
1 pointHi all, i thought it was high time i shared my G60 build with you . This car is now completed so the thread updates aren't in real time so its a copy and paste exercise for the most part but i will try to keep to thread updated in the future . Thanks for reading . Okay so back in 2020 i already had a G60 in black as a project bought on a bit of a whim and which needed quite a bit of work ! Always on the hunt for parts for it i had bought a few random parts off a uk ebay seller , by chance i spotted in one of his pictures the faintest outline of a what looked like a fairly complete car in red. enquired what the story with it and i turned out that this was the car he was breaking the parts for sale off !! Turns out he had owned the car since 2001 and had embarked on a semi refresh of the underside of the car not long after purchasing it ,the usual jobs ,subframe ,rear beam ,wishbones blasted and powdercoated ,new supsension etc. only it seems like he had bitten off more than he could chew ,along with a very small workspace ( see below )it just seemed to have gotten the better of him and he lost interest in it . Years later he starting selling of bits of the car gradually on ebay where i came across him. He was willing to sell off the remains of the car so a deal was done , i bought the whole lot sight unseen ,i was taking a bit of a chance on it but the cost of the new spare parts that came with it alone was worth the asking price.
-
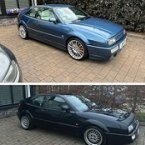
1 pointHello everyone Hope all is well. Back in the Corrado game just could not say no to this Kamei body kitted RE200 GTI 170 BHP Engineering car. Truly nutty car that was purchased new from GTI Engineering with lots of added extras . Very rare colour to Helios blue with a Kamei X1 body kit- what a mental spec ! Car dealer stamp on code sticker is GTI Engineering First registered 02.1990 - absolute no brainer with the historic tax only a few years away and have plenty of 16v parts shared with my Mk2 Golf. I use Peter James Insurance now - to add it onto my MK2 policy it only cost £55 and that includes rescue- now ladies and gents that is cheap motoring !
-
1 pointHad this week off work so got it out the garage, cleaned and waxed it ready. Planning to take it off SORN Monday so it’ll piss it down the next month!
-
1 pointheads up all - looms are ready & tested & can be sent out once the balance has been received by the maker 🙂
-
1 pointIs is on Classic parts, you had incorrect part nr, should be 535 827 761. Hinged fastener for Corrado Product no.: 535 827 761 In stock €27.99 prices excluding VAT, shipping costs and import fees Quantity Add to shopping cart Go to Product details Go to Delivery information
-
1 pointNot sure I really need to be cleaning my exhaust down pipe
-
1 pointWent for the 205/45/16s and I think worked out well , driving good no rubbing … thanks for the help guys 👍 including pic … it’s a bit dirty out there with the frost
-
1 pointThe way that this is grounded does not look factory to me. To double check if I am accurate or not, I would post to the VW Vortex as well because there are a lot of pretty active VW heads that are on that forum daily that could tell you in more detail if that is factory or not. But, I am 99% positive that is not factory. I will double check my Bentley today and see where all those grounds should be running to. I am almost positive a couple of those should be running to the valve cover as a grounding spot. My valve cover has grounds for the hall sender, the CO Pot, and the coolant temp sensor I believe that are attached to it. All of them are separate wires unlike how yours has been spliced into one.
-
1 pointThere was a short write up from Chris de Bono in the Autumn 1996 edition of Sprinter followed by the for sale advert in the Summer 1997 edition. I seemed to remember seeing photos in colour at the time but guess they must have been somewhere else. Dusty Mauve.pdf Campaian.pdf
-
1 pointYep, stage 1 is just like any other car, 2 is noticably loud and stage 3 is like a jet turbine taking off and will drain your battery flat in about 20 minutes - don't ask me how I know!
-
1 pointI’m sure Chris will reveal his method, but when I did this on my car, I used a wallpaper steamer with a nozzle attachment to soften the wax, and then wiped off with a cloth. I then used a degreaser and a cloth to remove the remainder. You can keep going with panel wipe if necessary, but I was happy to just reapply some fresh clear wax.
-
1 pointHi - a late 95 car should already have a VDO pump in it, as the Pierburg was only used for about 18 months for the early VRs. Your fuel gauge sender and float should just swap straight over on to a new VDO pump or swirl pot.
-
1 pointThanks, I got a cutting of a bumper and made a small patch to block the hole, i plastic welded it with a soldering iron from the back then filled the bumper. It was then re-sprayed. There are some pictures on page 3 👍
-
1 pointFinally some traction today.... New ECU installed and the car has fired up into life!! Due to the weather couldn't keep it running for long but there is life ...... a bit of white smoke which we will need to look into however we have progress... 😉
-
1 pointThanks Geri a great friend of mine on here - always supported my builds with positive comments. I will be hanging about for sure mate - sure will drop down what I get - its an open book right now. Cars that I enjoy looking at shows. Merc 190 e cosy Sl r129 sl60 pre merger amg sl r107 e46 m3 cab saab carlsson 900 turbo ( love these ) very rare car . 911 perhaps but i tend to sell them after a year in fear the engine pops - bloody chocolate cylinders. Might even have a look at a Jap car for the first time- maybe even an alpha . Audi s2 coupe Audo coupe 5 cylinder red 177 bhp. Golf rallye blue Mk7 club sport S. Will have to be a finished project though im done with the 2 years process and costs of a project - the cars and new owners are the winners- I want to be that new winner owner now ha - get in enjoy and then sell on for the same price a few years later.
-
1 pointThanks got mine today best quality loom available and a good price.
-
1 pointHey guys and gals, just want to say thanks to everyone who offered support on my project. It’s been a couple of years in the making, but finally completed everything last year! Literally everything has been replaced! Full respray, rebuilt 20vt, Ko3s turbo, stage 2, wiring loom by Dubnutz, all new belts, new cambelt, auxiliary, water pump, alternator, tensioner, battery, Brembo brakes (+G60 calipers), discs, pads, wheel bearings, abs pump, all wheel sensors, leather seats, new headlining, all sensors, knock, water, oil, air, aem AFR, new intercooler and pipework, hybrid shallow sump + new oil return pipe, full stainless power flow exhaust with track-slag down pipe, all fluids changed, new wheels, tyres, new windscreen and the list goes on!… really looking forward to catching up with likeminded enthusiasts this year and any corrado owners up for meeting up in the East Midlands for a convoy and a cruise feel free to link me up! cheers, Luke
-
1 pointJust to add... on the fuel pump relay, pin 85 connects to pin3 on connector G1 (the trigger signal) and in turn this goes to pin3 on the ECU. This trigger is a negative signal, so to test you need to put your 12v multi meter or your LED testers black probe on pin 3 of connector G1 and the your red probe to the switched live, you should also check ECU pin3 and a reading should only be available when your ignition key is turned. So pin3 at connector G1 or at ECU pin3 should NEVER be at +12
-
1 pointsteps 🤪
-
1 pointLate body g60 also only has one pump - and uses the early in tank vr 3 bar pierburg pump- same bracket as a vr for fuel filter. Fuel pressure regulator they are obsolete on a g60 though what a shit show. My guess is your electric plug/cabling on fuel pump or sender unit is wrong- the pump you have fitted is the single pump same as a VR or late G60 my car is the same.
-
1 pointIf the car runs when the relay is bridged, you defined to look at what switches the relay. And if you say there is a dodgy alarm/ immobiliser wiring then this is where I would be looking, and remove it. Make it all stock original and then you know what you are working with. Good luck 🤞
-
1 pointThere is a guy that has remade various parts, including the full rebuild sets. Pretty sure he’s only doing a certain amount of parts then they’ll be gone
-
1 pointBit of rust treatment. But I have pulled out some degraded sponge..
-
1 pointI saw some of your rust issues on Facebook , mine was very similar, sadly the underseal is now hiding the problems instead of preventing them 🤣 The fuel tank is an awkward beast, especially if it’s got a decent amount in it, definitely easier with 2 bodies
-
1 pointno m8 im not far from birmingham - i will ask the guy next time i see him for you
-
1 pointMoody - there are a few options available. I would say it's better to upgrade than try and find a working Corrado roof. My experiences to date - I bought a working corrado mechanism from a chap with the initals BR that was sold as working for £200. It broke on the second use. I wouldn't say it was the sellers fault but it's a 25+ year old bit of kit and certainly not worth £200. Don't do what I did - false economy. I then fitted a mk3 mecahansim with a Passat B4 moonroof. That combo works well - you can get the mech for about £45 (I use Leo GS the mk3 parts breaker on facebook - he is a great bloke and a moderator on a lot of groups). The passat moonroof can be picked up for around £50. I would sell mine if anyone wants it, it needs a new seal though. I wasn't a fan of the moonroof for my car. I prefered the stock tin panel. I got lucky and Chris F supplied me a bag of sunroof bits for a reasonable sum so I've got 3 corrado mechs built (2 x in car). I can't sell any of these though as I have 2 corrado's and need to keep it for spares. This is the best route to go - buy a broken mech and try and source a bag of bits (the bag of bits only cost me £50). I've seen somewhere someone has adapted the mk3 mech to work with the corrado inner panel. This is probably the best solution as the corrado mech is weak vs mk3. Mk3 mech out of the box will not auto slide the inner panel. I haven't looked into this with any detail yet.
-
1 pointNo worries glad to be of help 👍 You're only 21 and sorting out electrical issues fair play you're doing a great job there 👏 Si
-
1 pointI looked on the website and for you and could not see one in Spain. Maybe call them and ask for help. https://stockpiezasvw-audi.com/en/
-
1 pointI'd say don't bother testing, just replace it with a new one - that noise it's making in your video is not good.
-
1 pointYes I have many parts form a 2.0 A including the head +block + refurbished manifold + O2a gearbox with 16v gearing. upper and lower and many other parts . Engine came out of a Corrado a few weeks back and have a video of it running. I will send you an email with my contact details- based in the Midlands.
-
1 pointThat is correct. The grease is only applied after establishing good contact. I don’t have any experience with Liqui Moly 3140, but I like to practice no grease product on any electrical contact/mating surfaces. Sounds interesting, I’ll look into that product for future use.
-
1 pointFaulty crank sensor gives no spark and no fuel injected (dry plugs after cranking). try a different key?
-
1 pointThat's the feed line - comes from the tank to the pump, then to the filter and then to your fuel accumulator. There should also be a return line that goes straight back to the tank.
-
1 pointQuoted for truth. I think of the almost entirely positive community we had here.. then I look at some of the garbage people post on Facebook and on YouTube comments, etc.. it's like a different world!
-
1 pointAll, Just a word of warning to avoid this seller on eBay. I purchased a "Corrado" steering rack from them and when it arrived, turned out to be for a MK3 Golf. They are insisting it is the same but there are differences between them as many people know who are knowledgeable on Corrados. They are only offering to refund it if I pay both sets of postage and a 20% re-stocking fee, so I would get about £20 back from the £50 I spent on it! I am in touch with trading standard and am seeking legal advice through work. Someone pointed out that it is the same company who failed to return a gents Schrick off the forum : http://the-corrado.net/showthread.php?t=76610 I don’t like naming and shaming but feel that it is appropriate in this instance as they seem a fairly large supplier of Corrado used parts. Thanks, Andy
-
1 pointi just tried to down load it to a stick...that link has been removed......however in hd https://www.youtube.com/watch?v=WUOFMFKArl0 " Thank You very much indeed, loepan " ... I've just watched it and, like many others, I'm " chufti-ed " to bits !! and equally " Thank You very much too, kdub " for your really helpful gem of : AN EXCELLENT BIT OF SOFTWARE for grabbing youtube videos etc and allowing you to save them to your device. http://clipgrab.org Go to that link and select English as language. Then download the software (FREE). Now copy and paste the youtube address into the search bar and Grab Clip (Select mp4 Format). You will have in a few minutes the entire video saved to your hard drive for your viewing pleasure
-
1 pointif your switch is broken, and doesn't work properly, u can use early style sunroof switch, it is the same as Recaro switch, only difference in front of the switch, but i think u can swap it with front part of Recaro switch,
-
1 pointthere is a connector that goes into the dizzy, 3 wires, using a light, inspect the wiring and remove old tape, ive seen broken wires there on a couple of cars. also check the three colant temp wires beneath the dizzy they have a habit of breaking as well, its because of the heat and oil that crack the outer wire casing. if thats ok, you can check if the coil is getting a trigger signal from the dizzy at the coil pack connector. also check primary and secondary windings using a meter on the coil pack. let me know how you get on.
-
1 pointSounds like you've a sticky piston. Maybe the handbrake adjustment ? Worth checking them all.
-
1 pointI know mate, I'm not going to put myself out for 'maybes'. People can do basic maths and figure I dunno, perhaps a 10% discount on 10 sets, 15% on 20 sets and so on. So 10% off stands you at $400, x 1.23 for UK duty and VAT = £302. Shipping from the US and UK mainland on top. So if people decide ~ £350ish all in is going to be too much, they can duck out. Perhaps it's just a sign of the times. We sold over a 100 sets over two GBs last time! Anyway, I have asked Bill for pricing on 10, 20, 30 sets etc. And yep, I was also thinking it could be done through Stealth as they have the buying power and accounts already in place and can also include a mapping deal as you say!
-
1 pointWell once you've done it yourself, you'll know it's done correctly and will be 100% reliable.
-
1 pointa K&N type panel filter is all you need, the standard airbox is good for 180+ bhp, chopping holes in the airbox does nothing to improve the airflow and will just affect mpg on warm up and sap power on hot days. Removing the 'snorkel' tube at the front seems to help a little at very high revs, but otherwise I'd leave well alone, tempting though it may be to experiment :)
-
1 pointIs there not a plastic tab held down by a a plastic nut you need to do undo first? before lifting up the res. Located down the side of the power steering bottle I think