Leaderboard

.thumb.jpg.c28e860f2b35da39217cf8b96a7a5c73.jpg)

Popular Content
Showing content with the highest reputation since 02/05/2011 in all areas
-
3 pointsCheers, no green bulbs but they do flash a bit red. now fitted
-
2 pointsThere is a guide on vagdrivers for replacing the matrix without removing the dash: https://www.vagdrivers.net/threads/corrado-heater-matrix-replacement.19713/ Sent from my LE2123 using Tapatalk
-
2 pointsApologies all, I haven't managed to put the order in for the next batch yet, but hopefully will get onto that in the next couple of weeks.
-
2 pointsRight, it all works! You were right about this, I was going way overboard with 6mm wire, which wouldn't have fitted in all the connectors. i guess the original fan motor ran a much higher current. When I looked the actual ratings I found 1mm wire would be sufficient for fan speed 1. Anyway, this is what the finished wiring looked like: Which is to this wiring diagram: Essentially the same as the one at the top of the page but I have updated the wire thicknesses. Also I couldn't find Red/Green wire in 4mm so just used Red. I used this wire: Thin Wall Cable (autoelectricsupplies.co.uk) And these connectors to splice the wires: 108961-000 Raychem - Te Connectivity, Butt Splice, Yellow, DuraSeal Series | Farnell Which are Duraseal Yellow crimp butt connectors with heatshrink. These are nice because the heatshrink material gives a good seal around the wires at the connection. You need yellow (10-12AWG) for all connections I found. The Blue connectors (14-16 AWG) is just too small, even for the 1 and 2mm wire join, which approximately makes 13 AWG. You have to double over the end of the 2.0mm wire where it is on its own, but this is no big issue. The resistors I used are: HSC100R47J | TE Connectivity HSC100 Series Aluminium Housed Solder Lug Wire Wound Panel Mount Resistor, 470mΩ ±5% 100W | RS Components (rs-online.com) For the fan speed 1 circuit. This is a 0.47 Ohm resistor as I couldn't find a 0.4 Ohm. Makes little difference though. Don't know if this is the best brand, but it seemed to have a better temperature stability. And: HSA50R10J | TE Connectivity HSA50 Series Aluminium Housed Solder Lug Wire Wound Panel Mount Resistor, 100mΩ ±5% 50W | RS Components (rs-online.com) For fan speed 2. At the end the resistances were about 0.7 Ohm for fan speed 1, 0.2 Ohm for fan speed 2 and 0.1 Ohm for fan speed 3. Little bit higher accounting for the extra resistances for the other circuit components, and possibly rounding due to my multimeter only going to 1 decimal place accuracy, but within the right original range. You can also get the female connectors for the Comex slimline fans here: 2 Pin Plug Connector for Comex Fans from Merlin Motorsport For straight plug and play. These (and the spade connectors on the Passat plug) are open barrel types so you will need the correct crimper tool. To get the existing wires out of the Passat spade connectors is a pain but doable. For the 2 larger connectors (Speed 3 and Ground) I found it was possible to hammer a small screwdriver (jewellery/watch type) down the back of the wire to open it up. Make sure the spade is held securely in a vice to stop it bending, and use pliers to hold the neck of the connector as well. For the smaller two it should be possible to pull the wires out with a pair of pliers, starting with one or two threads in the middle of the bunch. With the wires out you can just about open the metal enough to get the new wire in. Because you are reusing these I would solder as well as re-crimping them. I re-crimped and the seemed to be holding OK, but soldered as well as a back up. I then knocked up a bracket to mount the resistors on. Here is the finished setup: Not my best wrapping! Thought I had ran out of the usual tape, and used the slightly furry stuff which doesn't look as neat, and then found the plain roll again. The panel for the resistors tucks around the side of the rad between the battery in the void behind the headlights, as my original plan of mounting the panel straight out clashed with the battery. This is it in the car: The big downside with this is that you can't get the battery out without removing the fans as the plug is in the way... Unfortunately I had no time to prototype this so I had to live with it for the time being. I think it theoretically should be possible to slide the whole shroud out in one go to get the battery out but it's a pain, and I will need to try and remedy this longer term. In hindsight I should have kept the panel coming out perpendicularly but flipped so that the resistors are mounted in the fan slipstream; I may try and do this, although will have to try and find another Passat plug! Anyway, I tested the three fan speeds with the battery prior to fitting and the all come on fine, and at different speeds (no reason why they shouldn't!) Since being on the car they do come on alright, although I can't really tell if all 3 speeds have been used yet. Not sure what temp speeds 2 and 3 come on and it's a bit hard to tell over the engine noise. Don't know if it was worth the hassle and expense yet, but the fans seem a bit quieter and on the initial slow (20-30mph), albeit, short driving runs the temp seems to have stayed about 90-100 degrees.
-
2 pointsNo disrespect for the poster but unfortunately a lot of people don't seem to be able to calculate. If someone wonders why I avoid Facebook. It's comments like this. Lots of people can build lots of parts, cheaper and better. Many people find a lot of parts too expensive. Lots of people talk a lot. Unfortunately, they never show better quality or a cheaper price. They want to drive an exclusive car for which there are no spare parts. They want the best quality. But they don't want to pay anything. That does not work. But, Iet me explain the 10th time. You think 600-700 € for a set of fog lights as good as new are too expensive? You think 800-900 € for a set of headlights as good as new are too expensive? Fog lights: A set of usable facelift fog lights with broken lenses, where it makes sense to renew them, costs around € 200. New lenses from VX are $ 175 + shipping + customs. Around € 220. Then comes the work: Remove 2x glasses and glue = 1.5h Repaint 2x housing = 1.0h Replace 2x reflectors = 80 € + 0.5h Build 2x new wiring harnesses = 1.0h Glue in new glasses twice = 0.5h Packing + writing an invoice + little things = 1.0h Then subtract 12% eBay fees from the price, subtract 3% PayPal fees and 16% VAT from the price. Headlights: A useful set of facelift headlights costs around € 400. 2 x polishing glasses = 6h Replace 2 x reflectors and recoat = 100 € + 0.5h Repair 2 x minor damage = 1.0h Packing + writing an invoice + little things = 1.0h Then subtract 12% eBay fees from the price, subtract 3% PayPal fees and 16% VAT from the price. Anyone who thinks the price is too high for this quality should perhaps buy a MK 2 or 3. The spare parts are cheap and available. I don't want to have these conversations anymore. My aim is not to sell as much as possible. My goal is to make the parts as good as possible. If the parts are too expensive for you, simply don't buy them. best regards Chris
-
2 pointsI wanna blob!!!!! Lol!!!
-
1 pointheads up all - looms are ready & tested & can be sent out once the balance has been received by the maker 🙂
-
1 pointGood luck Dougie. Mine is booked in end of the month for a proper alignment with rear shims and camberbolts and changing clutch master and slave. Horrible to drive at the moment due to bad alignment.
-
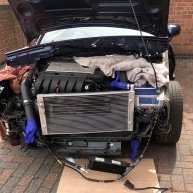
1 pointSo finally got the engine back in the car, pretty chuffed with the outcome.
-
1 pointhappy to report that after 14 months the VR6 is finally back home with essentially a brand new underside & nut & bolt restoration plus the Autostrada Modena's are on & looking mighty fine if i do say so myself lol pity you cant see any of the work that has just cost me a small fortune (over double what i had guessed at) but the first few journeys out have made me realise quite how much i had missed this car! the ride is sublime & the refreshed KW's feel great & the noise - nothing quite like it spent most of the weekend cleaning & resinstalling the interior, only sub & door cards left a quick pic from a gloomy drive today
-
1 pointHell yea! Keep us updated. Can't wait to see if it works
-
1 pointCheck the blue/white wire in the radio loom - it is probably connected wrong or earthing against something randomly. It should only be connected if you have a radio that support speed dependent volume control (GALA) and not many do. Otherwise, the spoiler control module may be at fault, and worth swapping out with one that is known to work.
-
1 pointTo be able to do the job it was imperative that I was able to deal with Tradition which I have not been able to do since just over half the people who voted said leave…. 🙈. Eventually after jumping through many hoops of fire I have been able to get an account and some of the prices are less than what they were when available directly through VAG UK although the carriage charges are outrageous BUT we had no choice. I have another €500 of parts in my basket but my customer has bought himself another Audi to practice his DIY skills and he may need a few parts for that.
-
1 pointI’ve no experience of this, I read the above as.... boxster “S” Rear will fit over 25mm disks rears need not to be reversed - Rear right fits front right - the nipple will remain at the top to expel air in the system when you bleed them (using front callipers you’d need to swap left to right to have the nipple at the top? Ie reversed). thats my take on what’s written in your quote, don’t shoot me if I’m wrong....
-
1 pointThanks for all your kind words. Yes totally agree one would be crazy to think if you nut and bolt you will get your money back- I expect if these two corrado to out live many of us on here now if garaged and taken care of- all the salt and daily driving is that kills them- in fact renovation can be pulling back the clock of 25 years use . Im 100 percent moving onto buying a car restored or in low mileage - summer salt free car- just makes easier ownership and to come out of them- I just like the buzz of trying new cars so need to buy my cars renovation free in the future- easy to sell on and use straight away and not be double figures out of of pocket if i sell. I might well get a 16v runabout in a couple of years and enjoy if for its worts and have a comprehensive brake down cover. I will still be about though guys dont worry.
-
1 pointThat is shame but at least it sounds like you'll get closure on that car. Pleased to see you're still going to get one and I will keep an eye I've been through pain of resto and bodywork etc and would recommend avoiding all that hassle and buying a good one straight off. Im not normally someone to worry about mileage (155k on mine) but concede in the UK market people would sooner by a ropey 100k car over a well sorted to 155k, so if I were doing it again I'd be aiming for sub 120k miles, great body and make sure it had leather (cost me a £grand to make that happen which on top of bodywork and engine work makes for an expensive game and a car that will never be worth its cost..). The engine can be sorted at say Stealth racing but the rest of the mechanicals (apart from ABS) is boggo mk3 golf so anyone can do it. All the best and keep us posted on outcomes of the old car. Sent from my SM-G960F using Tapatalk
-
1 pointNo worries bud glad to help Sent from my iPhone using Tapatalk
-
1 pointThanks got mine today best quality loom available and a good price.
-
1 pointCongratulations on the purchase - saw this car and went for a good price considering the work carried out and the recaro seats and alloys. Aftermarket Slimline fans - Shaun is the man for them on here- sounds to me likely to be set up wrong in the first place- if you search cooling guide on here its very informative - you can test by bridging all 3 speed settings. The fan control unit is a common failure point as well due to age . Basics first are to bridge the fan switch sensor (one in radiator) plug for settings 1 ignition off- setting 2 bridge same plug but different pins ignition on - settings 3 bridge the the black coolant sensor plug ignition on that is in a row next to the other 2 coolant sensors .
-
1 pointA few more pictures of the interior current condition....
-
1 pointLuis, I owned the car before C488ADO purchased it from me, it was an auto at the time but as far as Im aware never had porsche seats, It had grey recaros when I had it and i owned it for several years and used to show it on the cars stands at the VW shows im trying to remember when i sold it I definately owned it in 2008 as I have a photo of it at the house that I lived in then, I left there in 2010 and dont think I owned the car at that point, it was a very reluctant sale, a change of job meant I needed something newer and more reliable as I was going to see clients I searched for a long time before buying the car as she had to be a 95my blackberry vr6 the photo I have was taken 8th november 2008 showing the car 😉 also have a photo of her on the club stand at the tatton park show 4th jan 2009
-
1 pointNot the best quality but hopefully you can see how they clip on.
-
1 pointIt's CCK068: HEL Performance Braided FULL LENGTH Clutch Line Volkswagen Corrado (1989-1995) | eBay HEL Braided Clutch Line Hose VW Corrado Master Cylinder Slave 89-95 CCK068 Y3305 for sale online | eBay Volkswagen Corrado All Engines (1989-1995) Flexible Braided Master Cylinder to Slave Cylinder Clutch Line | Corrado | Volkswagen | Clutch Lines | Braided Lines | Car (helperformance.com) Oddly, didn't find it on their website when I first looked, but must just have missed it. Only difference from the standard fit is that I don't think it will clip into the first clip after the master cylinder as that will put too much of a bend in the line. Should be able to get the grommet off the original and slide it on so that it clips into the bracket welded to the side of the chassis near the battery tray. I'll take a photo when it's on the car to illustrate.
-
1 pointI use AMOS who is unpopular on here but he always has about 8 cars and years of supplies in his garage. Last time I went he had a nugget with a usa tailgate and third brake light. I would say he has the most parts in the UK- although I wouldn't take my car to be worked there as only let Vince work on my car.
-
1 pointI deleted an obvious spam attempt this morning. Watch out because the spammers will try to brute a moderator account to approve the post if they can - I had three attempts and lock outs over night. Maybe a good time to change your moderator passwords and make sure they are of a decent strength and complexity.
-
1 pointI have my Red 92 G60 Mk2 tornado 16v - my first resto - has sat for 2 years now and in need of a refresh Mk2 Pearl Grey 16v - currently rebuilding the engine (trying) and is currently a bare shell with bits of welding to be carried out Blue Corrado VR6 - which you put me onto - future project And my family think i am NUTS when it comes to these cars
-
1 pointLooks nice, HNV is a Bedford / Milton Keynes Reg so maybe a press car or registered to VW head office? Other than that I don't think I've seen it before? I can't remember the reg of my own cars let alone anybody elses lol
-
1 pointSomething wrong there then, I’d put a proper fuse in and see if there is power to the switch. if the switch is goosed you can get one of these mk3 controllers, the switch is basically the same just upside down on the other side. I used one to fix mine. https://www.heritagepartscentre.com/uk/1h0820045c-fresh-air-and-heater-controls.html
-
1 pointCorrado VR6 Storm in Mystic Blue. Car was bought from an enthusiast, I found it after 2 years of searching. To go over the car itself : Standard parts : Standard Storm parts, Mystic Blue paint, Black Leather interior, Storm detailing, BBS Solitaire wheels, Steel kickplates.... ALSO and not part of the standard extra's the dealer option Air Con, which is still in good working order. Done before I bought it : AMD work done within 2 years of it being bought, still produces 10-15hp more than standard, checked with Stealth rolling road a few years back. Silicon hoses where needed. Schrick Inlet manifold. Koni Suspension. Alpine head unit. Performance HT leads. Corrado Storm mats. And what I have added : Headlamp loom upgrade. Front and rear brake upgrade - front to 288mm and rear to MK4. Heater Control illumination. SWG Scuttle panel. Steering wheel refurbished. Replaced alarm with Cat 1 as previous alarm was malfunctioning. Chains and clutch done some 40k miles previous. Gearbox rebuild at approx 140k miles. Bare metal respray and new windscreen around 155k miles. New Bosch Battery. The car has a full service history having covered some 177,358 miles, I have 2 large binders full of history. Rear Spoiler works without a problem- both manual and automatically, Sunroof works sliding and tilt, although internal panel does not go up with tilt. Wing Mirrors work without a problem. Car drives and accelerates without issue. Leather interior in good condition considering age. Only draw backs are the heater that does not work on '2' which is a copper connection issue, a new heater control module can be sourced from German Heritage. Internal sunroof panel does not lift on tilt. Repaired rip in bottom rear of front passenger seat which I inherited from previous owner, never caused an issue, size of about 50p. MOT'd until April 2021. I have some extra parts as well for this that could be offered to the purchaser at a greatly reduced price. It breaks my heart to sell this but I am in a position that it needs to go, I will NOT accept silly money and can hang onto it as long as is necessary to get the right price. I think this is a very rare beast, not just because its the best Storm colour combination - Mystic Blue with Black Leather but also because of the Schrick manifold and the Air Con. Don't miss out... Offers over £7250. NO offers from outside UK will be accepted, all monies paid whether cash/cheque/bankers draft/Paypal will need to be processed by my Bank before the car is released. Car is advertised elsewhere so I reserve the right to withdraw this advert at any time. Buyer to arrange collection upon payment clearance.
-
1 pointLooks a great example, well done. Be careful with the sunroof. A mk3 golf unit swaps straight in. Do you know if the mechanism is working fine? If it is faulty and you wind it back electrically it could damage the sunroof panel.... perhaps try doing it manually first using the Allen key at the sunroof motor. Fingers crossed that it is ok, preventative maintenance, lube the runner channels. Even better, take the lot out, strip it down, clean it, then lube it. Big job but worth it in the long term. Too many are broken out there and no spares are available Great car 👍
-
1 pointThanks and your right, you know how special they are when the lorry driver who comes to pick it up is nearly in tears when he sees it, then spends 20 mins telling you what a brilliant car they are. Normally his fist pick up's go on the top deck but he said they can get damaged by trees so he was going to reserve that spot for all modern boring crap (his words) he was picking up next, didn't want the Corrado to get damaged. ( nice gesture but i think your too late mate).
-
1 pointHello there, yes you can fit Corrado VR6 70ltr fuel tank into Corrado's with 4 cyl engine's and vice versa, the early Corrado's had the 55ltr fuel tank, then in 1992 the tank volume was increased to 70ltr. The problem you're going to have is the fuel pressure, as the 16v as you already know has two fuel pumps, low pressure lift pump in tank roughly 3 bar of pressure, then high pressure fuel pump under car in swirl pot, which pumps at 5.2 to 5.6bar for KR 16v or 6.1 to 6.6 bar for 9A 16v, the 16v injection system is multipoint but is mechanical injection, final fuel delivery is via fuel distributor, which is controlled by fuel differential pressure governor/regulator, if the high pressure fuel pump doesn't deliver pressure as stated above, then the fuel injectors won't open as they need the correct specified pressure range. The VR6 injection system including the 2.0 16v ABF only have the one fuel pump in fuel tank, pump pressure is roughly between 3 and 4 bar, this system again is multipoint injection but has electrically operated injectors, that receive signals via ECU. I think you can possibly fit a MK3 Golf fuel tank into a MK2 Golf, but I've read on other forums the filler neck doesn't quite line up fully with fuel flap opening, but then others have said they fit fine, so regarding MK3 Golf tank into Corrado yes it may well be possible but how well it'll fit I'm not sure. But like I say you'll still need the high pressure fuel pump under car for your K-jet 16v injectors, unless you're able to fit high pressure pump in tank. MK3 Golf with VR6 (AAA) and 2.0 16v (ABF) I think use same fuel tank as the ABF fuel pump is very similar to VR6. Corrado fuel tank Part number 535 201 075H Length 910mm Width 630mm Height 620mm 55 litre tank with narrow fuel neck 22mm for unleaded petrol From 1988/89 to 1992 (weight 6 kg) Corrado fuel tank Part number 535 201 075AB / 535 201 075AE Length 950mm Width 630mm Height 615mm 70 litre tank with narrow fuel neck 22mm for unleaded petrol. From 1992/93 to 1995/96 (weight 9.5 kg) Hope this helps Si
-
1 pointBeen tinting rear lights
-
1 pointYeah I do. I love cleaning my balls and then whacking them really hard.
-
1 pointCongratulations on the prize. It is a great show, have attended the last couple of years but couldn't make today. Shame as the weather was great..
-
1 pointThe car looked absloutley stunning all weekend. Well deserved, unfortunatley I never got the chance to speak to you
-
1 pointAwesome. Payment and PM sent!
-
1 pointCheers Much appreciated.
-
1 pointYou're welcome and yes, I forgot the dash grills will come out by prising a flat head screwdriver underneath (carefully!)
-
1 pointDid mine recently in light gloss grey. They won't go rusty, keep themselves clean, and look almost original (they don't scream at you that they've been painted- so probably not what you had in mind).
-
1 pointWelcome, nice Storm Grey, bit of info here if you havn't already seen it >> http://the-corrado.net/showthread.php?84779-Storm-Grey-VR6-with-B12
-
1 pointIt might be useful to remove the loose connector (again!), check for any arcing and perhaps some pitting of either the connector spades or the panel spades. Give them a clean to remove any oxidation, and refit.
-
1 pointI can do that. My german is very well.
-
1 pointHello there, on some vehicles once the battery is disconnected you can some times lose the basic ECU settings, if the battery has been disconnected for 20 to 30 mins or more, but this normally relates to vehicles that have the full multi point fuel injection system, where the injectors are linked directly in to the ECU as well as most of the other engine sensors, on these such vehicles you'd have to use a diagnostic scanner to remove any fault codes from the ECU memory chip, and drive the car for 30 to 40 mins so the ECU can collect fresh data from all engine sensors, and log all basic related settings back in it's memory. On some of the new vehicles this can happen if the battery is disconnected for long periods. But on your Corrado 2.0 16v as it's got the old style fuel metering head like on the later MK1 Golfs and MK2 Golf GTI, it's basically mechanical injection as it has the fuel distributor, fuel governor and air flow sensor all in the one metering head unit, so this set up doesn't really lose it's basic ECU settings unlike the more advanced ECU system like on most modern cars including the VR6 but as you've said it only took 5 mins to replace the battery you should be ok, from what you've said it does sound like one of the circuits has had a power surge or something for a split second, which can happen when you replace a battery. You should always remove the black negative (EARTH) lead first, and it should always be the last lead to fit back to the battery terminal. The red live (POWER) lead is always the second one to remove from the battery, and should be the first one to fit back to battery terminal before the earth lead. If you don't fit and remove the battery terminal leads as above then you can course a small power surge, or in some cases it can course a short, it can still happen if you do use the correct procedure but it's very rare. . Plus you've said that you have to apply full throttle to start your Corrado up from stone cold, this again is a classic symptom of over fueling. Full throttle down to assist starting is a symptom of a lack of fuel / too much fuel / very weak spark / very low compression. But like I say in your case as your Corrado starts fine when it's warm / hot, and is difficult to start from cold it'll be too much fuel meaning the fuel to air ratio, will be out so the engine will stall when cold or idle very lumpy until it's up to temp. It does sound as though the Coolant temp switch has died or is on the weak side, this can affect the car starting from cold or even when the engine is warm, it really depends on how the coolant temp switch has burnt out. They are normally white or blue in colour and have a 2 pin plug on the Corrado 2.0 16v The other thing it could be is the Lambda sensor, this detects any un-burnt fuel deposits with in exhaust waste fumes, but normally you'll have erratic idling and can have highish fuel economy complete with engine being under powered slightly, plus you might hear the odd popping sound from the exhaust tail pipe due to the extra fuel being used. These normally on the 2.0 16v have a black 4 pin plug with a separate earth wire. Most OEM Lambda's are Bosch ones, cost is around £58.00 to £78.00 off Ebay Some times the cold start injector can stick open which floods the cylinders with fuel, again coursing bad cold starting. This is normally linked into the coolant temp switch circuit, so once the engine warms up slightly the coolant temp switch, should then tell the ECU to turn off the cold start program. Secondhand these are around £25.00 to £38.00 off Ebay, and new from VW Main Dealer they could be close to £100.00 if not more, that's if they still stock them, if they don't then try VW Heritage. This is the part number for the 1.8 16v cold start valve ( 026 906 171A ) it might even be the same for the 2.0 16v. When testing the cold start valve / injector you can remove the 2 pin connector plug and see if it effects it's running on start up, or you can remove the cold start valve from out of the inlet manifold and see if it is switching off correctly, but if you do remove the cold start valve it could rip / damage the gasket. You can do a similar thing as above and remove the connector plug off the Lambda sensor or coolant temp switch, again just to see if it makes a difference or not to the engines cold start up. This is what some of the Forum members have done just to rule out each possible error from some of the sensors in question, that relate to this cold start up problem. When starting your Corrado 2.0 16v from cold it'll idle at around 1150 RPM for 3 to 5 mins in really cold winter weather, and around 1 to 2 mins in mild weather and even less in the summer weather. Once the cold start program has switched off, your engine should then idle at 850 RPM. I've got a spare coolant temp switch if you want it, it still works and has done around 75,000 miles. The part number is ( V026 906 161 ) this is a 2 pin and has a 10mm diameter thread with 1mm thread pitch complete with washer. I don't want any money for it you can have it F O C, if you want it and if that is the problem with your current one. Basically the same as this one on Ebay. http://www.ebay.co.uk/itm/261233673855?ru=http%3A%2F%2Fwww.ebay.co.uk%2Fsch%2Fi.html%3F_sacat%3D0%26_from%3DR40%26_nkw%3D261233673855%26_rdc%3D1 Hope this helps. Si
-
1 pointa K&N type panel filter is all you need, the standard airbox is good for 180+ bhp, chopping holes in the airbox does nothing to improve the airflow and will just affect mpg on warm up and sap power on hot days. Removing the 'snorkel' tube at the front seems to help a little at very high revs, but otherwise I'd leave well alone, tempting though it may be to experiment :)
-
1 pointAluminium shifts heat better than steel too, so oil temp should be a little lower. Shame it's not finned!
-
1 pointHi mate. As for the check sum I think there is 2 different methods. As follows: If you have an ECU with an immobiliser, you cannot change the value at the checksum location or the car will just run for 2 seconds and cut out. What I did was change the values just above the checksum to make it match, originally the unused memory above the checksum are all 02's. As I put bigger injectors in I had reduced allot of the values which meant I only had to add the difference, therefore this only meant changing a few 8bit values. In my immobilised ecu the checksum is at location 0xEF00. The principal of the check sum is that it is simply a 16bit value that is the accumulated total of all the 8bit values before it. PM me your email and I'll send you the XDF that I have modified to calculate the checksum, its for the CP ecu which will be different but the calculation principal will be that same as long as you can locate the checksum and the range it covers. To view the XDF info go to XDF->view/edit XDF header info, click on the "checksum tab" and then click 'Edit Selected' As for the un-immobilised ECU's I've couldn't say for sure but I think you can just change the checksum value so it's simply a matter of locating it. On the AG ECU I remapped I could never locate the checksum so never bothered with it, it just gives a VAG-COM error but runs as normal.
-
1 pointHere's the quick vid I made last night just driving up the road and back basically. It's upside down as mounted it so I could press the buttons etc. As you can see, the quality doesn't seem as good, it doesn't handle exposure as well and the sound is crap! http://www.youtube.com/watch?v=Kl9Vv2d6LUk
-
1 point
-
1 pointThe car is a 1995 VR6 I've done some searching around on the forum and learnt a lot - but i just want to get some views before i invest in a new fuel pump. Here's a detailed description of the issue - some of these points may be red herrings: - Unfortunately allowed the fuel level to get very low then filled up with a full tank of BP unleaded [normally i only use optimax] - 11 miles later whilst driving on the motorway at about 70mph the car started to lose power, then was jerking around like a kangaroo! Pulled the car on to the hard shoulder - turned it off and on again and then it seemed better. - Drove another 100 miles that day, mainly motorway driving with slight hesitation esp when starting in first gear and also with low revs in second gear - car pulled and ran fine for most of the journey. - My friend who was in the car during all this said he'd had the same issue on his golf 16v and injector cleaner had helped. - Next day replaced the fuel filter and tried again - still serious hesitation to the point of almost stalling when pulling away. Once above 2500rpm power is good. - Then added injector cleaner which made about a 50% improvement with this issue - hesitation felt far less. But still present - also at high revs (4000/4500rpm) in 4/5th hesitation is felt. I think its the crap at the bottom of the fuel tank getting in to the fuel system. I had hoped the cheaper options of new fuel filter and injector cleaner would cure it - but its still there. Would adding injector cleaner again to the next tank full be advisable? Or is it bad to use it too often? Does it sound like the fuel pump is on its way out? Is there anyway to diagnose this before i pay for the fuel pump to be replaced? Could it be something else such as spark plugs? Any help appreciated :roll: I should add that the idle is very stable and smooth - it idles happily at about 600rpm and also the car fires first time without issue.