Leaderboard

.thumb.jpg.c28e860f2b35da39217cf8b96a7a5c73.jpg)

Popular Content
Showing content with the highest reputation since 02/05/2011 in Posts
-
3 pointsCheers, no green bulbs but they do flash a bit red. now fitted
-
2 pointsThere is a guide on vagdrivers for replacing the matrix without removing the dash: https://www.vagdrivers.net/threads/corrado-heater-matrix-replacement.19713/ Sent from my LE2123 using Tapatalk
-
2 pointsApologies all, I haven't managed to put the order in for the next batch yet, but hopefully will get onto that in the next couple of weeks.
-
2 pointsRight, it all works! You were right about this, I was going way overboard with 6mm wire, which wouldn't have fitted in all the connectors. i guess the original fan motor ran a much higher current. When I looked the actual ratings I found 1mm wire would be sufficient for fan speed 1. Anyway, this is what the finished wiring looked like: Which is to this wiring diagram: Essentially the same as the one at the top of the page but I have updated the wire thicknesses. Also I couldn't find Red/Green wire in 4mm so just used Red. I used this wire: Thin Wall Cable (autoelectricsupplies.co.uk) And these connectors to splice the wires: 108961-000 Raychem - Te Connectivity, Butt Splice, Yellow, DuraSeal Series | Farnell Which are Duraseal Yellow crimp butt connectors with heatshrink. These are nice because the heatshrink material gives a good seal around the wires at the connection. You need yellow (10-12AWG) for all connections I found. The Blue connectors (14-16 AWG) is just too small, even for the 1 and 2mm wire join, which approximately makes 13 AWG. You have to double over the end of the 2.0mm wire where it is on its own, but this is no big issue. The resistors I used are: HSC100R47J | TE Connectivity HSC100 Series Aluminium Housed Solder Lug Wire Wound Panel Mount Resistor, 470mΩ ±5% 100W | RS Components (rs-online.com) For the fan speed 1 circuit. This is a 0.47 Ohm resistor as I couldn't find a 0.4 Ohm. Makes little difference though. Don't know if this is the best brand, but it seemed to have a better temperature stability. And: HSA50R10J | TE Connectivity HSA50 Series Aluminium Housed Solder Lug Wire Wound Panel Mount Resistor, 100mΩ ±5% 50W | RS Components (rs-online.com) For fan speed 2. At the end the resistances were about 0.7 Ohm for fan speed 1, 0.2 Ohm for fan speed 2 and 0.1 Ohm for fan speed 3. Little bit higher accounting for the extra resistances for the other circuit components, and possibly rounding due to my multimeter only going to 1 decimal place accuracy, but within the right original range. You can also get the female connectors for the Comex slimline fans here: 2 Pin Plug Connector for Comex Fans from Merlin Motorsport For straight plug and play. These (and the spade connectors on the Passat plug) are open barrel types so you will need the correct crimper tool. To get the existing wires out of the Passat spade connectors is a pain but doable. For the 2 larger connectors (Speed 3 and Ground) I found it was possible to hammer a small screwdriver (jewellery/watch type) down the back of the wire to open it up. Make sure the spade is held securely in a vice to stop it bending, and use pliers to hold the neck of the connector as well. For the smaller two it should be possible to pull the wires out with a pair of pliers, starting with one or two threads in the middle of the bunch. With the wires out you can just about open the metal enough to get the new wire in. Because you are reusing these I would solder as well as re-crimping them. I re-crimped and the seemed to be holding OK, but soldered as well as a back up. I then knocked up a bracket to mount the resistors on. Here is the finished setup: Not my best wrapping! Thought I had ran out of the usual tape, and used the slightly furry stuff which doesn't look as neat, and then found the plain roll again. The panel for the resistors tucks around the side of the rad between the battery in the void behind the headlights, as my original plan of mounting the panel straight out clashed with the battery. This is it in the car: The big downside with this is that you can't get the battery out without removing the fans as the plug is in the way... Unfortunately I had no time to prototype this so I had to live with it for the time being. I think it theoretically should be possible to slide the whole shroud out in one go to get the battery out but it's a pain, and I will need to try and remedy this longer term. In hindsight I should have kept the panel coming out perpendicularly but flipped so that the resistors are mounted in the fan slipstream; I may try and do this, although will have to try and find another Passat plug! Anyway, I tested the three fan speeds with the battery prior to fitting and the all come on fine, and at different speeds (no reason why they shouldn't!) Since being on the car they do come on alright, although I can't really tell if all 3 speeds have been used yet. Not sure what temp speeds 2 and 3 come on and it's a bit hard to tell over the engine noise. Don't know if it was worth the hassle and expense yet, but the fans seem a bit quieter and on the initial slow (20-30mph), albeit, short driving runs the temp seems to have stayed about 90-100 degrees.
-
2 pointsNo disrespect for the poster but unfortunately a lot of people don't seem to be able to calculate. If someone wonders why I avoid Facebook. It's comments like this. Lots of people can build lots of parts, cheaper and better. Many people find a lot of parts too expensive. Lots of people talk a lot. Unfortunately, they never show better quality or a cheaper price. They want to drive an exclusive car for which there are no spare parts. They want the best quality. But they don't want to pay anything. That does not work. But, Iet me explain the 10th time. You think 600-700 € for a set of fog lights as good as new are too expensive? You think 800-900 € for a set of headlights as good as new are too expensive? Fog lights: A set of usable facelift fog lights with broken lenses, where it makes sense to renew them, costs around € 200. New lenses from VX are $ 175 + shipping + customs. Around € 220. Then comes the work: Remove 2x glasses and glue = 1.5h Repaint 2x housing = 1.0h Replace 2x reflectors = 80 € + 0.5h Build 2x new wiring harnesses = 1.0h Glue in new glasses twice = 0.5h Packing + writing an invoice + little things = 1.0h Then subtract 12% eBay fees from the price, subtract 3% PayPal fees and 16% VAT from the price. Headlights: A useful set of facelift headlights costs around € 400. 2 x polishing glasses = 6h Replace 2 x reflectors and recoat = 100 € + 0.5h Repair 2 x minor damage = 1.0h Packing + writing an invoice + little things = 1.0h Then subtract 12% eBay fees from the price, subtract 3% PayPal fees and 16% VAT from the price. Anyone who thinks the price is too high for this quality should perhaps buy a MK 2 or 3. The spare parts are cheap and available. I don't want to have these conversations anymore. My aim is not to sell as much as possible. My goal is to make the parts as good as possible. If the parts are too expensive for you, simply don't buy them. best regards Chris
-
2 pointsI wanna blob!!!!! Lol!!!
-
1 pointApologies that I can't really help with having the 16v, but. Have you looked in the WIKI at cooling, as i recall that mentions the sensors. I think the best investment with any corrado is the Bentley manual. Some people have a pdf version floating around
-
1 pointFair play for keeping it all this time. mk3 abf 16v is what they should have put in place of the 2.0 16v 9a unit. Sounds great, keep us updated.
-
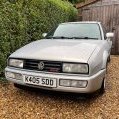
1 pointHello Everyone, A long standing school friend of mine has owned a VR6 for many years and I always loved the sound of the engine. Late last year I decided to take the plunge myself and I am now the owner of a VR6 Storm - Mystic Blue. Since there is a Corrado Forum sticker on the wondow, I suspect there are some members of the Forum who might recognise the car? The engine pulls really well but, unsurprisingly, the car has a number of issues that need sorting out and the knowledge on this Forum is going to be a very valuable resource! Although I have done a lot of my own mechanics over the years I currently only have a single garage which is a bit too tight for working on the car... so my first question to the Forum is does anyone know of a garage/mechanic who know the Corrado located in Suffolk or Essex (I live near Ipswich). If not I suppose I will have to make use of the Summer weather to do some jobs outside (at least I have plent of space on the drive !) My second question is regarding the engine started getting quite hot this week. When I checked the coolant level it was a tiny bit below the minimum level, but topping it up has made no difference. The strange thing is when I switch the ignition off the radiator fans start up, but when I switch the ignition on or start the car the fans are no longer running. Wonder if this is a common/known issue? However since it is getting hot even when crusing in top gear at 60 when I assumne the fans should not be needed would I be righ in suspecting the thermostat is not openeing fully? This VR6 is by no means concours but it is in my opinion in too good condition to break so I am determined to fix the mechanical issues first and then sort out the paintwork. I look forward to getting to know everyone Pete
-
1 pointTo be able to do the job it was imperative that I was able to deal with Tradition which I have not been able to do since just over half the people who voted said leave…. 🙈. Eventually after jumping through many hoops of fire I have been able to get an account and some of the prices are less than what they were when available directly through VAG UK although the carriage charges are outrageous BUT we had no choice. I have another €500 of parts in my basket but my customer has bought himself another Audi to practice his DIY skills and he may need a few parts for that.
-
1 pointUpdate, as I would have had to remove my "NOS", from about 2006 VDO Pump I mentioned I installed 18+ months ago to replace the fuel hoses (which I did change at the time , but stupid me, used the wrong hose, needs to be Submersible type, which I have now got Cohline 2190), it was just as well I did. The couple of small cracks noticed before install had spread like cancer, and given time probably the whole top cap would have broken apart, only the swirlpot top, where the return nozzle is affected, all the rest is fine, so its probably a different crappy plastic. See attached pictures, to me this evidence that the VOO NOS items, are probably not worth the risk, as even if the cracks are not there to start with, they could start sometime later. The Pump itself is ok, I have taken the unit apart completely to clean the filters, I obviously need to remove the old fuel (car has not been driven in 10+ years, has been started many times, but always on a low tank, and the fuel is now pretty horrible.! I may buy the JP Pump, and see if i can swap my VDO Pump into the JP casing, I would then have a spare pump.
-
1 pointJust checked, no markings on the body but I've no idea if it is the original, car has 133k miles.
-
1 pointThanks for all your kind words. Yes totally agree one would be crazy to think if you nut and bolt you will get your money back- I expect if these two corrado to out live many of us on here now if garaged and taken care of- all the salt and daily driving is that kills them- in fact renovation can be pulling back the clock of 25 years use . Im 100 percent moving onto buying a car restored or in low mileage - summer salt free car- just makes easier ownership and to come out of them- I just like the buzz of trying new cars so need to buy my cars renovation free in the future- easy to sell on and use straight away and not be double figures out of of pocket if i sell. I might well get a 16v runabout in a couple of years and enjoy if for its worts and have a comprehensive brake down cover. I will still be about though guys dont worry.
-
1 pointThanks to all of you for the help, really appreciate it. So.... I felt like to go to the bottom of this I had to do something I promised myself not to do again after replacing the heater matrix... I only had to remove a few trims though this time and got a access to it. Replaced it with the old one and got all 4 speeds working again! So that new one must be defective I guess. Case closed, up to the next ha haa. Cheers
-
1 pointYou’d be a fool to sell that….
-
1 pointI thought that might be yours that went up this weekend. It’s easier said than done, but if mines sending me over the edge I leave it alone for a few weeks to build up enthusiasm and it’s always better to step back sometimes when you are chasing issues. When you come back to it you might look at the problem from a different angle or think of something you’ve missed which generally works out for me. Good luck either way
-
1 pointJust got to keep plugging away. I was real down on it a few weeks back, but knew there were better days ahead. Sounds like you have your hands full with your cars already ? Weighed up selling it and procuring a Volvo estate. I just couldn’t psychologically open up the life change that such a purchase would entail. My attention now moves towards getting the VR6 running. ho hum, out of the frying pan etc etc
-
1 pointIt’s great to see that they chose the best colour 😎 I’m bias !
-
1 pointgood find m8 fastest owned - probably my modified VR but i think my modified & half stripped R53 supercharged mini would give it a run for its money. they both produce noise induced grins time after time! fastest ive been in - a few contenders; the nissan GTR i drove was crazy but then my old boss took me out in his modded porsche GT3, which covered ground so quickly it was incredible most interesting is a tough one - i still remember a ride in a 308 ferrari when i was about 10, had some great times in my uncles VW camper van but id go with my dads porsche 911 3.0 SC targa
-
1 pointIs Bosch W6DPO still the recommended plugs to go for? If so where do all you guys get them as none of my local Factors can supply!
-
1 pointOooo nice pic. We love freshly painted items more than xmas 😂
-
1 pointThis is a late genuine fan switch from a good seller - check your pin lay out is that same as in a triangle as early has a horizontal 3 pin lay out. On diagram there is no sealing washer. https://www.deutsche-parts.co.uk/1h0959481b-switch-new-genuine-part.html
-
1 pointYour boss looks the same as my momo one. The black wire with the female came with the boss and I made the blue wire to plug into the connections on my horn and boss metal disc as you have. As you can see the steering wheel it is for is also a momo. If you only have one terminal/wire coming out of each horn button they must be earthed through the horn buttons already to the steering wheel and you just need to plug those wires into your female black wire to give it it’s positive feed. test it with a battery and a couple of wires the wires coming from the steering wheel to positive through a test bulb/light and a negative wiring touching the steering wheel itself. Push the button and the test light should light up. My brass disk is also pushed in similar to yours
-
1 pointLate bulged bonnet. Late wider arched front wings. Late bumper - body line goes straight and tapers out. Late headlamp again Rear arches are the same early and late Sent from my iPhone using Tapatalk
-
1 pointA few more pictures of the interior current condition....
-
1 pointI use AMOS who is unpopular on here but he always has about 8 cars and years of supplies in his garage. Last time I went he had a nugget with a usa tailgate and third brake light. I would say he has the most parts in the UK- although I wouldn't take my car to be worked there as only let Vince work on my car.
-
1 pointUnfortunately the 535 at the beginning means it is a Corrado specific part - the first three digits indicate the Medellin number. Maybe it would be possible to remove the mount from a car that is being broken for parts if the bonding is not too strong?
-
1 pointCorrado VR6 Storm in Mystic Blue. Car was bought from an enthusiast, I found it after 2 years of searching. To go over the car itself : Standard parts : Standard Storm parts, Mystic Blue paint, Black Leather interior, Storm detailing, BBS Solitaire wheels, Steel kickplates.... ALSO and not part of the standard extra's the dealer option Air Con, which is still in good working order. Done before I bought it : AMD work done within 2 years of it being bought, still produces 10-15hp more than standard, checked with Stealth rolling road a few years back. Silicon hoses where needed. Schrick Inlet manifold. Koni Suspension. Alpine head unit. Performance HT leads. Corrado Storm mats. And what I have added : Headlamp loom upgrade. Front and rear brake upgrade - front to 288mm and rear to MK4. Heater Control illumination. SWG Scuttle panel. Steering wheel refurbished. Replaced alarm with Cat 1 as previous alarm was malfunctioning. Chains and clutch done some 40k miles previous. Gearbox rebuild at approx 140k miles. Bare metal respray and new windscreen around 155k miles. New Bosch Battery. The car has a full service history having covered some 177,358 miles, I have 2 large binders full of history. Rear Spoiler works without a problem- both manual and automatically, Sunroof works sliding and tilt, although internal panel does not go up with tilt. Wing Mirrors work without a problem. Car drives and accelerates without issue. Leather interior in good condition considering age. Only draw backs are the heater that does not work on '2' which is a copper connection issue, a new heater control module can be sourced from German Heritage. Internal sunroof panel does not lift on tilt. Repaired rip in bottom rear of front passenger seat which I inherited from previous owner, never caused an issue, size of about 50p. MOT'd until April 2021. I have some extra parts as well for this that could be offered to the purchaser at a greatly reduced price. It breaks my heart to sell this but I am in a position that it needs to go, I will NOT accept silly money and can hang onto it as long as is necessary to get the right price. I think this is a very rare beast, not just because its the best Storm colour combination - Mystic Blue with Black Leather but also because of the Schrick manifold and the Air Con. Don't miss out... Offers over £7250. NO offers from outside UK will be accepted, all monies paid whether cash/cheque/bankers draft/Paypal will need to be processed by my Bank before the car is released. Car is advertised elsewhere so I reserve the right to withdraw this advert at any time. Buyer to arrange collection upon payment clearance.
-
1 pointIt was pfsht Candy white thread,
-
1 pointOh Keyo, all this extreme negativity, he didn’t want advise on a concourse show wining, body job cost estimate 😂😂😂😂
-
1 pointMake it 58 I need a pair of outer window scrapers
-
1 point
-
1 pointThe VDOs are bloody expensive though. Hopefully you get the correct one - the problem is that a lot of sites just list the one pump as a generic replacement without mentioning the pressure. I'm not really sure what the impact would be of running a 3 bar pump on a 2.9, as long as you had a matching FPR - but it might throw out the ECU map as it would have been tuned to 4 bar pressure.
-
1 pointYou bring up a very good point (PCD) and one which I had overlooked! :lol:
-
1 pointHi all, Firstly - thanks for the donations - they do all help! I've always prided myself on keeping this forum clean - so I do try to keep the adverts and begging down to a minimum so you can all enjoy the site rather than get bombarded with pleas... But - to be fair - the link is at the bottom of every page - it's also in my and a couple of the Mods' signatures - so does get about the forum a bit! I think it's in the welcome PM too.... But, clearly not enough if you managed to miss it! Thanks again, though!
-
1 pointnice. like the colour & the plate make yourself at home :)
-
1 pointGo for them Mike, I'm in two minds weather to mod or not.
-
1 pointSorry for everyone who's been waiting, I've had an issue with the the inverters, they arrived but they wern't up to scratch so I returned them and sourced some new ones. I'm not doing this to make heaps of money, but saying that, I want people to be satisfied with them so I won't release them until I know they're good, I'll be updating the thread as soon as they're ready Steve
-
1 pointIn india !! With the unicorns
-
1 pointI can do that. My german is very well.
-
1 pointHello there, on some vehicles once the battery is disconnected you can some times lose the basic ECU settings, if the battery has been disconnected for 20 to 30 mins or more, but this normally relates to vehicles that have the full multi point fuel injection system, where the injectors are linked directly in to the ECU as well as most of the other engine sensors, on these such vehicles you'd have to use a diagnostic scanner to remove any fault codes from the ECU memory chip, and drive the car for 30 to 40 mins so the ECU can collect fresh data from all engine sensors, and log all basic related settings back in it's memory. On some of the new vehicles this can happen if the battery is disconnected for long periods. But on your Corrado 2.0 16v as it's got the old style fuel metering head like on the later MK1 Golfs and MK2 Golf GTI, it's basically mechanical injection as it has the fuel distributor, fuel governor and air flow sensor all in the one metering head unit, so this set up doesn't really lose it's basic ECU settings unlike the more advanced ECU system like on most modern cars including the VR6 but as you've said it only took 5 mins to replace the battery you should be ok, from what you've said it does sound like one of the circuits has had a power surge or something for a split second, which can happen when you replace a battery. You should always remove the black negative (EARTH) lead first, and it should always be the last lead to fit back to the battery terminal. The red live (POWER) lead is always the second one to remove from the battery, and should be the first one to fit back to battery terminal before the earth lead. If you don't fit and remove the battery terminal leads as above then you can course a small power surge, or in some cases it can course a short, it can still happen if you do use the correct procedure but it's very rare. . Plus you've said that you have to apply full throttle to start your Corrado up from stone cold, this again is a classic symptom of over fueling. Full throttle down to assist starting is a symptom of a lack of fuel / too much fuel / very weak spark / very low compression. But like I say in your case as your Corrado starts fine when it's warm / hot, and is difficult to start from cold it'll be too much fuel meaning the fuel to air ratio, will be out so the engine will stall when cold or idle very lumpy until it's up to temp. It does sound as though the Coolant temp switch has died or is on the weak side, this can affect the car starting from cold or even when the engine is warm, it really depends on how the coolant temp switch has burnt out. They are normally white or blue in colour and have a 2 pin plug on the Corrado 2.0 16v The other thing it could be is the Lambda sensor, this detects any un-burnt fuel deposits with in exhaust waste fumes, but normally you'll have erratic idling and can have highish fuel economy complete with engine being under powered slightly, plus you might hear the odd popping sound from the exhaust tail pipe due to the extra fuel being used. These normally on the 2.0 16v have a black 4 pin plug with a separate earth wire. Most OEM Lambda's are Bosch ones, cost is around £58.00 to £78.00 off Ebay Some times the cold start injector can stick open which floods the cylinders with fuel, again coursing bad cold starting. This is normally linked into the coolant temp switch circuit, so once the engine warms up slightly the coolant temp switch, should then tell the ECU to turn off the cold start program. Secondhand these are around £25.00 to £38.00 off Ebay, and new from VW Main Dealer they could be close to £100.00 if not more, that's if they still stock them, if they don't then try VW Heritage. This is the part number for the 1.8 16v cold start valve ( 026 906 171A ) it might even be the same for the 2.0 16v. When testing the cold start valve / injector you can remove the 2 pin connector plug and see if it effects it's running on start up, or you can remove the cold start valve from out of the inlet manifold and see if it is switching off correctly, but if you do remove the cold start valve it could rip / damage the gasket. You can do a similar thing as above and remove the connector plug off the Lambda sensor or coolant temp switch, again just to see if it makes a difference or not to the engines cold start up. This is what some of the Forum members have done just to rule out each possible error from some of the sensors in question, that relate to this cold start up problem. When starting your Corrado 2.0 16v from cold it'll idle at around 1150 RPM for 3 to 5 mins in really cold winter weather, and around 1 to 2 mins in mild weather and even less in the summer weather. Once the cold start program has switched off, your engine should then idle at 850 RPM. I've got a spare coolant temp switch if you want it, it still works and has done around 75,000 miles. The part number is ( V026 906 161 ) this is a 2 pin and has a 10mm diameter thread with 1mm thread pitch complete with washer. I don't want any money for it you can have it F O C, if you want it and if that is the problem with your current one. Basically the same as this one on Ebay. http://www.ebay.co.uk/itm/261233673855?ru=http%3A%2F%2Fwww.ebay.co.uk%2Fsch%2Fi.html%3F_sacat%3D0%26_from%3DR40%26_nkw%3D261233673855%26_rdc%3D1 Hope this helps. Si
-
1 pointPeople will tell you a grand for the interior as a full setup with door cards etc But in the current clim you won't get that For example everyone say a schrick vgi is worth £850ish but the last 2 I have seen sold for £500 and £600 so well off £850
-
1 pointManaged to dismantle clean resolder and repair this. Will post some pics shortly, but as David said they're glued together, as well as having a locking 'lip' on the inside. Heat with a hairdryer for as long as you can hold it. Then use some jewellers screwdrivers down each of the longer sides. Carrefully but firmly hold the washer nozzle and gently ease it out of the outer casing. On mine the connection had corrodes, but this was cleaned with emery cloth and the cable resoldered and supported with heat shrink. Be careful when removing the connectors that sit either side of the heater block as they can be easily damaged. ---------- Post added at 10:10 PM ---------- Previous post was at 10:08 PM ---------- using the hairdryer has the added advantage of rejuvenating the colour from a faded grey back to black! Also gives you a chance to polish the area where the nozzle sits.
-
1 pointHey hey, You have a 9A engine. The MK3 Golf uses a 2.0 16v engine but is a ABF engine. The MK2 GTi uses a 1.8 16v - KR Code. The Corrado 9A engine is basically a uprated, newer version of the Golfs KR engine in that it has a bigger displacement and uprated fuelling system (Electric rather than the golfs mechanical fuelling). Your fuelling system is KE-Jet where the Golfs is K-Jet. The blocks and cylinder heads are basically the same casings, just different internals. The MK3 Golf 2.0 16v ABF engine uses Digifant fuelling so is a much more advanced electric system and is completely different to that of the Corrado's 2.0 16v. It's also a taller block and 150bhp (yours is 139bhp). So, in answer to your question, I'm sure you can swap some parts with the Golf MK2's 16v engine. But mainly you are sticking to the 9A engined cars such as Corrado's and Passats. Audi's from the same era had a 6A engine fitted which is the same as the 9a just longitudinal instead of the Corrado's transverse mounting. Oh, and not all Corrado's and Passats 16V's had the 9A engine in. The earlier ones came with the 1.8 16v (KR), I think anything made post 1992 should have the 2.0 16v 9A engine. Hope that helps and didn't boggle you!
-
1 pointHey, This little project has been in the pipeline for several months now, and a few members on here already know of its existence. However been as though I'm about to take the plunge and rip my Corrado apart I thought I might as well start a thread detailing roughly whats going on. Firstly, some of you probably know my 8V. It was my first Corrado, I bought it in 2008 and spent a happy year owning, maintaining and improving it. I then sold it to a local guy and bought a VR6 which I also owned for a year. However, moving into my own place meant I needed to free up some capital so the VR6 had to go. The day the VR sold I saw my old 8V driving past with a 'for sale' poster in the window. I followed it back to the guys house and eventually struck a deal to buy it back. Result - some capital free'd up and I was still in a Corrado :) Here's the 8V (and the VR for good measure): There's something else though, while running the VR I also had a brief fling with a Mk2 Ibiza TDi (90bhp) which I bought cheaply for the missus to learn to drive in. It was a great car, nice and torquey but still great on fuel (55mpg +) and with plenty of tuning potential. I sold the Ibiza to Matt (Leonard) on here just before buying the 8V back, but even though I'd only owned it for a short amount of time it had planted the seed of an idea in my head, here's a picture: Soooo...where was I...oh yeah, inspiration. I bought the 8V, ran it for a while and in September 2010 my Dad decided that he didn't need the Discovery TDi that he was using as a daily and asked me to help him find a more practical daily driver with a similar internal capacity. 'Passat B4 TDi' sprang into my head as I'm slightly biased towards VW and I knew that they could be picked up cheaply in reasonable condition - so an eBay search ensued and not long afterwards I found a 150k Passat B4 GL TDi a couple of miles down the road, with FSH and 2 owners from new for £400. It was immediately purchased and my Dad was a happy chap. I was also a chap with a head full of ideas, as while researching for Passat information on the internet I'd discovered http://www.tdiclub.com - an American website devoted to the VW TDi range of engines. While having an innocent browse I'd also discovered a member called 'G60ing' who happened to have built two Corrado TDi's over in the states. Reading his build threads over on VWVortex led me to think more and more about the possibility of doing my own TDi conversion. More research, including finding 'Mikkijayne' on this forum and Vortex, led me to discover that the ideal donor vehicle for such a conversion into a Corrado is a Passat B4 TDi - exactly the vehicle I'd bought for my Dad! The B4 is ideal because it is essentially a Corrado in all the bits that matter. The clocks are the same so are literally plug and play, the engine wiring loom is seperate from the headlamp loom (unlike the much more common Mk3 Golf TDi) and a lot of the other bits are a simple swap onto the Corrado, even as far as the fuel filter bracket on the O/S suspension turret. Further research led me to establish that the B4 GL TDi (not CL) was the one to go for, as that spec level featured the MFA as an optional extra, which I really wanted to retain on the Corrado. I established that if I could find a B4 GL TDi donor (with MFA) then pretty much everything would be a straight swap onto my Corrado, as they both run CE2 electrics so everything *should* work. About the same time as all of this was happening I had bought another Corrado VR6 which turned out to be a total rust bucket and potential moneypit. I soon decided that it wasn't worth trying to get back on the road and set out to break it. However, the widetrack running gear wasn't going anywhere as I decided my potential Corrado-8V-TDi would really benefit from being widetrack and therefore 5-stud, allowing a much wider range of wheels and of course the possibility of better, bigger brakes. So the VR6 unfortunately met a slightly sad end but parts of it are on probably 50 other Corrado's so its not all bad! Just after christmas my Dad asked me to help with the cambelt change on his B4, so round I went to help him do that... While working on it he happened to mention that the car was due for an MOT fairly soon and that it would need discs/pads/caliper rebuilds all round as the brakes were constantly seizing on. He knew all about my TDi plans and I asked him whether he'd be willing to let me buy him another B4 (in better condition but not necessarily a GL), so I could have his B4 as a donor vehicle. The long and short of it is that the answer was yes, I found him a really tidy B4 CL TDi in sherry pearl (the same colour as my Corrado!), and I ended up with his old B4 GL sat in my garage as a TDi donor 2 days after I'd finished breaking the VR6 and scrapped the shell :) Here's the MFA clocks with the MPG potential: So...my plan was this: Corrado 8V 1.9 TDi 1Z engine (90bhp - 142lb/ft as standard) Widetrack running gear front and rear Reconditioned suspension components 288mm brakes Mk4 rear calipers There are quite a few things to do apart from just dropping the engine into place. Firstly I have had as many of the widetrack suspension components and 288mm brakes blasted and powdercoated black (thanks Mark and Dave!): I've also been thinking about lots of other things, such as enlarging the fuel filler neck (diesel fuel nozzles are bigger!), fitting a front mounted intercooler and pipework as the Passat one doesn't fit at all, sorting out fuel lines, ensuring that the exhaust will work ok and of course making sure the engine bay and inner bulkhead is suitably soundproofed - I don't want a rough, unrefined car. Then there's the tuning potential. Advice from tdiclub.com pointed me in the direction of the AFN engine, which is a 110bhp lump fitted with a VNT (variable vane) turbo as standard. They were fitted to the Galaxy/Sharan/Passat B5/Audi A4/Seat Toledo and a few other models and they will work quite nicely with the Passat B4 engine loom. However they are £500+ on eBay and I couldn't justify that. So more research established that the AHU (Mk3 Golf, Mk2 Ibiza) engine (90bhp, no VNT) is an AFN in every way apart from the lack of VNT. I looked for AHU's and they fetch about £200 - even better. Then I looked at the difference between the AHU engine and the 1Z as fitted to my donor B4 and found out that there really isn't much difference between them at all - 3lb/ft and a small amount of difference to the internals. I decided that the best thing to do would be to get the conversion running and then worry about tuning later on - however a set of injectors will see me at 120bhp from 90bhp with no other modifications so that'll do to begin with. Couple that with a VNT turbo, PD130 inlet manifold, a remap and a couple of other small modifications and I should see 150-160bhp with approaching 300 lb/ft of torque which I think would be plenty for a daily driver. One final modification that I'm planning on doing while the conversion takes place is an upgrade to the later type ABS system thats fitted to the Passat. Its made by ATE and basically gets rid of the annoying ABS ECU (it's integrated into the pump) and the even more annoying rear brake compensator valve. The ABS sensors are the same as the Corrado and the bracket that mounts it to the bulkhead is even the same - job's a good'un! I'm planning on replacing all of the brake pipes anyway so it makes sense to quickly fit the new ABS system while I'm at it. Wiring should be fairly simple too as the Corrado and Passat are essentially the same in the wiring department. I took the Corrado off the road at the end of February in readiness for the conversion and happened to buy the old Ibiza back from Matt to use as a daily while I carry out the conversion - it all worked out rather well really! I think that's about everything, hopefully you're not bored to death reading about it by now!! This weekend just gone I set about removing the engine from the Passat, which was nice and straightforward: The Passat will be weighed in this Saturday coming (2nd April) and then the Corrado will be coming home as I've got the next week booked off ready to do the majority of the work. I'll also be replacing the heater matrix and a few other bits and bobs while I'm at it. I think thats about it - plenty more to come but its going to be done for Stanford Hall on the 1st May, that is my self enforced deadline and I really don't like missing deadlines ;) Thanks for reading, keep an eye out for more updates Tom
-
1 pointThanks for stepping up! I think it's just a case of everyone getting used to the new format- the forum was similar with past face lifts. Takes a few weeks for posting to get back to what it was before the change. Gonzo, any progress?
-
1 pointMy corrado has sat in the garage since about october time, its not been started since, the battery went flat so i removed that and have been charging it. Its been there through all that really cold weather we had. Should i just put battery back in and attempt to turn it over or should there be anything else i check out 1st? just don't wanna break it
-
1 pointi will have to have a look i think its just a bare hub
-
1 pointHere's the quick vid I made last night just driving up the road and back basically. It's upside down as mounted it so I could press the buttons etc. As you can see, the quality doesn't seem as good, it doesn't handle exposure as well and the sound is crap! http://www.youtube.com/watch?v=Kl9Vv2d6LUk
-
1 point