Leaderboard

.thumb.jpg.c28e860f2b35da39217cf8b96a7a5c73.jpg)
Popular Content
Showing content with the highest reputation since 02/05/2011 in Posts
-
3 pointsCheers, no green bulbs but they do flash a bit red. now fitted
-
2 pointsThere is a guide on vagdrivers for replacing the matrix without removing the dash: https://www.vagdrivers.net/threads/corrado-heater-matrix-replacement.19713/ Sent from my LE2123 using Tapatalk
-
2 pointsApologies all, I haven't managed to put the order in for the next batch yet, but hopefully will get onto that in the next couple of weeks.
-
2 pointsRear beam needs to be mounted with both the body hangers loose as the beam eyes are mounted up. Dont torque up the beam eyes, or the hanger bolts until the the car has dropped and rolled a bit. Torque up with the wheels on the ground. That should lead to automatic squaring of the beam. Actually - has anybody noticed this before - the hangers for the rear beam are somewhat slotted on purpose. I wonder if, given the torque levels used, this was deliberate, to allow some adjustment - probably no more than 0.5 degrees (looking at the size of the slots). So, if this is correct, you are right, there is some room for adjustment. I spoke to a master tech at a VW garage just now and he said the A2 chassis (MK2s-MKivs) including the Corrado all had the slots built into the hangers to enable the rear axle to be fitted without hassle, but also confirmed that those slots come in useful, offering a "shave of adjustment ". The front K frame is more interesting - am doing it myself right now - the crucial part seems to be in getting the steering rack properly marked and resited on the K-frame when bolted in; the steering column properly settled, camber bolts being used (if needed) to get the front geometry right. Dont set the geometry until the dampers have settled for about 30 miles. The alignment team can only adjust the front wheels- but they may need to do it 3 times before it sits right.
-
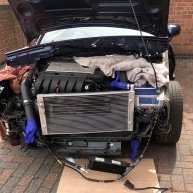
2 pointsRight, it all works! You were right about this, I was going way overboard with 6mm wire, which wouldn't have fitted in all the connectors. i guess the original fan motor ran a much higher current. When I looked the actual ratings I found 1mm wire would be sufficient for fan speed 1. Anyway, this is what the finished wiring looked like: Which is to this wiring diagram: Essentially the same as the one at the top of the page but I have updated the wire thicknesses. Also I couldn't find Red/Green wire in 4mm so just used Red. I used this wire: Thin Wall Cable (autoelectricsupplies.co.uk) And these connectors to splice the wires: 108961-000 Raychem - Te Connectivity, Butt Splice, Yellow, DuraSeal Series | Farnell Which are Duraseal Yellow crimp butt connectors with heatshrink. These are nice because the heatshrink material gives a good seal around the wires at the connection. You need yellow (10-12AWG) for all connections I found. The Blue connectors (14-16 AWG) is just too small, even for the 1 and 2mm wire join, which approximately makes 13 AWG. You have to double over the end of the 2.0mm wire where it is on its own, but this is no big issue. The resistors I used are: HSC100R47J | TE Connectivity HSC100 Series Aluminium Housed Solder Lug Wire Wound Panel Mount Resistor, 470mΩ ±5% 100W | RS Components (rs-online.com) For the fan speed 1 circuit. This is a 0.47 Ohm resistor as I couldn't find a 0.4 Ohm. Makes little difference though. Don't know if this is the best brand, but it seemed to have a better temperature stability. And: HSA50R10J | TE Connectivity HSA50 Series Aluminium Housed Solder Lug Wire Wound Panel Mount Resistor, 100mΩ ±5% 50W | RS Components (rs-online.com) For fan speed 2. At the end the resistances were about 0.7 Ohm for fan speed 1, 0.2 Ohm for fan speed 2 and 0.1 Ohm for fan speed 3. Little bit higher accounting for the extra resistances for the other circuit components, and possibly rounding due to my multimeter only going to 1 decimal place accuracy, but within the right original range. You can also get the female connectors for the Comex slimline fans here: 2 Pin Plug Connector for Comex Fans from Merlin Motorsport For straight plug and play. These (and the spade connectors on the Passat plug) are open barrel types so you will need the correct crimper tool. To get the existing wires out of the Passat spade connectors is a pain but doable. For the 2 larger connectors (Speed 3 and Ground) I found it was possible to hammer a small screwdriver (jewellery/watch type) down the back of the wire to open it up. Make sure the spade is held securely in a vice to stop it bending, and use pliers to hold the neck of the connector as well. For the smaller two it should be possible to pull the wires out with a pair of pliers, starting with one or two threads in the middle of the bunch. With the wires out you can just about open the metal enough to get the new wire in. Because you are reusing these I would solder as well as re-crimping them. I re-crimped and the seemed to be holding OK, but soldered as well as a back up. I then knocked up a bracket to mount the resistors on. Here is the finished setup: Not my best wrapping! Thought I had ran out of the usual tape, and used the slightly furry stuff which doesn't look as neat, and then found the plain roll again. The panel for the resistors tucks around the side of the rad between the battery in the void behind the headlights, as my original plan of mounting the panel straight out clashed with the battery. This is it in the car: The big downside with this is that you can't get the battery out without removing the fans as the plug is in the way... Unfortunately I had no time to prototype this so I had to live with it for the time being. I think it theoretically should be possible to slide the whole shroud out in one go to get the battery out but it's a pain, and I will need to try and remedy this longer term. In hindsight I should have kept the panel coming out perpendicularly but flipped so that the resistors are mounted in the fan slipstream; I may try and do this, although will have to try and find another Passat plug! Anyway, I tested the three fan speeds with the battery prior to fitting and the all come on fine, and at different speeds (no reason why they shouldn't!) Since being on the car they do come on alright, although I can't really tell if all 3 speeds have been used yet. Not sure what temp speeds 2 and 3 come on and it's a bit hard to tell over the engine noise. Don't know if it was worth the hassle and expense yet, but the fans seem a bit quieter and on the initial slow (20-30mph), albeit, short driving runs the temp seems to have stayed about 90-100 degrees.
-
2 pointsNo disrespect for the poster but unfortunately a lot of people don't seem to be able to calculate. If someone wonders why I avoid Facebook. It's comments like this. Lots of people can build lots of parts, cheaper and better. Many people find a lot of parts too expensive. Lots of people talk a lot. Unfortunately, they never show better quality or a cheaper price. They want to drive an exclusive car for which there are no spare parts. They want the best quality. But they don't want to pay anything. That does not work. But, Iet me explain the 10th time. You think 600-700 € for a set of fog lights as good as new are too expensive? You think 800-900 € for a set of headlights as good as new are too expensive? Fog lights: A set of usable facelift fog lights with broken lenses, where it makes sense to renew them, costs around € 200. New lenses from VX are $ 175 + shipping + customs. Around € 220. Then comes the work: Remove 2x glasses and glue = 1.5h Repaint 2x housing = 1.0h Replace 2x reflectors = 80 € + 0.5h Build 2x new wiring harnesses = 1.0h Glue in new glasses twice = 0.5h Packing + writing an invoice + little things = 1.0h Then subtract 12% eBay fees from the price, subtract 3% PayPal fees and 16% VAT from the price. Headlights: A useful set of facelift headlights costs around € 400. 2 x polishing glasses = 6h Replace 2 x reflectors and recoat = 100 € + 0.5h Repair 2 x minor damage = 1.0h Packing + writing an invoice + little things = 1.0h Then subtract 12% eBay fees from the price, subtract 3% PayPal fees and 16% VAT from the price. Anyone who thinks the price is too high for this quality should perhaps buy a MK 2 or 3. The spare parts are cheap and available. I don't want to have these conversations anymore. My aim is not to sell as much as possible. My goal is to make the parts as good as possible. If the parts are too expensive for you, simply don't buy them. best regards Chris
-
2 pointsI wanna blob!!!!! Lol!!!
-
1 pointDeposit taken so the car is now sold. Thanks for all the interest.
-
1 pointhappy to report that after 14 months the VR6 is finally back home with essentially a brand new underside & nut & bolt restoration plus the Autostrada Modena's are on & looking mighty fine if i do say so myself lol pity you cant see any of the work that has just cost me a small fortune (over double what i had guessed at) but the first few journeys out have made me realise quite how much i had missed this car! the ride is sublime & the refreshed KW's feel great & the noise - nothing quite like it spent most of the weekend cleaning & resinstalling the interior, only sub & door cards left a quick pic from a gloomy drive today
-
1 pointStarted the re-assembly
-
1 pointFYI, I used the Loctite rear view mirror bonder on my campervan and have had no issues. The key is to spend time prepping / degreasing the mount / screen, follow the instructions and wait as long as possible before installing the rear view mirror to the mount.
-
1 pointThat looks fine. 👌 Does the job and is protected
-
1 pointUpdate, as I would have had to remove my "NOS", from about 2006 VDO Pump I mentioned I installed 18+ months ago to replace the fuel hoses (which I did change at the time , but stupid me, used the wrong hose, needs to be Submersible type, which I have now got Cohline 2190), it was just as well I did. The couple of small cracks noticed before install had spread like cancer, and given time probably the whole top cap would have broken apart, only the swirlpot top, where the return nozzle is affected, all the rest is fine, so its probably a different crappy plastic. See attached pictures, to me this evidence that the VOO NOS items, are probably not worth the risk, as even if the cracks are not there to start with, they could start sometime later. The Pump itself is ok, I have taken the unit apart completely to clean the filters, I obviously need to remove the old fuel (car has not been driven in 10+ years, has been started many times, but always on a low tank, and the fuel is now pretty horrible.! I may buy the JP Pump, and see if i can swap my VDO Pump into the JP casing, I would then have a spare pump.
-
1 pointHi, My G60 pump is the same 4 bar VDO unit, , it was bought from a e-bay trader more than 10 yrs ago who sold dealers old stock etc, it was a Genuine VDO Unit, I didn't fit it for 10 years (!), and it had acquired a couple of tiny cracks, they had not been there when I looked at it a few years ago, so must be an plastic aging issue ( probably the same rubbish plastic used for the headlamp adjusting screws holder), no cracks around the fuel pipe junctions though, I will be taking it out again to redo the fuel hoses in tank, so will check again, may have to think about replacing it again! Attached a couple of pics.
-
1 pointFinally some traction today.... New ECU installed and the car has fired up into life!! Due to the weather couldn't keep it running for long but there is life ...... a bit of white smoke which we will need to look into however we have progress... 😉
-
1 pointVSR on the left and shrick on the right - I sold a shrick last year and it fetched 1500 and sold behind closed doors - vsr can expect to pay over double then a schrick but rarely come up for sale . Schrick come up at least a few times a year - vsr probs looking at 1 every few years . Last shrick I saw sell was a breaker found one on a sharan vr6 . As mentioned above fb is your best bet - most important thing is to make sure the butterfly flap screws are secure or they could drop off and chew your engine .
-
1 pointIs Bosch W6DPO still the recommended plugs to go for? If so where do all you guys get them as none of my local Factors can supply!
-
1 pointCongrats on your new Corrado. It looks very clean and is in one of the best colours for a C (in my opinion). Enjoy your new purchase, you won't regret it. Here is a few links to parts suppliers and specialists that might help. https://www.vwspares.co.uk/ https://www.heritagepartscentre.com/uk/ https://www.gsfcarparts.com/ https://www.stealthracing.co.uk/ https://www.jabbasport.com/
-
1 pointI saw some of your rust issues on Facebook , mine was very similar, sadly the underseal is now hiding the problems instead of preventing them 🤣 The fuel tank is an awkward beast, especially if it’s got a decent amount in it, definitely easier with 2 bodies
-
1 pointI have my Red 92 G60 Mk2 tornado 16v - my first resto - has sat for 2 years now and in need of a refresh Mk2 Pearl Grey 16v - currently rebuilding the engine (trying) and is currently a bare shell with bits of welding to be carried out Blue Corrado VR6 - which you put me onto - future project And my family think i am NUTS when it comes to these cars
-
1 pointI looked on the website and for you and could not see one in Spain. Maybe call them and ask for help. https://stockpiezasvw-audi.com/en/
-
1 point
-
1 pointIve got an old set of notes from Dennis on the now sadly defunct Canadian corrado club. I remember i had a real issue with the soldering of the relevant wires as they're so thick! Anyway, hope it helps. Just drop me a line if you need any more input. Hasan Wiring Modifications.doc
-
1 pointMrs had a 2010 Tdi for 2.5 years, nothing but servicing and a pair of rear spring broken - got rid of it after the emissions upgrade due to poorer low throttle response and dpf regen too frequent imo. a lad at work also has a Tdi with 130k and had a bill of around 1200 for the last mot for rear suspension springs, bushes and the electronically adjustable Dampers - they warned him of the impending fate of the front for the next mot..... he’s getting rid of it. The mrs is now a Scirocco spotter, “Ohh my old car” every journey - it’s the only car she’s ever taken any notice of... “Saw a lovely purple one today, have you seen the grey one on the new estate”, follow by “When you going to get your shit cars off my patio”...
-
1 pointIt was pfsht Candy white thread,
-
1 pointHello there, yes you can fit Corrado VR6 70ltr fuel tank into Corrado's with 4 cyl engine's and vice versa, the early Corrado's had the 55ltr fuel tank, then in 1992 the tank volume was increased to 70ltr. The problem you're going to have is the fuel pressure, as the 16v as you already know has two fuel pumps, low pressure lift pump in tank roughly 3 bar of pressure, then high pressure fuel pump under car in swirl pot, which pumps at 5.2 to 5.6bar for KR 16v or 6.1 to 6.6 bar for 9A 16v, the 16v injection system is multipoint but is mechanical injection, final fuel delivery is via fuel distributor, which is controlled by fuel differential pressure governor/regulator, if the high pressure fuel pump doesn't deliver pressure as stated above, then the fuel injectors won't open as they need the correct specified pressure range. The VR6 injection system including the 2.0 16v ABF only have the one fuel pump in fuel tank, pump pressure is roughly between 3 and 4 bar, this system again is multipoint injection but has electrically operated injectors, that receive signals via ECU. I think you can possibly fit a MK3 Golf fuel tank into a MK2 Golf, but I've read on other forums the filler neck doesn't quite line up fully with fuel flap opening, but then others have said they fit fine, so regarding MK3 Golf tank into Corrado yes it may well be possible but how well it'll fit I'm not sure. But like I say you'll still need the high pressure fuel pump under car for your K-jet 16v injectors, unless you're able to fit high pressure pump in tank. MK3 Golf with VR6 (AAA) and 2.0 16v (ABF) I think use same fuel tank as the ABF fuel pump is very similar to VR6. Corrado fuel tank Part number 535 201 075H Length 910mm Width 630mm Height 620mm 55 litre tank with narrow fuel neck 22mm for unleaded petrol From 1988/89 to 1992 (weight 6 kg) Corrado fuel tank Part number 535 201 075AB / 535 201 075AE Length 950mm Width 630mm Height 615mm 70 litre tank with narrow fuel neck 22mm for unleaded petrol. From 1992/93 to 1995/96 (weight 9.5 kg) Hope this helps Si
-
1 pointI know it's messy. But i went through organised and labeled a few of the obvious issues. Such as loose vacuum lines etc.. (Please remember that I am without an ECU, not that I really have a vacuum line to currently stretch to it) Most of what has been done is undocumented from well in 15 Years ago. Will also try to get it running to the best of my ability when the ECUs Arrive back.
-
1 point
-
1 pointTrying to ignore this the best I can.
-
1 pointPendine Sands! No wonder they rusted away!
-
1 pointCheck the wiring to the oil pressure switchs ,blue one ? yellow one ? where the wiring runs by the rad fan I got 2 switchs for about £15.00, but my switchs where ok
-
1 pointWhat paint ? Looks good,I may have to copy you [emoji3] Sent from my iPad using Tapatalk
-
1 pointI'm very new to the scene as just been able to get to the age where I can insure my valver for a sorta reasonable price, I've paid my subscription to the CCGB and like the members that we have, also on the Corrado forum too. I'm sad to see this situation, as I'd love to get going to some meets and see some cool cars and being able to show my car too (as you lot are the only ones that will appreciate it lol). Problem is as I suppose it is with most members is getting the cars to shows, being the drive or the fact that the car has broke again. I'm in that boat unfortunately, lots of work to do and recovering from a motorbike accident doesn't help either. I like the CCGB site but I do spend most of my time on here, but I do find I struggle to interpret the calendar on the CCGB website and how I'm able to sign up to events (probably it's very simple, just me being an idiot). And again, I'm from Oxford ways, and some shows will be a struggle to get too but you can't really seem to help that as we have members all over the place. And Jim as for the magazine I didn't even know you had one! I'd be very interested to have a read and also add some content to help out. Hopefully once I'm a bit more mobile I'd like to do my car up and I'm even going down the air ride route so some members might be interested.
-
1 pointMight be interested if the price was right 👍
-
1 pointHi there I have one but would need to check wiring can do so at weekend if you haven't been sorted by then
-
1 pointthat g60's was a good deal, i love my mk1 golfs and remember seeing mass's up for sale on Facebook, lovely editions, but still nowt like driving the corrado....whats your thoughts mass? p3rks good luck with the hunt
-
1 pointthanks will take a look
-
1 pointHa ha, no worries. Be glad to help out.
-
1 pointGold!!!
-
1 pointWelcome. Do you still have a mk1.
-
1 pointLooks a lovely example . Welcome along to the forum .
-
1 pointFrom speaking to some audio enthusiasts and experts very recently on this subject, essentially the advice was quite loudly to forget about the rear 6x4's. They're too small to make any meaningful contribution to your sound setup in the car - so just put some new / reasonable replacements in of any brand, and concentrate on the soundstage up front.
-
1 pointThe 02M diff shaft is bigger diameter than the O2A, so I don't think you can use O2M cups. For what it's worth, I used bog standard GKN replacements from GSF / EuroCarParts on my VR6 Turbo years ago and they're still going strong. But if you want mega strong, here are a couple of options: Best and strongest shafts / CVs - http://www.driveshaftshop.com/import-axles/volkswagen GKN do uprated shafts and joints too - http://www.gknservice.com/global/motorsport/cv_shafts_joints.html
-
1 pointthats pants, great you got it back possibly soon.
-
1 pointHad a quick look at my car (9A) and thought its possible the dipstick might get in the way with the 8v one? I often find the compatibility tests are wrong, as are general listings. They go both ways-they say it wont fit and it does and more often, they say it fits and its the wrong part!!
-
1 pointGood work so far on the tear down. Water may also be from the door membranes so worth checking, especially if you end up in the general area when renewing any speaker wiring. Dim dip resistor needs to be disconnected for uprated wiring so that may be the reason that isn't plugged in. Also, good call on the immobiliser if you do take it out. Some cars are now suffering from alarm/immobilser install on top of install (and even on top again in some cases) and it's quite satisfying taking it back knowing that you won't be stranded due to electrical gremlins. Good luck with progress.
-
1 pointI know mate, I'm not going to put myself out for 'maybes'. People can do basic maths and figure I dunno, perhaps a 10% discount on 10 sets, 15% on 20 sets and so on. So 10% off stands you at $400, x 1.23 for UK duty and VAT = £302. Shipping from the US and UK mainland on top. So if people decide ~ £350ish all in is going to be too much, they can duck out. Perhaps it's just a sign of the times. We sold over a 100 sets over two GBs last time! Anyway, I have asked Bill for pricing on 10, 20, 30 sets etc. And yep, I was also thinking it could be done through Stealth as they have the buying power and accounts already in place and can also include a mapping deal as you say!
-
1 pointIt was a very late VR so I'm pretty convinced the connector will be the same, wish I'd made a note of the P/N now :lol: I'll let you know asap :) No worries on the engine and box! Tom
-
1 pointMy corrado has sat in the garage since about october time, its not been started since, the battery went flat so i removed that and have been charging it. Its been there through all that really cold weather we had. Should i just put battery back in and attempt to turn it over or should there be anything else i check out 1st? just don't wanna break it
-
1 pointYes there is a small plastic 10mm nut to undo which is easy enough to get to, I found that sliding the power steering reservoir out of the way helped things. You got another VR now then Adam?


.thumb.jpg.7fa46ae6fc12859e0ad0612aa6ded4f6.jpg)